Deploying OWA
We will cover two basic deployment scenarios: the single-server scenario, and the front-end/back-end scenario.
Single-Server Scenario
In the single-server scenario, there is only one Exchange server. Users connect directly to IIS on the single Exchange server and access their mailboxes on the Exchange server. For many smaller environments, this will be the topology used. This is also the most simple and straightforward approach to implementing OWA.
Front-End/Back-End Scenario
In the front-end/back-end scenario, at least one front-end (FE) server hosts the Exchange protocols in a bank of IIS servers. In the back-end (BE), at least one Exchange database server is running. The FE servers proxy client calls to the BE servers to give them access to their mailboxes or public folders.
The protocols that can be offered using this scenario include POP3 (Post Office Protocol version 3), IMAP4 (Internet Messaging Application Protocol version 4), NNTP (Network News Transfer Protocol), and HTTP (Hyper Text Transfer Protocol). For a detailed discussion of these protocols, refer to Chapter 20, “Supporting Internet Protocols and SMTP.”
Both the enterprise and standard versions of Exchange 2003 support this front-end/back-end scenario. Front-end servers will not host a mailbox or a public folder store. Front-end servers forward client requests to back-end servers that are also running Exchange 2003. A back-end server maintains at least one mailbox or public folder store. Note that you can use an Exchange 2003 FE to proxy to an Exchange 2000 BE server, but the functionality will be limited to the Exchange 2000 feature set. If you want the full set of features that ships with Exchange 2003, you need to use Exchange 2003 at both ends.
The back-end/front-end configuration gives you several advantages:
-
Single namespace Because you can use protocols such as Network Load Balancing (NLB), no matter how many IIS servers you place in the cluster, the clients will have only a single name and IP address to remember when they want to connect to their mailboxes over HTTP.
-
Offload processing If you choose to implement SSL or some other type of encryption, the front-end servers will handle all the encryption and decryption processing, thus offloading this work from the BE database servers.
-
Better security You can select where you want your FE servers to reside—inside a firewall, outside a firewall, or perhaps in a perimeter network. FE servers can be configured to authenticate users before proxying their requests to BE servers.
-
Scalability Because you can add new servers to the FE load-balancing cluster, each added server represents additional capacity to manage new and existing client requests. And because clients do not need to know which BE server hosts their mailboxes, you can move a client’s mailbox to a new server, and that move will be transparent to the client. This architecture is very scalable and can accommodate millions of users.
NLB is a server that ships with Windows 2003 that dynamically distributes client calls for services between multiple FE servers. Notice that we are talking about the client request level, not the client session level. Sessions aren’t load- balanced; all the individual client calls are. This load balancing is achieved through the virtualization of the Media Access Control (MAC) and IP addresses on each Network Interface Card (NIC) on each server in the cluster. Hence, as each call comes into the servers, that call has the same host name, IP address, and MAC card combination as the other calls, making it much easier to load- balance the traffic load, not just session load, between servers.
| More Info | To learn more about network load balancing, refer to the Network Load Balancing Technical Overview white paper, which can be found in TechNet or the MSDN Library. |
You can always use a third-party hardware solution for load balancing, or you can implement the Domain Name System (DNS) round-robin scheme.
Microsoft has some other guidelines for implementing the FE/BE architecture. First, place at least two servers in the NLB cluster for each protocol you want to offer using this architecture. Each FE server will determine where the user’s mailbox resides by using the user’s directory information from Windows 2003 server.
Second, if you need broad availability for your Exchange databases, implement a clustering solution for these databases. Doing so will ensure you achieve as much up-time as possible.
Finally, do not allow direct access to the BE servers. It will defeat your purpose in creating FE servers in the first place, and it will place unnecessary load on those BE servers.
Configuring an OWA FE Server
The default configuration for Exchange 2003 is that no additional configurations are required on an FE server other than selecting the Front End server check box. This box is available in the server’s properties. Once selected, the Exchange server is ready to run as an FE server.
If you host multiple domain names or multiple public folder trees, create additional virtual servers or directories. To create a new virtual server, open the ESM and navigate to the HTTP protocol folder. Then right-click the folder, point to New, and select HTTP Virtual Server. You need to name the server, so enter a unique IP address and port number combination (Figure 19-5), and set your access and authentication values on the Access tab. After you finish, the new virtual server will be created and you can start the server.
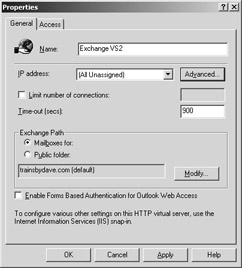
Figure 19-5: Adding a new HTTP Virtual Server.
| Note | The virtual server in Exchange and the Web site in IIS will need to be started separately. Note that if you select the same IP address as the default virtual server and select a different port number, you’ll need to manually configure the port number on the new Web site in IIS in order to get both the Web site and the virtual server to start. Also, an FE server cannot be the Recipient Update Server for any domain controllers in your organization. |
When you create a new virtual server, that server is associated with the default domain name for your Exchange organization, so you’ll need to associate the new virtual server with a specific SMTP domain name. You can do this in the virtual server’s properties in the ESM, as shown in Figure 19-5. Click the Modify button and select the domain name for this virtual server to manage. If you don’t change the association, users will be unable to log on to the front-end server unless they also have e-mail addresses from the default domain. If the domain name that you need to assign to the virtual server does not appear in the list, add it in as an additional SMTP domain for your Exchange organization in the Recipient Policies.
To host multiple domain names using virtual directories instead of new virtual servers, add a virtual directory under the default Exchange HTTP virtual server by right-clicking the Exchange Virtual Server, pointing to New, and selecting Virtual Directory. You can select the domain name you’d like the virtual directory to service by clicking the Modify button (Figure 19-6). Once selected, this virtual directory can service client requests for e-mail or public folder access.
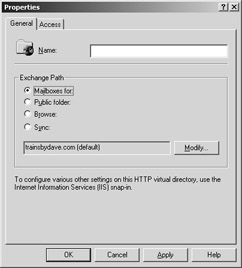
Figure 19-6: Configuring a virtual directory and assigning it to a domain name for an HTTP Virtual Server.
You would want to use virtual directories over virtual servers when you need to either browse or synchronize e-mail with OMA clients. When you want to access e-mail over Port 80 using the same IP address for each domain name, virtual directories are your answer. Let’s look at how this works using an example. Your default domain name is trainsbydave.com and you want to host e-mail for Networknowledge. By using virtual directories, the URL for Networknowledge would be www.trainsbydave.com/Networknowledge.
If you have additional IP addresses available, using a virtual server for each additional hosted domain might make more sense, because each virtual server would be assigned a unique IP address and the URL would be domain-specific: www.networknowledge.com/exchange or www.trainsbydave.com/exchange. Remembering one domain name in the URL might be easier for your users than remembering two different domain names.
Unlike with the virtual server, you have two additional selections: Browse and Sync. The Sync selection dims the Modify button and inserts the Outlook Mobile Access selection to allow synchronization of your OMA clients. This virtual directory inherits the parent virtual server’s SMTP domain assignment. Hence, if you need to synchronize e-mail with OMA clients for five different domain names, you’ll need to have five different HTTP virtual servers set up, each assigned to a different SMTP domain name.
| Note | When you configure additional virtual servers or directories on the FE servers, you need to do the same on the BE servers so that the FE/BE topology works properly. This is because the address through which the client browser accesses the FE server is forwarded by the FE server to the BE server, so the BE server must be aware of every name a client might use to read the FE server. Note that when your BE servers are clustered, you must use the cluster group name. |
Firewalls and FE Servers
Consider your firewall topology when you plan the placement of your FE servers. You have only three placement choices: place the FE server inside your firewall, place the FE server outside your firewall, or place the FE server between two firewalls. Each configuration has pros and cons. Let’s discuss each one individually.
Placing an FE Server Inside a Single Firewall
When you place an FE server inside your firewall, you have a single firewall separating your FE server and the network from the Internet. The positive aspect of this topology is the cost savings as well as the offering of some security to your FE server and network. You need to open the client access ports to the FE server, such as port 110 for POP3, 143 for IMAP4, 119 for NNTP, and 80 for HTTP.
The downside to this topology is that once the firewall has been compromised or traversed, your entire network is exposed. This isn’t just an issue with the FE server—it is an issue of having only one firewall. Many smaller organizations will choose a single firewall because of the financial savings. However, if at all possible, implement two firewalls and a perimeter network.
Place the FE Server Outside Your Firewall
Placing your FE server outside of a single firewall is probably the least desirable configuration because your FE server is entirely exposed, and the number of ports you must open on your firewall to allow the FE server to talk with the BE server makes the firewall look like Swiss cheese.
To have a firewall between your FE and BE server, you need to open the following ports:
-
389 and 3268 for Lightweight Directory Access Protocol (LDAP) lookups to a domain controller and global catalog server
-
80 for regular HTTP traffic
-
53 for DNS traffic
-
135 and 1024+ for remote procedure call (RPC) traffic
-
445 for Netlogon traffic
-
88 for Kerberos traffic
Some of these port openings can be mitigated by using Hosts file entries on each FE server. In addition, you can configure the FE server to use specific domain controllers and global catalog servers by modifying the entries on the Directory Access tab in the server’s properties. This will enable you to close the RPC ports. On this tab, be sure you deselect the Automatically Discover Servers check box (Figure 19-7) to disable the option.

Figure 19-7: The Directory Access tab in the server’s properties.
Placing the FE Server Between Two Firewalls
Placing the FE server between two firewalls is the preferred method of implementing the FE/BE topology. The FE server is protected by the Internet firewall, and only the client access ports are open on the Internet firewall. The required ports of 135, 1024+, 445, and the ports we just discussed will need to be opened on the intranet firewall between your FE and BE servers, or else the Hosts file and the Directory Access modifications will need to be made, but this is certainly better than opening these ports on your external firewall.
If you place an FE server in a perimeter network to service HTTP requests, then on the Internet firewall, open only port 80. On the firewall between your FE and BE servers, open the ports discussed in the previous section or make the Hosts file and DSAccess modifications as described.
You’ll also want to configure two other registry keys. The first is the DisableNetlogonCheck registry key. DSAccess connects to Active Directory to check available disk space, time synchronization, and replication participation using NetLogon over RPC. If you chose to not allow RPC traffic over your firewall, you should stop this NetLogon check. Here is the DisableNetlogonCheck registry key information:
Key: HKEY_LOCAL_MACHINE\System\CurrentControlSet\Services\MSExchangeDSAccess Value Name: DisableNetlogonCheck Data Type: REG_DWORD Value Data: 1
On the FE servers, you should also create a registry key to prevent DSAccess from pinging domain controllers, and you do this by editing the LdapKeep- AliveSecs key. Create this registry key as follows:
Key location: HKEY_LOCAL_MACHINE\System\CurrentControlSet\Services\ MSExchangeDSAccess Value Name: LdapKeepAliveSecs Data Type: REG_DWORD Value Data: 0
Although you can’t use SSL (443) between the FE and BE servers, you can implement Internet Protocol Security (IPSec) at the network layer. IPSec can be configured to either require the security or simply to ask for the security.
| More Info | For step-by-step instructions about how to create IPSec filters between your FE and BE servers, refer to Chapter 4 of Securing Exchange Communications in the Security Operations Guide for Exchange 2000. This guide can be found in TechNet (www.microsoft.com/technet). |
EAN: 2147483647
Pages: 254