Connecting to Microsoft Mail Systems
The Connector for MS Mail, included with Exchange 2000 Server, enables messaging connectivity and directory synchronization between Exchange 2000 Server and Microsoft Mail for PC Networks. The Connector for MS Mail is similar in configuration and function to other foreign messaging system connectors. It can be used over LAN, asynchronous, or X.25 connections. Microsoft Mail has an extensive history and has optional gateways to many external messaging systems. Exchange Server can connect to an existing Microsoft Mail system and use these gateways. The Connector for MS Mail was created to integrate seamlessly with Microsoft Mail so that if you need to migrate a Microsoft Mail system to Exchange Server, the transition will be transparent to the users. Configuring the Connector for MS Mail is fairly straightforward, but before you learn how to configure it, you should spend a little time learning how it works.
Understanding the Connector for MS Mail
Microsoft Mail is a passive, shared-file messaging system, meaning that it uses a centralized post office composed of shared folders on a network server. Each recipient on the Microsoft Mail system is given access to one of these folders. When one user sends mail to another, the client application formats the message and saves it in the recipient's shared folder. The recipient's client application regularly checks that folder to see whether any new messages have arrived.
When you configure the Connector for MS Mail, a shadow Microsoft Mail post office is created on the Exchange server. This means that the Microsoft Mail system to which you are connecting sees the Exchange server as just another Microsoft Mail system, reducing the amount of effort needed to configure the connection, because no additional software is needed for Microsoft Mail. The server on which the Connector for MS Mail is created will add a service to Windows 2000 that moves messages between post offices, emulating the Microsoft Mail External.exe application. The Windows 2000 service moves the messages between the shadow post office and the Microsoft Mail system for which it is configured.
Unlike Microsoft Mail, Exchange 2000 Server is an active client/server messaging system. The Connector for MS Mail enables the transfer of messages between these two very different types of systems. This connector has three components, each of which duplicates a function performed by a component of a Microsoft Mail system. These three components are as follows:
- Mail Connector Post Office A temporary storage area for messages that are being transferred between Exchange 2000 Server and a Microsoft Mail post office. The Mail Connector Post Office does not contain any actual recipient mailboxes; therefore, it is often referred to as a shadow post office. It is the equivalent of a post office in Microsoft Mail.
- Mail Connector Interchange A Windows 2000 service that provides routing of messages between Exchange 2000 Server and the Mail Connector Post Office.
- Mail Connector (PC) MTA A Windows 2000 service that provides routing of messages between the Mail Connector Post Office on the Exchange server and one actual Microsoft Mail post office. Only one Connector for MS Mail can be configured on any given Exchange server, but each Connector for MS Mail can connect to multiple actual Microsoft Mail post offices, using a separate Mail Connector (PC) MTA for each post office. The Mail Connector (PC) MTA is the equivalent of a dedicated Microsoft Mail MTA. This component performs the same function as the External.exe application in Microsoft Mail.
When a user sends a message from a Microsoft Mail post office to a recipient on an Exchange server, each of these three components is involved in the transfer. The Mail Connector (PC) MTA receives the message from a Microsoft Mail post office and places it in a queue in the Mail Connector Post Office. The Mail Connector Interchange polls the Mail Connector Post Office at regular intervals. When it finds a message, the Mail Connector Interchange retrieves it, converts it to Exchange format, and places it in the queue for the Exchange Server MTA. The Exchange Server MTA routes the message to the Exchange recipient. When a user sends a message from Exchange 2000 Server to a Microsoft Mail post office, the process occurs in reverse.
Configuring the Connector for MS Mail
The Connector for MS Mail can be configured to work over a LAN connection or over a RAS asynchronous connection. Only one Connector for MS Mail can be configured on any given Exchange server, but each connector can connect to multiple Microsoft Mail post offices.
You use Exchange System to configure the Connector for MS Mail. First, however, you may need to install the connector itself. Check the Connectors container for any given routing group to see what servers the Connector for MS Mail is installed on. If it's installed on the server you want, you need only configure the connector as described in the next several sections. If it's not installed, run Exchange 2000 Server Setup on that server again to add the Connector for MS Mail to the installation.
Once the Connector for MS Mail is installed, its configuration object appears in the Connections container for the appropriate routing group in Exchange System, as shown in Figure 22-16. This container holds the configuration objects for each Connector for MS Mail installed in the group. You configure a Connector for MS Mail by using its property sheet, which you open in the usual manner.
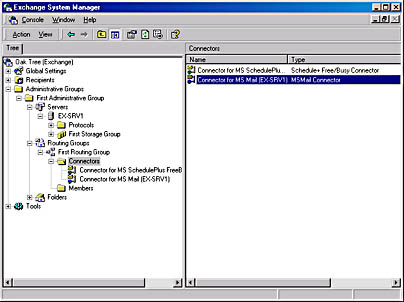
Figure 22-16. Viewing the connectors for a routing group.
Interchange Tab Unlike most of the other property sheets that you configure, the property sheet for the Connector for MS Mail opens to the Interchange tab, shown in Figure 2217, instead of the General tab. It does this because you must select an administrator's mailbox before configuring any other options on the connector. The Interchange tab also lets you specify how the Connector for MS Mail moves information between Exchange 2000 Server and the Microsoft Mail post office. You can configure the following settings:
- Administrator's Mailbox Designates the recipient who is to receive any delivery status messages associated with the connector, including nondelivery reports (NDRs). You must specify an Exchange mailbox in this field before you can configure other settings for the connector.
- Primary Language For Clients Specifies the primary language that the Microsoft Mail clients will use. The default language is English.
- Maximize MS Mail 3.x Compatibility Microsoft Mail 3.x supports only the earliest versions of object linking and embedding (OLE), the Microsoft standard allowing applications to call the functions of other applications. For example, using OLE, a fully functional Microsoft Excel spreadsheet can be embedded in an e-mail message. When the Maximize MS Mail 3.x Compatibility option is enabled, the Connector for MS Mail creates two versions of each OLE object—one using the older standards and the other using newer standards. Maximizing compatibility allows clients using Microsoft Mail 3.x to view OLE objects, but it can double the size of any message that uses OLE.
- Enable Message Tracking Allows you to use the message-tracking utility in Exchange System to track messages transferred between Exchange 2000 Server and the Microsoft Mail post office. This utility is covered in Chapter 23.

Figure 22-17. The Interchange tab of the Connector for MS Mail's property sheet.
Local Postoffice Tab The Local Postoffice tab, shown in Figure 22-18, is used to configure the Mail Connector Post Office, or the shadow post office. You can set the name of the network (by default the Exchange organization), the name of the post office itself, and a logon password, if you are using RAS to connect.
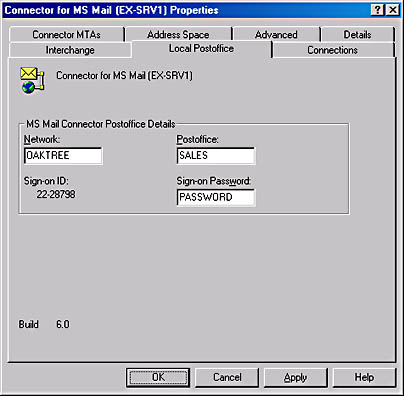
Figure 22-18. Configuring the shadow post office on the Exchange server.
Connections Tab You use the Connections tab, shown in Figure 22-19, to set up the list of Microsoft Mail post offices that the Connector for MS Mail will serve. At first, the only post office listed is the Mail Connector Post Office, the shadow post office that is maintained on the Exchange server.
To add a post office to the list, click Create. The Create Connection dialog box opens (Figure 22-20). This dialog box allows you to indicate the name and path of the Microsoft Mail post office to which you want to connect. It also allows you to specify the type of connection: LAN, Async, or Indirect. By default, the Connector for MS Mail attempts to deliver a message to the post office three times before generating an NDR. You can change this value by changing the setting in the Connection Attempts field.
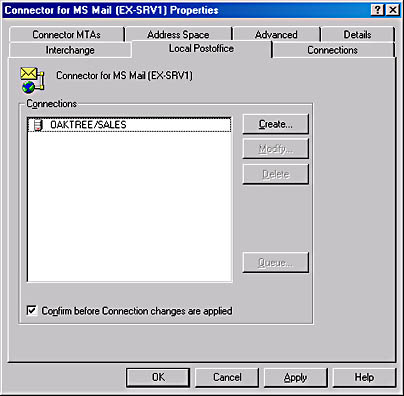
Figure 22-19. Viewing the Microsoft Mail post offices served by the Connector for MS Mail.
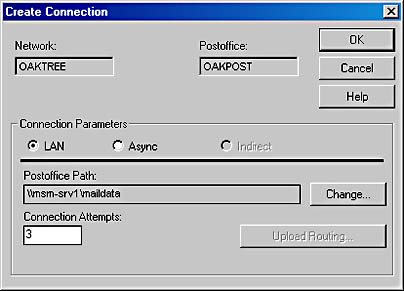
Figure 22-20. The Create Connection dialog box.
Connector MTAs Tab The Connector MTAs tab, shown in Figure 22-21, is used to create a connector MTA to transfer messages between the shadow post office and the Microsoft Mail post office. You must create one connector MTA for each Microsoft Mail post office to which you want to connect.
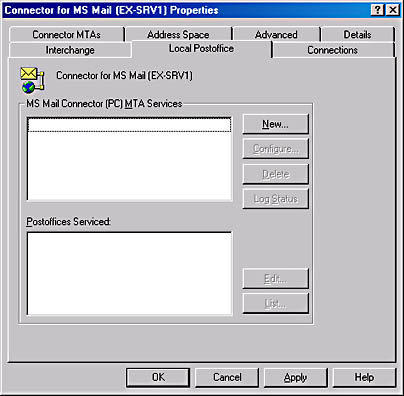
Figure 22-21. Creating a connector MTA.
To create a new connector MTA, click New. The New MS Mail Connector (PC) MTA Service dialog box opens (Figure 22-22). You can configure several settings in this dialog box:
- Service Name Indicates the name of the new connector MTA service you are creating. Give it a name that designates the Microsoft Mail post office that the connector MTA will service.
- Log Messages area Contains options for creating a log of messages transferred over the new connector MTA. You can log sent messages, received messages, or both. This option can be valuable when you are setting up an MTA for the first time and want to make sure that the connection is working as it should. It can also be valuable in troubleshooting the connector or in gauging the connector's performance.
- Polling Frequency area The Check For Mail Every XX Minutes option specifies how often the MTA should check for new messages in the shadow post office. The Update Configuration Every XX Minutes option specifies how often the MTA checks for changes to settings that you configure in the MS Mail Connector (PC) MTA Options dialog box (Figure 22-23), which you display by clicking the Options button. The settings in this dialog box are as follows:
- Maximum LAN Message Size area Contains options that specify whether to limit message size and, if so, the maximum size in kilobytes (KB) that can be transferred over the MTA via a LAN connection.
- Free Disk Space area Contains options that cause the shadow post office to be closed, stopping all transfers to and from it, when the available free disk space in your Microsoft Mail post office drops to the specified level. Once the shadow post office is closed, it won't open again until the free disk space reaches the second level specified.
- NetBIOS Notification When selected, allows Microsoft Mail users to be notified of new messages via a pop-up window.
- Disable Mailer When selected, prevents the MTA from transferring messages between the Microsoft Mail post office and the shadow post office.
- Disable Mail Dispatch When selected, stops the MTA from distributing any directory-synchronization messages. Directory synchronization is discussed in the next section, "Configuring Directory Synchronization."
- Startup area Contains options that specify whether the MTA service starts automatically at system startup or must be started manually by an administrator.
- Connection Parameters area Contains options that indicate whether the MTA should connect over LAN or async. This setting overrides any setting made for the Connector for MS Mail on the Connections tab.
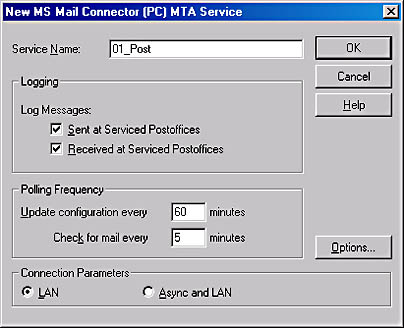
Figure 22-22. The New MS Mail Connector (PC) MTA Service dialog box.

Figure 22-23. The MS Mail Connector (PC) MTA Options dialog box.
REAL WORLD Configuring a Microsoft Mail Post Office to Connect to Exchange ServerOn the other side of the system, the Microsoft Mail post office will need to be configured to "see" the new shadow post office on the Exchange server. To configure this post office, follow these basic steps:
- Open the Admin.exe program and log on as an administrator.
- Use the arrow keys to select the External Admin menu, and then click Enter.
- Select the Create menu, and then click Enter.
- The Enter Network Name prompt appears. Type the Microsoft Mail network name that was configured for the shadow post office on Exchange Server, and then click Enter.
- The Enter Post Office Name prompt appears. Type the post office name created for the shadow post office on Exchange Server, and then click Enter.
- The Select Route Type prompt appears. Select Direct because you will not be routing mail through another Microsoft Mail post office to get to the shadow post office. Then click Enter.
- The Direct Connection Via prompt appears. Select how that connection will occur, and click Enter.
- At the Create? prompt, select Yes, and click Enter. You can then click Escape until you are prompted to quit and exit the program.
Once you've completed the tabs on the Connector for MS Mail's property sheet, the Exchange side of the configuration is complete. All you have to do is start the new MTA service and your shadow post office will be online and ready to go. The new service will be shown in the Services tool in Control Panel under the name you gave it in the New MS Mail Connector (PC) MTA Service dialog box. Your next step is to go to the Microsoft Mail post offices to which you configured connections and set up external post office entries for the shadow post office. This process is described in the sidebar "Configuring a Microsoft Mail Post Office to Connect to Exchange Server." Then you'll be ready to send a test e-mail from both the Microsoft Mail and Exchange sides of your mail system.
Configuring Directory Synchronization
After you've created the Connector for MS Mail and configured your Microsoft Mail post offices, message transfer between your Exchange organization and your Microsoft Mail system is enabled. Something is still missing, however. Although users can send messages between the two systems, they don't have access to the directory information of the other system. Instead, they are required to know the Microsoft Mail address of the recipient (even for recipients in the Exchange organization, because the Exchange server acts as a shadow Microsoft Mail post office). To allow users to look up directory information in the other system, you must configure directory synchronization between the two messaging systems.
NOTE
Don't confuse directory synchronization with directory replication. Directory replication is the replication of the Active Directory directory service between Windows 2000 domain controllers. Directory synchronization is the synchronization of directory information between an Exchange server and a foreign messaging system.
Microsoft Mail native directory synchronization is exceptionally complex because of Microsoft Mail's file-based systems. It uses a program called Dispatch.exe, which is usually run on a separate machine, along with the External.exe program. Dispatch, in turn, launches a program called Nsda. Nsda further launches Reqmain and Srvmain. This cascade of programs is confusing, but it is used for specific reasons. The External program connects to the external post offices configured for that Microsoft Mail post office. Dispatch schedules the connections to those external post offices for directory synchronization. Nsda handles directory synchronization by running Reqmain to request the main directory from the other post office and Srvmain to send the local directory to the other post office.
NOTE
Remember that Microsoft Mail was initially written in the mid-1980s, when systems had external 33-MHz 80286 chips with MS-DOS and 1 MB of RAM. Although this process may seem overly complex now, it was the only way to get the job done without a minicomputer back then.
REAL WORLD Preparing for Directory SynchronizationConfiguring directory synchronization between Exchange 2000 Server and an existing Microsoft Mail network may sound like a fairly easy task—and in theory it is. In the real world, however, things don't always go so smoothly. Often, existing Microsoft Mail networks are unplanned, undocumented beasts that slowly grow over the years in such a way that nobody has a clear idea of how they are set up.
Whether you are implementing an Exchange organization that will coexist with a Microsoft Mail network or planning a migration from Microsoft Mail to Exchange Server, take the time to thoroughly document and clean up your existing Microsoft Mail network. This effort will make it much easier to configure, maintain, and troubleshoot message transport and directory synchronization. The following suggestions will help you get started:
- Document the current Microsoft Mail network. Identify all the existing post offices, including the users of those post offices.
- Document the current directory synchronization topology. Where is the Dirsync server? Which post offices are requestors?
- Have users clean up their existing Microsoft Mail post offices if you plan to migrate messages to Exchange 2000 Server.
- Resolve any outstanding problems on the Microsoft Mail network, ensuring that directory synchronization works correctly before you configure the Connector for MS Mail in Exchange 2000 Server.
In a Microsoft Mail messaging environment, each post office maintains a directory of information about the recipients whose mailboxes exist in that post office. When a network has multiple post offices, a process called Dirsync synchronizes the directory information among the post offices. On the Microsoft Mail network, one post office is set up as a Dirsync server. All other post offices are set up as Dirsync requestors. Three timed events used by the Nsda program, called T1, T2, and T3, govern the synchronization of directory information between the Dirsync requestors and the Dirsync server. Here's how the process works:
- At the T1 event, every Dirsync requestor on the network sends any changes made to its current directory information to the Dirsync server. The T1 event fires on all post offices.
- At the T2 event, the Dirsync server starts Dispatch.exe, which in turn starts other processes that combine the directory information from all Dirsync requestors and the Dirsync server into a Global Address List. The Dirsync server then sends that list back to the Dirsync requestors. The T2 event fires only on the Dirsync server post office.
- At the T3 event, each Dirsync requestor rebuilds its own Global Address List, based on the new directory information from the Dirsync server. The T3 event fires on all post offices. After these three events occur, all post offices on the network use a common address list.
The Mail Connector Post Office on the Exchange server can be configured to act as either a Dirsync server or a Dirsync requestor. Unless you are building a new Dirsync system and want to use Exchange server as the Dirsync server, you should set up the Exchange server as a Dirsync requestor on your current system. The next section describes how to do this.
Configuring Exchange 2000 Server as a Dirsync Requestor
Setting up the Exchange server as a Dirsync requestor is quite simple. In the Exchange System snap-in, navigate to the Connectors container for the routing group in which you want to configure the requestor. Then, on the Action menu, point to New and choose Dirsync Requestor. The property sheet for the new Dirsync requestor opens.
General Tab The General tab of the Dirsync requestor's property sheet (Figure 22-24) allows you to define the basic properties of the new Dirsync requestor. On this tab you can configure the following settings:
- Name Specifies the name of the new Dirsync requestor. Give it a name that indicates the server on which the requestor is installed and the name of the Microsoft Mail network—for example, server_name (Dirsync) network_name.
- Append To Imported Users' Display Name When selected, causes the requestor name to be added after each custom recipient that is created by the Dirsync process. This can be very useful in identifying recipients created by a specific requestor.
- Dirsync Address Indicates the custom recipient that receives directory synchronization messages. By default, the Dirsync address is set to a hidden administrator's mailbox, $SYSTEM, on the Dirsync server.
- Address Types area Contains options that specify the address types the new Dirsync requestor will submit to the Dirsync server during synchronization.
- Requestor Language Indicates the language used by the Dirsync requestor. The Dirsync server uses this information in formatting the address lists that it sends back to the requestor.
- Server Specifies the Exchange server in the routing group that will act as the Dirsync requestor. The default is the server to which the Exchange System snap-in was connected when you created the requestor.
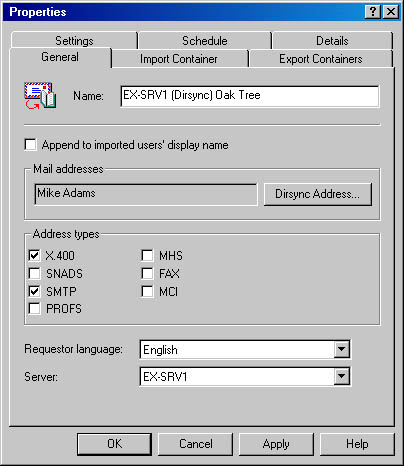
Figure 22-24. The General tab of the property sheet for a new Dirsync requestor.
Import Container Tab The Import Container tab, shown in Figure 22-25, is used to define the Recipient container on the Dirsync requestor where addresses that are imported from the Dirsync server should be stored. This option is available only while you are creating the requestor; after the requestor is created, you cannot change the Recipient container. You can also specify what should happen when Exchange Server tries to synchronize a Microsoft Mail mailbox for which a Windows 2000 user account does not exist. Your options are to create a new contact, create a new user account, or create a new but disabled user account. For more on these types of recipients, see Chapter 9.
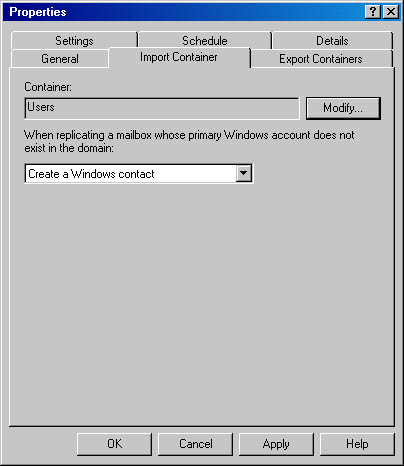
Figure 22-25. Specifying an Import container for the Dirsync requestor.
Export Containers Tab The Export Containers tab, shown in Figure 22-26, specifies the Recipient containers whose recipients should be exported to the Dirsync server during the T1 event. Click the Add button to select from a list of Recipient containers to use. You can add as many as you like. By default, users, groups, and contacts are all exported. The Export Contacts and Export Groups options at the bottom of the tab allow you to disable synchronization of contacts and groups.
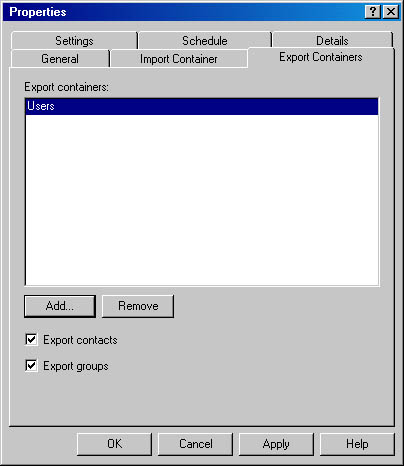
Figure 22-26. Specifying the Export containers for the Dirsync requestor.
Settings Tab The Settings tab, shown in Figure 22-27, is used to specify various settings that govern the new Dirsync requestor. The options on this tab are as follows:
- Dirsync Password Gives the password for the Dirsync server. You can specify a password on the Dirsync server to prevent unauthorized access to the system. If such a password is in effect, you must enter it here.
- Participation area Contains options that indicate whether the Dirsync requestor sends updated directory information to the Dirsync server, receives updated information, or both. This feature can be useful if you have a great deal of directory information being transferred. You can set up separate Exchange servers to receive and send directory information.
- Template Information area Contains options that let you import Microsoft Mail templates and export Exchange 2000 Server templates, if your Microsoft Mail post offices use address templates. Templates allow users of one system to manually enter the addresses of the users on the other system on an ad hoc basis each time they create new messages instead of using an address book.
- Dirsync Information area Contains options that force the Dirsync requestor to perform an import, an export, or both of every address available on the Dirsync server during the next T1 and T3 events. Select these options for the first time your new requestor enters the Dirsync cycle.
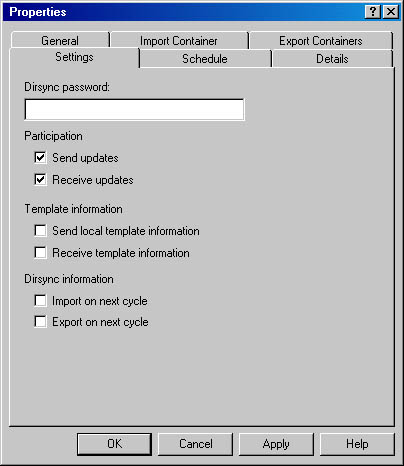
Figure 22-27. Settings tab of the property sheet for a new Dirsync requestor.
Schedule Tab The final tab you need to configure is the Schedule tab. Two Dirsync events, T1 and T3, are important for every Dirsync requestor. The Schedule tab allows you to configure the time at which the T1 event fires—that is, when the requestor sends updates to the Dirsync server. By default, this happens once each night. You do not need to configure a schedule for the T3 event for an Exchange 2000 Server Dirsync requestor, because updates are dynamically committed to the directory as soon as they reach the requestor.
When you finish configuring the Dirsync requestor's property sheet, your Exchange 2000 server will be set up as a Dirsync requestor. You then need to configure the Dirsync server on the Microsoft Mail network with information about the new requestor. For more information on this procedure, refer to your Microsoft Mail product documentation.
Setting Up Exchange 2000 Server as a Dirsync Server
Configuring Exchange 2000 Server as a Dirsync server is even easier than configuring it as a Dirsync requestor. The process requires only three steps:
- Use Exchange System to configure a Dirsync Server object for the Exchange routing group.
- Configure a Remote Dirsync Requestor object in Exchange System for each remote Dirsync requestor on the Microsoft Mail network.
- Configure the remote Dirsync requestors to use the new Dirsync server.
The following sections cover the first two steps of this process. For the third step, refer to your Microsoft Mail product documentation.
Configure a Dirsync Server Object in Exchange System To configure a Dirsync Server object, first navigate to the Connectors container for the chosen routing group in Exchange System. Then, on the Action menu, point to New and choose Dirsync Server. The Dirsync Server property sheet opens (Figure 22-28).
NOTE
You will need to configure an MS Mail recipient policy before you can create and configure a Dirsync Server object. To do this, navigate to the Recipients Policy container under the Recipients container. You can either modify the Default Policy or create a new one. In either case, on the E-Mail Addresses tab, ensure the MS Mail address is correct for Exchange users and check the box next to the MS Mail e-mail address.
As you can see, there is much less to configure for the Dirsync server than for the Dirsync requestor. The Schedule tab is identical to the other Schedule tabs that you have grown accustomed to by now. You use it to define the times at which the Dirsync server sends master address list updates to remote Dirsync requestors—otherwise known as the T2 event.
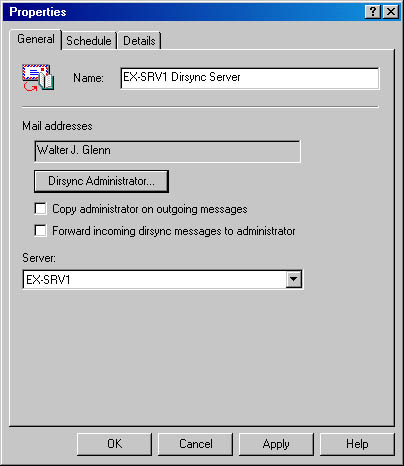
Figure 22-28. The Dirsync Server property sheet.
The General tab contains several settings:
- Name Gives both the display name and the directory name of the Dirsync server. Specify a name that includes the name of the Exchange server on which the Dirsync server is being installed.
- Dirsync Administrator Clicking this button displays a dialog box where you can designate a mailbox to which synchronization status messages should be sent.
- Copy Administrator On Outgoing Messages When selected, causes all outgoing synchronization messages from the Dirsync server to be copied to the Dirsync administrator's mailbox during the T2 event. Enabling this option often results in a large number of messages being sent to the administrator's mailbox, but the messages are useful in troubleshooting problems with synchronization.
- Forward Incoming Dirsync Messages To Administrator When selected, causes all incoming messages from Dirsync requestors to be forwarded to the Dirsync administrator's mailbox during the T1 event. Again, this option can be a valuable aid in troubleshooting synchronization problems.
- Server Specifies the Exchange server that will act as a Dirsync server. The default is the server to which Exchange System was connected when you created the Dirsync server.
Configure a Remote Dirsync Requestor Object in Exchange System For each remote Dirsync requestor on the Microsoft Mail network that the new Dirsync server will serve, you must configure a Remote Dirsync Requestor object in Exchange Administrator. To create the Remote Dirsync Requestor object, navigate to the Connections container and select a Dirsync Server object. Then, on the Action menu, point to New and choose Remote Dirsync Requestor.
The process you use to configure the remote Dirsync requestor is virtually identical to the process you use to configure Exchange 2000 Server as a Dirsync requestor. Refer to "Configuring Exchange 2000 Server as a Dirsync Requestor," earlier in this chapter, for details. After you create a Remote Dirsync Requestor object for each Dirsync requestor on the Microsoft Mail network, remember to configure the actual Dirsync requestors themselves.
MORE INFO
Arriving at a peaceful coexistence between an Exchange organization and a Microsoft Mail network involves more detail than a single chapter can provide. You can find additional valuable information on coexistence and migration issues in Deploying Exchange 2000 Server (Microsoft Press, 1998) in the Notes From the Field series.
EAN: N/A
Pages: 193