Installing Outlook 2000
Installing client software is one of the most repetitive tasks you face as an administrator. However, it's one that you've got to perform because a client/server system such as Exchange 2000 Server will not work unless both sides of the equation are in place.
Because this book focuses on Exchange Server, we will not provide detailed instructions for installing Outlook 2000. We'll simply give an overview of the installation methods available, explaining some of the options you or your users have when performing a standard Outlook installation on an individual machine. We'll then introduce the Office Custom Installation Wizard, which allows you to create customized installations for your users.
MORE INFO
This chapter focuses on Outlook 2000 from an administrator's view, but Outlook is a pretty complex program. If you want to learn more about using Outlook 2000, read Running Microsoft Outlook 2000 by Alan Neibauer (Microsoft Press, 1999).
Standard Outlook Installation
Like most Microsoft programs, Outlook 2000 installs with a setup wizard—in this case, the new Windows Installer. Windows Installer is a powerful new utility that allows you to customize just about every aspect of an installation and also takes care of adding and removing components after an installation. Figure 16-1 shows the component selection window of Windows Installer. For each component of Outlook 2000, you can elect to
- Install the component to run from the local hard disk. If disk space is abundant, many administrators choose to install every available component to run in this way.
- Install the component to run over the network from a shared access point. If disk space is an issue, this option will conserve space.
- Set the component to install the first time the user attempts to use it. This is a favorite choice for those that are somewhere in between the two choices above. If a user never needs a certain component of Outlook, it is never installed and doesn't waste space. On the other hand, those components that are used constantly are installed locally. This option also saves the administrator time during the initial install.
- Not install the component at all. This simply means that the user will have to run the installer again to install the component. You can also use this option to prevent the user from installing certain components, as long as you don't make the installation files available.
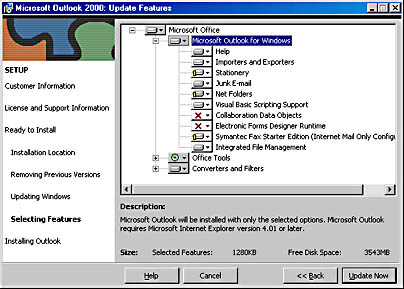
Figure 16-1. Specifying which Outlook 2000 components to install.
After you've selected the components to install, Windows Installer takes care of the rest of the installation with little or no intervention on your part. Once the installation is complete, you need to choose a mode for running Outlook 2000. There are three choices, as shown in Figure 16-2:
- Internet Only This service option makes Outlook act as an Internet mail client to any server that supports POP3, SMTP, or IMAP4.
- Corporate or Workgroup This service option is designed for use over a local area network (LAN) with Exchange Server or another third-party, LAN-based mail system such as Lotus Notes. It provides the complete set of Outlook features.
- No E-Mail This service option causes Outlook to act as a stand-alone personal information manager offering only contact, task, and schedule management features.
Chapter 15 discusses each of these options in more detail.
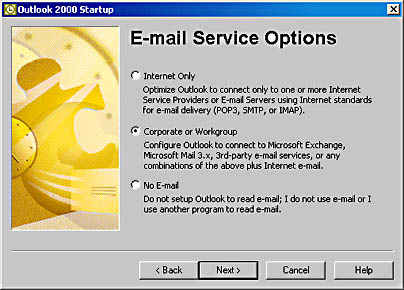
Figure 16-2. Choosing an operating mode for Outlook 2000.
NOTE
To function correctly, Outlook 2000 requires that Microsoft Internet Explorer 4.01 or later be installed on client computers.
When you've selected an e-mail service option, Outlook starts up and prompts you to configure the user's e-mail account. In an Exchange organization, this configuration involves providing the name of the Exchange server and the user name.
Customizing Outlook Installation
As an administrator, you can customize the setup of Outlook 2000 in three ways. You can run the Setup program with command-line switches, use a setup information file to answer various setup questions and then specify the setup information file using command-line switches, and customize an installation of Outlook with the Office Custom Installation Wizard. This section briefly discusses these options.
Using Command-Line Switches
You can customize the setup of Outlook somewhat by using various switches. Most of the switches involve the use of a Microsoft Installer (.MSI) package file. Table 16-1 lists the available command-line switches.
MORE INFO
For more information on using switches to modify your Outlook installations, see Knowledge Base article Q202946.
Table 16-1. Command-line switches for installing Outlook 2000
| Switch | Use |
|---|---|
| /a <msifile> | Creates an administrative install point using the .MSI file for client installations. |
| /f [options] <msifile> | Repairs the Outlook installation using various repair modes. |
| /g <language ID> | Specifies the language to be used. English, which is the default, is ID 1033. |
| /I <msifile> | Specifies the name of the .MSI file to be used during installation. This switch cannot be used with the /a switch. |
| /j [options] <msifile> | Creates an icon that can be used later to install a feature not configured during setup. |
| /l [options] <logfile> | Specifies the log file used during installation and switches to be passed to the Windows Installer. |
| /x <msifile> | Uninstalls Outlook. |
| /q [options] | Specifies the amount of information to be presented on screen during the installation. |
| /wait | Indicates that the installer should wait for the installation to complete before exiting. |
| /settings | Specifies the path and settings file to be used for the automated installation. |
Using a Setup Information File
If a file named Setup.ini exists in the same directory as Setup.exe, or if the /settings <inifile> switch specifies an .INI file with a different name, that file will be used to modify the default behavior of the setup. Because this file can specify all of the parameters you would normally provide at the command line, it is useful for a number of reasons:
- You can avoid typographical errors at the command line.
- You are not subject to limitations on the length of the command.
- You can enforce specific settings, even with an interactive installation.
The file is merely a text document and can be opened with Microsoft Notepad or any other text editor. Like other .INI files, each line represents one aspect of the installation. To include a comment, type a semicolon at the beginning of each comment line.
MORE INFO
The format of the settings file is described in the Setup Reference workbook (SetupRef.xls), which is included with the Microsoft Office 2000 Resource Kit (Microsoft Press, 1999).
Using the Office Custom Installation Wizard
The Office Custom Installation Wizard, shown in Figure 16-3, works with Windows Installer to let you tweak almost every detail of the installation process. You can
- Define the path where Outlook 2000 is installed on client computers
- Set the installation options (run from hard disk, install on first use, don't install) for individual components of Outlook 2000
- Define a list of network servers for Windows Installer to use if the primary installation server is unavailable
- Specify other products to install or other programs to run on the user's computer when the Outlook installation is done
- Hide selected options from users during setup
- Add custom files and Windows registry settings to the installation
- Customize desktop shortcuts for Outlook 2000
- Set user default options
- Use Office profile settings created with the Profile Wizard for Office 2000 to preset user options
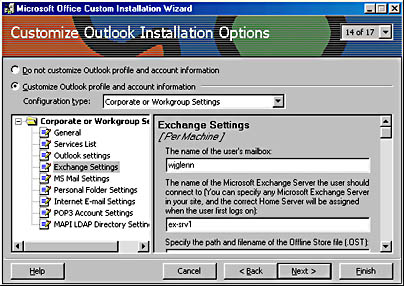
Figure 16-3. Customizing an Outlook installation with the Office Custom Installation Wizard.
To accomplish all of this, the Windows Installer uses two types of files: an installer package (an .MSI file) and an installer transform file (an .MST file). The installer package contains a database that describes the configuration information. The installer transform file contains modifications that are to be made as Windows Installer installs Outlook. The package file never changes; it is essentially a database that helps Windows Installer relate various features to actual installation files. The transform file is what the Office Custom Installation Wizard helps you create. It allows you to create unique setup scenarios that all use the same installation files. In other words, you could create different installation routines for different departments but use only one network installation point.
MORE INFO
The Office Custom Installation Wizard is included on the CD-ROM that accompanies the Microsoft Office 2000 Resource Kit. It is also available on line at http://www.microsoft.com/office/ork/2000/appndx/toolbox.htm. The resource kit provides detailed information on using the wizard.
Systems Management Server
Systems Management Server (SMS) is a Microsoft application specifically designed to help administrators address the needs of larger user communities. The Microsoft Office 2000 Resource Kit (available in both book form and on line contains instructions for creating installation packages and configuration files that can be used by SMS. The resource kit also contains a sample package definition file (PDF) that can be used with SMS to distribute the customized version of the executable client setup file to the users on your network. The PDF is a text file that includes the setup parameters necessary to install Outlook 2000 using SMS. The sample PDF is as follows:
[PDF] Version=1.0 [Package Definition] Product=Microsoft Outlook 2000 9.0 Comment=Microsoft Outlook 2000 for Windows WorkstationAccess=UserRead, UserWrite, GuestRead, GuestWrite SetupVariations=Typical, Custom, Manual, Uninstall [Typical Setup] CommandName=Typical CommandLine=OFF9SMS.BAT /TYPICAL UserInputRequired=FALSE SynchronousSystemExitRequired=TRUE SystemTask=FALSE SupportedPlatforms=Windows NT (x86), Windows95 [Custom Setup] CommandName=Custom CommandLine=OFF9SMS.BAT /CUSTOM "New Custom Setup File.MST" UserInputRequired=FALSE SynchronousSystemExitRequired=TRUE SystemTask=FALSE SupportedPlatforms=Windows NT (x86), Windows95 [Manual Setup] CommandName=User input required CommandLine=OFF9SMS.BAT /MANUAL UserInputRequired=TRUE SynchronousSystemExitRequired=TRUE SystemTask=FALSE SupportedPlatforms=Windows NT (x86), Windows95 [Uninstall Setup] CommandName=Uninstall CommandLine=OFF9SMS.BAT /UNINSTALL UserInputRequired=FALSE SynchronousSystemExitRequired=TRUE SystemTask=FALSE SupportedPlatforms=Windows NT (x86), Windows95 [Setup Package for Inventory] InventoryThisPackage=TRUE Detection Rule Part 1=File 1 Detection Rule Part 2=AND Detection Rule Part 3=File 2 [File 1] File=MSO9.DLL Collect=FALSE CheckSum= CRC= Date= Time= Byte= Word= Long= Token 1= Token 2= Token 3= Token 4= [File 2] File=outl2000.ini Collect=FALSE CheckSum= CRC=0, 204, 20996 Date= Time= Byte= Word= Long= Token 1= Token 2= Token 3= Token 4= [Last Modified] Date=12-31-98 Time=10:14:09 |
You must accomplish two steps before distributing Outlook 2000 to your client systems. First you must create a package. The package consists of the PDF just discussed and a package source folder containing all of the files necessary for the installation. After you've created the package, the second step is to create an advertisement to distribute the package. An advertisement consists of the package as well as a list of all client systems on which you want the package installed (called a collection). SMS provides flexibility and granularity so that you can install the package only where you want it. For example, you may decide to install the package only on client systems that meet minimum memory and hard disk parameters and ignore all other systems. The job can also be set to run only after a certain time period and, if not voluntarily accepted by the user within that time frame, it can be configured to become a mandatory installation that the user cannot stop or defer to a later time period.
REAL WORLD Creating Your Own Installer PackagesIn addition to using SMS and the Office Custom Installation Wizard to create installer packages, you can also create your own installer packages using Veritas' Winstall LE, included with Microsoft Windows 2000 Server. With this software, you can create a package that represents your installation of Outlook or any other program.
The way it works is simple. Winstall takes a "before" snapshot of a system without Outlook on it. This snapshot consists of a file system listing and a registry listing. It then prompts you to install the application in question—Outlook, in this case. Once the installation is complete, Winstall takes an "after" snapshot. From the two snapshots, Winstall generates a difference file consisting of a list of files that are installed (and their proper locations) as well as the registry entries that should be added, deleted, or changed as a result of the Outlook installation. This installation information is written to an .MSI file. Winstall stores this file, a copied set of the installed files, and a .REG file containing the registry changes on a shared folder on a server. When you run this .MSI package, the Outlook files are placed in their appropriate locations and the registry is modified. There are no wizards to walk through and no options to choose. The end result is a reproducible installation that takes far less time than installing Outlook 2000 manually.
Should you choose to modify the installation, you can modify the .MSI file with Winstall LE, or you can start over and re-create a new .MSI package by installing Outlook 2000 with a different set of options.
EAN: N/A
Pages: 193