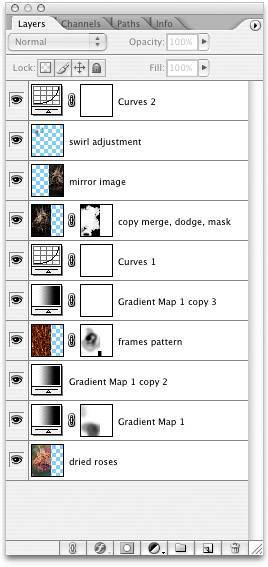
1. | Open the Dried Roses file.
|
2. | Choose the Crop tool and crop the image to 1630 x 1630 pixels
|
3. | Choose Image, Adjustments, Curves. Set curve points to Input: 53, Output: 59, and Input: 185, Output: 205.
|
4. | Select Gradient Map from the Adjustment Layer menu in the Layers palette. In the dialog box that appears, click the gradient strip to launch the Gradient Editor.
|
5. | Double-click the white color stop on the right, below the gradient. In the Color Picker that appears, specify an RGB "pink" color of R198, G183, B157.
|
6. | Select the Brush tool with a 200-pixel brush; set black as the foreground color and Opacity to 36% in the Options bar.
|
7. | Paint a transparent mask in the background and lower part of the flower.
|
8. | Select the Gradient Map 1 layer in the Layers palette and drag it to the New Layer icon at the bottom of the Layers palette to duplicate the layer. Double-click the layer name to select it and rename it Gradient Map Copy 2.
|
9. | Select the Layer Mask thumbnail for Gradient Map 1 Copy 2 and drag it to the trash, clicking the Discard button and closing the dialog that appears.
|
10. | Open the Frame Shop file.
|
11. | Select the Rectangular Marquee tool and drag a vertical marquee in the center of the frame image.
|
12. | Choose Edit, Copy.
|
13. | Choose Filter, Pattern Maker.
|
14. | Enable the Use Clipboard as Sample check box in the Tile Generation section of the Pattern Maker window and click the Generate button to create a random pattern.
|
15. | Click the Generate Again button repeatedly to create additional sample patterns as needed.
|
16. | Click the Forward and Back buttons in the Tile History section to scroll through the tiles and select the desired pattern. Click OK to apply the pattern.
|
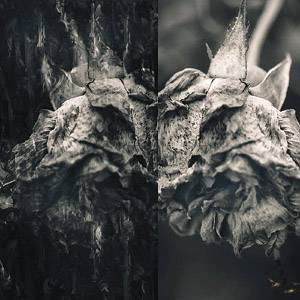
17. | Choose Select, All.
|
18. | Choose Edit, Copy.
|
19. | Choose File, Close and click the Don't Save button to close the Frame Shop file without saving the pattern.
|
20. | Activate the image composite and choose Edit, Paste to paste the pattern. Double-click the name in the Layers palette to select the new layer and name the layer Frames Pattern.
|
21. | In the Layers palette, set the Opacity slider to 25% for the Frames Pattern layer, select the Move tool, and reposition the pattern. Reset the Opacity slider to 100%.
|
22. | For the Frames Pattern layer, set the blending mode in the Layers palette to Overlay.
|
23. | Click the Add Layer Mask button in the Layers palette to add a mask. Select the Brush tool and specify a 200-pixel brush and an Opacity value of 27%. Paint a transparent mask in the center of image.
|
24. | Select the Gradient Map Copy 2 layer and drag it to the New Layer icon in the Layers palette to duplicate the layer.
|
25. | Select Curves from the Adjustment Layer menu in the Layers palette. Set the data points to input: 30, output: 46, and input: 112, output: 235.
|
26. | Choose Select, All.
|
27. | Choose Edit, Copy Merged.
|
28. | Choose Edit, Paste to paste the merged layer.
|
29. | Select the Dodge tool with a 300-pixel brush and dodge the central area of the merged layer.
|
30. | Click the Add Layer Mask icon in Layers palette menu to add a mask.
|
31. | Select the Brush tool with a 200-pixel brush and set black as foreground color. Paint the mask into the lower-right corner and outer edges of the image.
|
32. | Choose Image, Canvas Size. Change the width from 1630 to 2305, select the left-middle anchor square, and click OK to add canvas to the right side of the image.
|
33. | Select the Rectangular Marquee tool and draw a vertical selection around the central rose image.
|
34. | In the Layers palette, turn off the visibility icon on all layers except Dried Roses, Gradient Map 1, and Gradient Map 1 Copy 2.
|
35. | Choose Edit, Copy Merged and Edit, Paste to paste the merged selection as a new layer. Double-click the layer title and name the new layer Mirror Image.
|
36. | Press the Shift key and drag the Mirror Image layer to the right, aligning it with the area of new canvas.
|
37. | Choose Edit, Transform, Flip Horizontal to flip the layer.
|
38. | Select the Crop tool and drag a crop selection from the upper-right to the lower-left, pressing the Shift key to constrain the selection to a square. Double-click in the selection to crop the image.
|
39. | Click the New Layer icon in the Layers palette to create a new layer. Double-click the layer title and name the new layer Swirl Adjustment.
|
40. | Select the Clone Stamp tool, set Opacity to 68%, enable the Sample All Layers check box, and choose a 167-pixel brush.
|
41. | Option-click (Alt-click in Windows) in the shadow areas and paint out the bright swirl shape in the upper-left center of the image.
|
42. | Choose Curves from the Adjustment Layer menu in the Layers palette and set the curve data points to Input: 38, Output: 53, and Input: 169, Output: 219.
|