| Preparing a file for printing means a lot of different things. It could mean a complicated offset professional color project with film and plates, or it could refer to an inkjet proof or a laser print. For the sake of argument, this task refers to color printing on a press or proofing device. It is important that you check with your printer before prepping files and setting things up because all printers do things a bit differently. What follows are general guidelines for how to optimize a file for printing. Determine Output Resolution In most cases, you will print at 300dpi for high-quality images. You can reduce this number slightly for some offset presses (inkjet and color laser printers and copiers are even more forgiving). Open the Image Size dialog box by choosing Image, Image Size. If you know the resolution requirements required by your printer, type them in the Resolution field; if you don't, type 300 as a baseline and select pixels/ inch. Make sure that the Resample Image check box is not selected to avoid degradation of image quality. 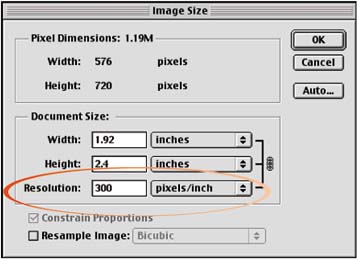
Set the Color Settings Choose Edit, Color Settings to open the Color Settings dialog box. Select US Prepress defaults from the Settings menu. In the Working Spaces section, select the various profiles and parameters specified by your printer or leave the defaults. In the Color Management Policies section, select Preserve Embedded Profiles whenever a match or near match is available; otherwise, you must experiment with converting to the appropriate working spaces. See Part 1, Task 8, "How to Specify Photoshop Color Models," for details. 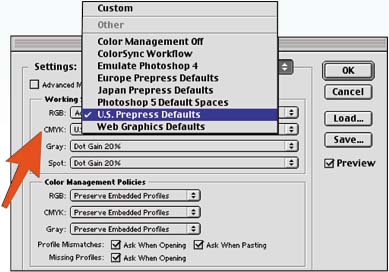
Set Page Layout Select File, Print with Preview to launch the Print dialog box. In the Scaled Print Size area, set the scale percentage as necessary to fit the image on the page size. Use the thumbnail image as a guide for entering the proper new value. If necessary, go to the Position area and deselect the Center Image check box and drag the thumbnail image to reposition it on the page. 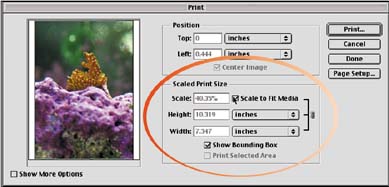
Check for Out-of-Gamut Colors To print in color, you have to convert the color mode for your image to CMYK. Because the CMYK color format allows fewer colors than, say, the RGB format, you could lose some of the colors in your image during the color conversion. Choose View, Gamut Warning. The gamut mask points out the areas where colors could be lost in the image so that you can address the problem before the image goes to the printer. 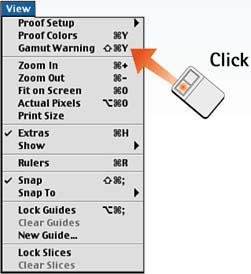
Correct Problem Colors After you identify where the problem colors lie, choose View, Gamut Warning again to turn off the gamut mask and then choose View, Proof Setup, Working CMYK. Photoshop displays a preview of how the colors will look when they are converted. These color shifts are often subtle, and you may decide you can live with them. If not, edit the colors in your image using any of the color tools. (Hint: The Sponge tool may soften some saturated colors.) 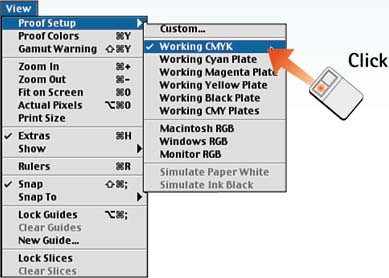
Convert File to Proper Color Mode After you correct any color problems, convert the file to CMYK format. Choose Image, Mode, CMYK Color to convert the file. 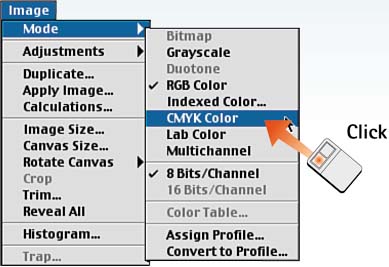
Save File in Proper Format Now save the file in the proper format as specified by your printer: Choose File, Save As and then select the desired format from the Format menu. If in doubt, save the image as a Photoshop EPS file (for a PostScript device) or as a Basic TIFF file (for a standard device). 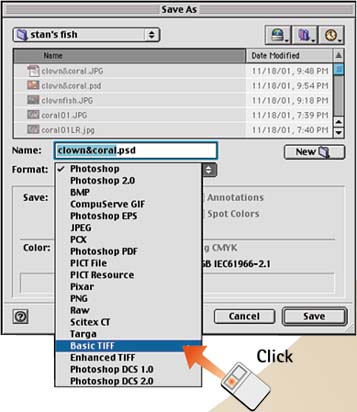
|