Task 10 How to Set ImageReady Preferences
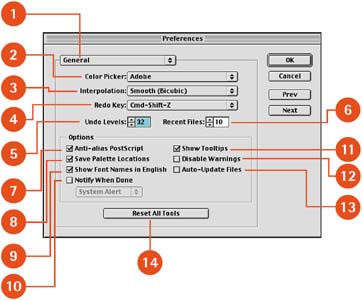
General Controls

Choose Edit, Preferences, General to open the Preferences box to the General page. You use this page to control interpolation, the Color Picker option, and a number of other general application parameters.
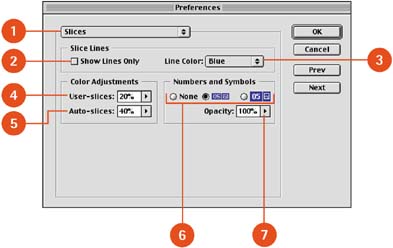
graphics/p1_10fig01.jpg

Preferences Title pop-up menu: graphics/1_icon.jpg Click the arrow to display a list of other pages in the Preferences box; choose an option to open that page.

Color Picker pop-up menu: graphics/2_icon.jpg Click the arrow to display the list of options; then select the Adobe or System option.

Interpolation pop-up menu: graphics/3_icon.jpg Click the arrow to display the options: Smooth (Bicubic) and Jagged (Nearest Neighbor). In most cases, leave this option set at Smooth (Bicubic) for best results.

Redo Key pop-up menu: graphics/4_icon.jpg Click the arrow to select the key combination that reapplies a command.

Undo Levels spinbox: graphics/5_icon.jpg Determines the number of undo states supported by the History palette. Type a value in the field to change the setting. The higher you set this number, the more memory ImageReady uses to store the changes.

Recent Files spinbox: graphics/6_icon.jpg Enter the number of recent files you want to appear in the Recent Files submenu. Use the up/down arrows if desired.

Anti-alias PostScript check box: graphics/7_icon.jpg Select this option to achieve smooth results when placing or importing PostScript images.

Save Palette Locations check box: graphics/8_icon.jpg Reopens palettes in the same place and at the same size as when they were closed.

Show Font Names in English check box: graphics/9_icon.jpg Translates all font names into English.

Notify When Done check box and pop-up menu: graphics/10_icon.jpg Enable the check box to produce a notification when tasks are completed. Choose System Alert or Text to Speech from the pop-up menu as the notification method.

Show Tooltips check box: graphics/11_icon.jpg Activates the pop-up tool descriptions when you hover the mouse pointer over the interface elements.

Disable Warnings check box: graphics/12_icon.jpg Disables layer effect and selection warnings.

Auto-Update Files check box: graphics/13_icon.jpg Updates and saves files automatically.

Reset All Tools button: graphics/14_icon.jpg Resets all tools to their default configurations specified at the initial installation.

Slices

Choose Edit, Preferences, Slices to open the Preferences box to the Slices page. You use this page to specify how ImageReady generates slices, including naming conventions, colors, and slice lines. A slice is the portion of the image when ImageReady divides an image into smaller pieces for optimization and display in an HTML table.

graphics/p1_10fig02.jpg

Preferences Title pop-up menu: graphics/1_icon.jpg Click the arrow to display a list of other pages in the Preferences box; choose an option to open that page.

Show Lines Only check box: graphics/2_icon.jpg Shows only the slice lines when you view slices, omitting the transparent coloring.

Line Color pop-up menu: graphics/3_icon.jpg Specifies the color of the slice lines. Choices include 24 color options.

Color Adjustments User-slices box and slider: graphics/4_icon.jpg Determines the opacity for the color shading of the user slices. Click the arrow and drag the slider or type a number value to change the setting.

Color Adjustments Auto-slices box and slider: graphics/5_icon.jpg Determines the opacity for the color shading of the auto slices. Click the arrow and drag the slider or type a number value to change the setting.

Numbers and Symbols radio buttons: graphics/6_icon.jpg Control the size of slice numbers and icons. Select None or the small or large icon button.

Numbers and Symbols Opacity box and slider: graphics/7_icon.jpg Click the arrow and drag the slider or type a number value to control the opacity of the slice numbers and symbols.

Image Maps

Choose Edit, Preferences, Image Maps to open the Preferences box to the Image Maps page. You use this page to specify how ImageReady displays imagemap information. An imagemap refers to the process of creating hot spots in Web images that serve as links or triggers for other actions.
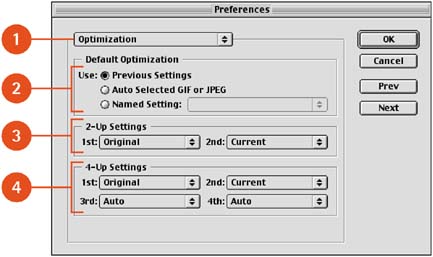
graphics/p1_10fig03.jpg

Preferences Title pop-up menu: graphics/1_icon.jpg Click the arrow to display a list of other pages in the Preferences box; choose an option to open that page.

Show Lines Only check box: graphics/2_icon.jpg Uses an outline to designate an imagemap.

Show Bounding Box check box: graphics/3_icon.jpg Creates a rectangular bounding box around an imagemap.

Line Color pop-up menu: graphics/4_icon.jpg Allows you to choose the line color for outlining imagemaps from a list of 24 different line colors.

Image Map Overlay box and slider: graphics/5_icon.jpg Designates an imagemap with a tinted white fill to separate it from the rest of the image. The slider value determines the fill opacity.

Optimization

Choose Edit, Preferences, Optimization to open the Preferences box to the Optimization page. You use this page to specify how optimization settings are calculated and displayed.

graphics/p1_10fig04.jpg

Preferences Title pop-up menu: graphics/1_icon.jpg Click the arrow to display a list of other pages in the Preferences box; choose an option to open that page.

Default Optimization radio buttons: graphics/2_icon.jpg Select how you want to generate optimization defaults for an image. Choices are Previous Settings, Auto Selected GIF or JPEG, and Named Setting. Named setting allows you to select from a list of standard optimization defaults.

2-Up Settings pop-up menus: graphics/3_icon.jpg Determine which iterations of the image are displayed in the 2-Up window. Defaults for the first menu are Original and Current, but the second menu allows you to choose from a long list of optimized presets.

4-Up Settings pop-up menus: graphics/4_icon.jpg Determine which iterations of the image are displayed in the 4-Up window. Defaults are Original and Current, but you also can choose from a long list of optimized presets, including Auto, which uses the next logical level of compression.

Cursors

Choose Edit, Preferences, Cursors to open the Preferences box to the Cursors page. You use this page to specify brush and cursor shapes and sizes.

graphics/p1_10fig05.jpg

Preferences Title pop-up menu: graphics/1_icon.jpg Click the arrow to display a list of other pages in the Preferences box; choose an option to open that page.

Painting Cursors radio buttons: graphics/2_icon.jpg Select Standard (icon), Precise (cross hairs), or Brush Size (circular) as the shape of the painting cursor.

Other Cursors radio buttons: graphics/3_icon.jpg Select Standard (icon) or Precise (cross hairs) for the cursor shape.

Transparency

Choose Edit, Preferences, Transparency to open the Preferences box to the Transparency page. You use this page to specify how transparency is depicted in a file.
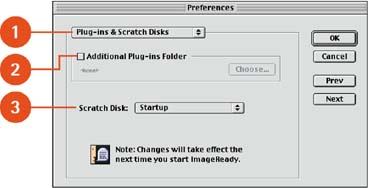
graphics/p1_10fig06.jpg

Preferences Title pop-up menu: graphics/1_icon.jpg Click the arrow to display a list of other pages in the Preferences box; choose an option to open that page.

Grid Size pop-up menu: graphics/2_icon.jpg Controls the size of the checkerboard used to indicate transparency. Options are None, Small, Medium, and Large.

Grid Colors pop-up menu: graphics/3_icon.jpg Controls the color of the checkerboard used to indicate transparency. Options are Light, Medium, Dark, Red, Orange, Green, Blue, Purple, and Custom.

Custom color swatches: graphics/4_icon.jpg Click one or both of the swatches to select specific colors for the transparency checkerboard.

Transparency preview window: graphics/5_icon.jpg Shows the current transparency checkerboard pattern.

Plug-Ins & Scratch Disks

Choose Edit, Preferences, Plug-Ins & Scratch Disks to open the Preferences box to the Plug-Ins & Scratch Disks page. You use this page to tell ImageReady where to look for plug-ins and scratch disks. Note that in Windows, this page is called simply Plug-Ins; the Windows version does not allow you to specify a scratch disk location.

Plug-ins are commands and filters that extend ImageReady's core functionality. They all should be stored in a single folder so that ImageReady can access them as needed. This page of the Preferences box allows you to specify the proper folder for ImageReady to access.

As ImageReady manipulates files, it temporarily appropriates hard disk space to cache image data as things are copied and layered. When you work with larger files, it's even more important to have free disk space for the scratch disk. This page of the Preferences box is also the place for you to tell ImageReady which drives to use for the scratch disk.

graphics/p1_10fig07.jpg

Preferences Title pop-up menu: graphics/1_icon.jpg Click the arrow to display a list of other pages in the Preferences box; choose an option to open that page.

Additional Plug-ins Folder check box and Choose button: graphics/2_icon.jpg Enable the check box and click Choose to navigate to an additional plug-ins folder.

Scratch Disk pop-up menu (Mac only): graphics/3_icon.jpg Click the arrow to display a list of potential scratch disks. All mounted disks are listed as scratch disk options.


How to Use Adobe Photoshop 7
ISBN: 0789727706
EAN: 2147483647
Year: 2005
Pages: 144

flylib.com © 2008-2017.
If you may any questions please contact us: flylib@qtcs.net