| The Web Photo Gallery feature in Photoshop is a great way to quickly post to the Web a thumbnail directory of images that includes links to full-sized images, filenames, and the photographer's name. Anyone who wants to post a directory of images should take advantage of this feature, which is built around Photoshop's Actions technology. Users place images into a single folder, set the parameters, and step back. The script runs everything right before your eyes, building the code, optimizing the images and thumbnails, and creating all the links. Select Web Photo Gallery In Photoshop, choose File, Automate, Web Photo Gallery to open the Web Photo Gallery dialog box. Select a page layout from the Styles pop-up menu, observing the thumbnail on the right side of the dialog box to evaluate the results. 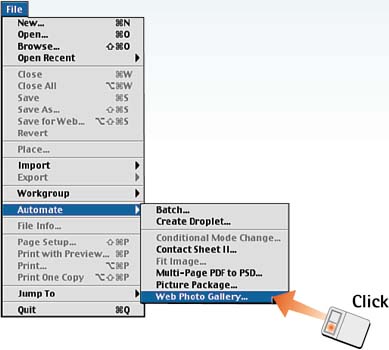
Set File Source and Destination In the Folders section, click the Choose button and navigate to the source folder (the folder that contains all the images). Click Choose to close the Select Image Directory dialog box. Now click the Destination button and navigate to the destination folder (where the final files and HTML documents will be stored). Click Choose to make your selection. 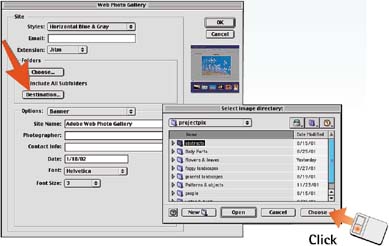
Name and Date the Site From the Options menu, select Banner. In the bottom section of the dialog box, fill in all appropriate fields, listing the site name, date, and photographer information. You can also select the date, font, and font size if you want. 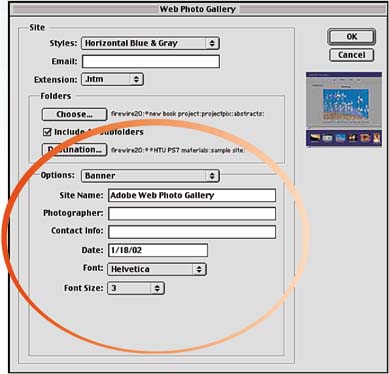
Resize Images From the Options menu, select Large Images to see more options. Enable the Resize Images check box if you want to resize the main images that open from the thumbnails. With this box enabled, choose the image size from the adjacent pop-up menu and the JPEG compression rate from the JPEG Quality pop-up menu. To enter a specific JPEG compression value, select the quality setting from the JPEG Quality menu. 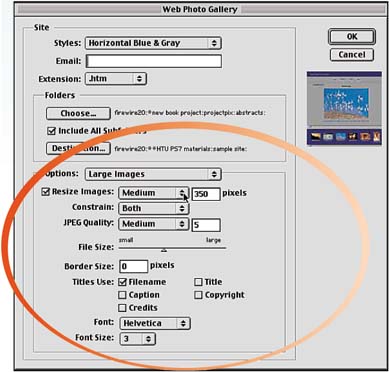
Set the Page Layout Select Thumbnails from the Options pop-up menu. To use the filename or the text stored in the File Info section as a caption, check the appropriate box. Set the font parameters and the column and row parameters as desired. 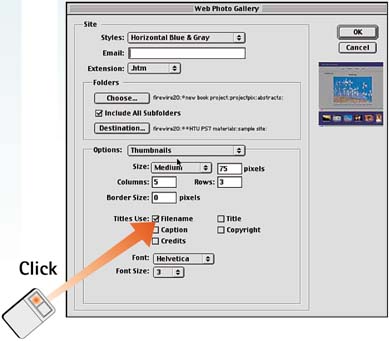
Build and Test the Site Click OK to build the Web Photo Gallery site. Photoshop runs the script on its own, opening files, compressing, and saving everything to the source folder you specified in Step 2. When the script is complete, Photoshop launches the Web Photo Gallery in a browser window for you to test. Click the thumbnails to test the links and make sure that everything is listed properly. 
How-To Hints File Structure Photoshop creates several files and folders within the source folder you designated to support the Web Photo Gallery. All the images are stored in an images folder; thumbnails go into a thumbnails folder. A separate HTML page also is created for each image and is stored in a folder called pages. The main gallery page is called index.htm. When posting your gallery page online, be sure to include all these elements on your server. Custom Colors Select Custom Colors from the Options menu to specify the text, link, background, and banner text colors. Click each color swatch to launch the Color Picker and select the desired color. Enable the Only Web Colors check box in the Color Picker to restrict the choices to Web-safe colors. |
|