General Controls Select Edit, Preferences to open the Bridge Preferences window (in Mac OS X, select Bridge, Preferences). Then select General from the list on the left. This page controls the appearance of Bridge and the basic information it displays. 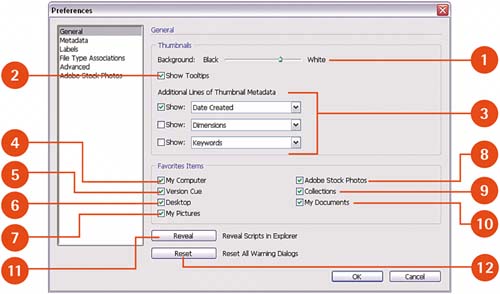  Thumbnails Background slider: A slider control ranging from black to white controls the darkness of the background behind the thumbnails. Thumbnails Background slider: A slider control ranging from black to white controls the darkness of the background behind the thumbnails.
 Show Tooltips check box: If enabled, hovering the mouse pointer over a thumbnail or control pops up a brief description or help information. Show Tooltips check box: If enabled, hovering the mouse pointer over a thumbnail or control pops up a brief description or help information.
 Additional Lines of Thumbnail Metadata check boxes and menus: Select the file information to be displayed under each thumbnail. You can display up to three lines of information, and each line can display 1 of 17 types of metadata. Additional Lines of Thumbnail Metadata check boxes and menus: Select the file information to be displayed under each thumbnail. You can display up to three lines of information, and each line can display 1 of 17 types of metadata.
 My Computer check box: When enabled, the My Computer folder appears on the Favorites tab in the Bridge window. My Computer check box: When enabled, the My Computer folder appears on the Favorites tab in the Bridge window.
 Version Cue check box: When enabled, a Version Cue icon appears on the Favorites tab in the Bridge window. Version Cue check box: When enabled, a Version Cue icon appears on the Favorites tab in the Bridge window.
 Desktop check box: When enabled, the Desktop folder appears on the Favorites tab in the Bridge window. Desktop check box: When enabled, the Desktop folder appears on the Favorites tab in the Bridge window.
 My Pictures check box: When enabled, the My Pictures folder appears on the Favorites tab in the Bridge window. My Pictures check box: When enabled, the My Pictures folder appears on the Favorites tab in the Bridge window.
 Adobe Stock Photos check box: When enabled, an icon for Adobe Stock Photos appears on the Favorites tab in the Bridge window. Adobe Stock Photos check box: When enabled, an icon for Adobe Stock Photos appears on the Favorites tab in the Bridge window.
 Collections check box: When enabled, a Collections icon appears on the Favorites tab in the Bridge window. Collections check box: When enabled, a Collections icon appears on the Favorites tab in the Bridge window.
 My Documents check box: When enabled, the My Documents folder appears on the Favorites tab in the Bridge window. My Documents check box: When enabled, the My Documents folder appears on the Favorites tab in the Bridge window.
 Reveal Scripts in Explorer/Finder: Opens the folder that contains the scripts Bridge uses. Reveal Scripts in Explorer/Finder: Opens the folder that contains the scripts Bridge uses.
 Reset All Warning Dialogs: Resets all warning dialog boxes back to their original installation defaults. Reset All Warning Dialogs: Resets all warning dialog boxes back to their original installation defaults.
Metadata Select Edit, Preferences to open the Bridge Preferences window (in Mac OS X, select Bridge, Preferences). Then select Metadata from the list on the left. This page controls which metadata sections and fields are displayed in the Metadata panel in the Bridge window. In the Metadata list in the Preferences window, you can expand or collapse the main categories by clicking the arrow to the left of the main category headings. If you enable the check box next to a main category heading, all the options in that category are automatically enabled, but you can enable and disable individual fields. 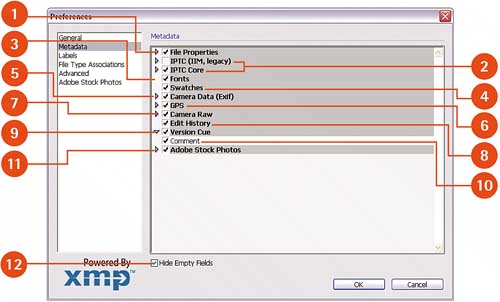 - File Properties check boxes: These options describe the actual file, such as the date it was created, its size, and so on.
- IPTC check boxes: These options provide editable text fields where information such as the photographer's name, the copyright date, where the image was taken, and any assigned keywords can be stored. IPTC Core is the current standard; IPTC IIM has been replaced by IPTC Core but is included for older files.
- Fonts check boxes: Lists fonts used in InDesign files.
- Swatches check boxes: Lists swatches used in InDesign files.
- Camera Data (Exif) check boxes: These options show information recorded by the digital camera, including exposure information, camera model, lens used, and so on.
- GPS check boxes: These options display navigational information recorded by cameras with global positioning systems.
- Camera Raw check boxes: These options display the Camera Raw adjustment settings.
- Edit History check boxes: This option displays the edit history if the History Log option is enabled in Photoshop preferences and set to Metadata.
- Version Cue check boxes: These options lists information from Version Cue.
- Comment check box: If enabled, this option allows you to enter a text comment about the image.
- Adobe Stock Photos check boxes: These options list the data embedded in stock photos purchased from Adobe.
- Hide Empty Fields check box: If enabled, fields with no data don't display in the Metadata panel.
Labels Select Edit, Preferences to open the Bridge Preferences window (in Mac OS X, select Bridge, Preferences). Then select Labels from the list on the left. This page controls label naming and shortcuts. 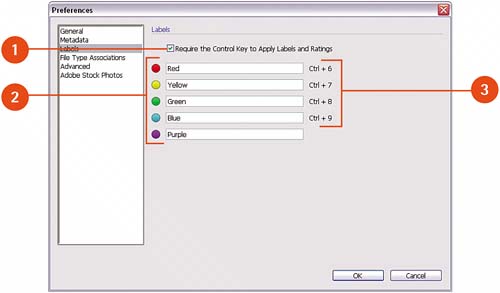 - Require the Control Key to Apply Labels and Ratings check box: Adds the Control key to the shortcuts used to apply labels and ratings to files.
- Color Name: Five label colors are available (Red, Yellow, Green, Blue, and Purple), but each label can have any name you like. Just click in the field next to the color dot and type your new label name.
- Shortcut combination: Displays the keystroke combination used to assign the adjacent label. You cannot change the information here; your only option is whether to use the Ctrl key in combination with the assigned shortcut key by using the Require the Control Key to Apply Labels and Ratings check box. The purple label has no shortcut key available.
File Type Associations Select Edit, Preferences to open the Bridge Preferences window (in Mac OS X, select Bridge, Preferences). Then select File Type Associations from the list on the left. This page controls which application Bridge will use to open different file types, overriding any operating system associations.  - File Type: Displays the name of the file type, along with its associated two-, three-, or four-letter extension.
- Associated Program: Displays the application Bridge will use to open a specific file type, or it displays None if no association is set. To add or change an association, click the program name (or the word None) to access the Browse tab, from which you can navigate to the desired application using your operating system's file browser.
- Hide Undefined File Associations check box: Hides all file types with no associated application.
- Reset to Default Associations button: Restores file type associations to their installation default settings.
Advanced Controls Select Edit, Preferences to open the Preferences window (in Mac OS X, select Bridge, Preferences). Then select Advanced from the list on the left. This page controls Bridge performance. 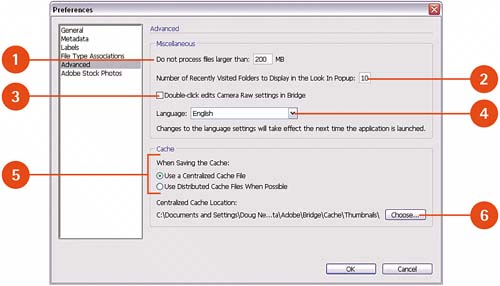 - Do Not Process Files Larger than X MB Field: Creating thumbnails for large files can take some time, so you can set the maximum file size for which Bridge will display a thumbnail.
- Number of Recently Visited Folders to Display in the Look in Popup field: The Find dialog box has a Look in pop-up menu that lists recently visited folders. This option sets the number of most recently visited folders to display in that pop-up menu.
- Double-click Edits Camera Raw Settings in Bridge check box: If enabled, double-clicking a Raw file thumbnail opens the file directly in Camera Raw. If disabled, Photoshop launches and then the file opens in Camera Raw.
- Language menu: Sets the language used for the Bridge interface. The options available here depend on the language of the Creative Suite applications installed.
- When Saving the Cache options: Set to Use a Centralized Cache File to save thumbnails in a single large database. Set to Use Distributed Cache Files when Possible to store thumbnails in a small database in the same folder as the images.
- Centralized Cache Location and Choose button: If a centralized cache is used, you can change the location for the cache by clicking the Choose button.
Adobe Stock Photos Select Edit, Preferences to open the Preferences window (in Mac OS X, select Bridge, Preferences). Then select Adobe Stock Photos from the list on the left. This page controls all the options for Adobe Stock Photos. 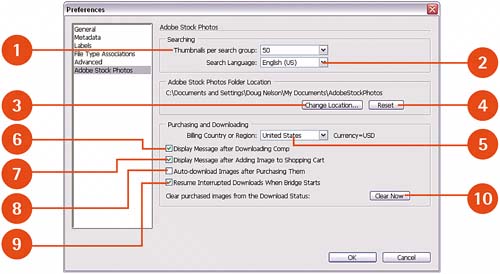 - Thumbnails per Search Group menu: Searches can have thousands of matches. This option limits the number of thumbnails displayed per results page.
- Search Language menu: This option sets the language to search in, without changing the Bridge interface language.
- Change Location button: Click to select a new location for the Adobe Stock Photos folder.
- Reset button: Click to restore the Adobe Stock Photos folder to its default location (the My Documents folder for Windows users, in the <user login>, Documents folder for Mac users).
- Billing Country or Region menu: Select the default country or region from which you'll be paying for photos. The currency Adobe accepts from that country displays next to the country name.
- Display Message After Downloading Comp check box: If enabled, it sends an alert message whenever your comp is finished downloading.
- Display Message After Adding Image to Shopping Cart check box: If enabled, it sends an alert message whenever you add an image to your shopping cart.
- Auto-download Images After Purchasing Them check box: If enabled, it automatically saves photos to the default folder after purchase.
- Resume Interrupted Downloads when Bridge Starts check box: If enabled, it automatically resumes an interrupted download (for example, after a lost connection) the next time Bridge is launched.
- Clear Now button: Clears purchased images from the Download Status display.
|