Inserting Clip Art

The most easily accessible art you have comes with PowerPoint in the form of clip art images. These are images created by an artist in such a way that they can be enlarged, shrunk, or even distorted. Further, they're often combinations of images that can be separated. You can also modify them by changing colors or adding drawings of your own.

To insert a clip art image, follow these steps:

  1. graphics/ipc.gif Choose Insert, Picture, Clip Art. Or click the Insert Clip Art button on the Drawing toolbar. PowerPoint displays the Clip Art task pane. For now, don't worry about looking for anything specific. You'll do that later.

  2. Click the Go button in the task pane. PowerPoint uses the Results area to display all the clips found in the specified search (see Figure 6.2). If you don't specify anything to search for, PowerPoint finds only a relatively small number of standard clip art and other media images.

  3. Scroll through the results until you find an image you'd like to insert and click the image to place it on the slide.

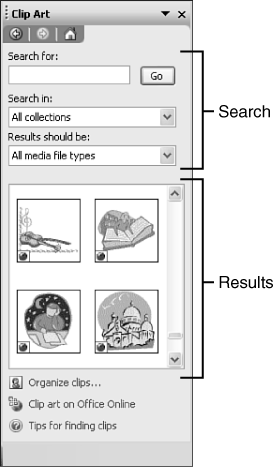
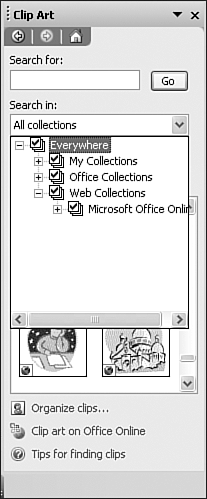
Figure 6.2. The Clip Art search functions help you find the images you need.

graphics/06fig02.gif

Finding Images by Using the Clip Organizer

Inserting an image from the Clip Art task pane is easy. Finding exactly the right image can be more difficult, but PowerPoint makes it easy to search for and find clip art images.

Let's poke around a bit to see how the Clip Art task pane works. First, click the Search In drop-down list box to see which collections are active and to select or deselect collections (see Figure 6.3).

Figure 6.3. You can limit a search to specific collections or add collections, such as the clip art collection found at the Microsoft Web site.

graphics/06fig03.gif

Collections are organized hierarchically, with main groups of folders and several subfolders. As you search a hierarchy, you'll find the following:

  • A plus sign to the left of a folder means there are subfolders that you don't see. Click the plus to expand the selection.

  • A minus sign to the left of a folder means it's already expanded. Click the minus to collapse the folder and hide the subfolders.

  • A check mark in a single check box beside a collection means that the collection is selected but some of its subfolders are not.

  • A check mark in a stack of check boxes means that the collection and all its subfolders are selected.

Practice selecting and deselecting various collections and folders. When you're ready to select a specific collection, you'll find these options:

  • My Collections This group includes all folders on your local hard drive that contain usable clip art images. Unfortunately, most of the images aren't really usable, but Windows thinks they are. The only real usable images are in locations that you've used to store photos or downloaded images. You probably want to deselect locations such as Windows or other system folders.

  • Office Collections This group contains the images that come with Office 2003. This group also contains quite an array of specialized categories, such as Animals, Emotions, and Leisure. You'll soon find, however, that most of the categories are empty promises, containing only one or two images.

  • Web Collections Initially, at least, the only collection in this group is Microsoft's Clip Art on Office Online. The good news is that this collection is extensive, and the many subfolders contain dozens of very useful images. The bad news is that you have to be online through a modem or network to see or access these images. The rest of the good news is that you don't have to memorize a Web address because PowerPoint automatically goes to the location where these images are found.

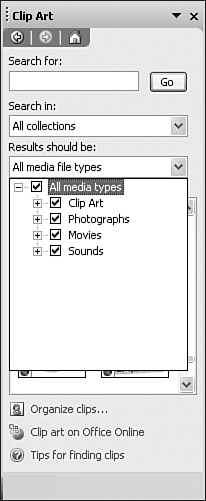
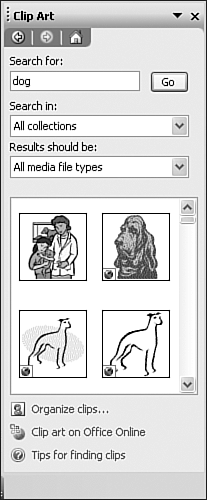
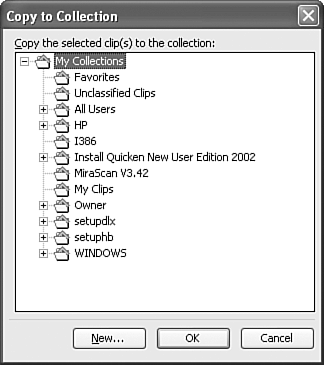
After you select the collections you want to use, click the Results Should Be drop-down list box to select the media types you want to search for (see Figure 6.4).

Figure 6.4. Besides clip art, you can search for all sorts of media, including photographs, movies, and sounds.

graphics/06fig04.gif

You can also browse and select specific media formats. Unless you're an expert, most of these different media formats won't mean much to you. Nor does it really matter. Just select the broad categories you want, such as Clip Art or Photographs. At this point, let's not complicate things with the categories Movies and Sounds.

The final step is to search the selected collections. If you click the Go button, PowerPoint finds and displays all the images in the selected collections.

However, you can further narrow your search by typing one or more keywords, such as dog. Then when you click the Go button, PowerPoint finds only images that include "dog" or "dogs" in their keywords, and it displays the results in the Results area. If you search only the local Office collections, you'll find only one such image, but if you include the Clip Art on Office Online collection, you'll find dozens of dogs, of all breeds and colors, and in both cartoon and realistic renditions (see Figure 6.5, which also shows an expanded Results area). The small globe at the lower-left corner of an image means that it's a Web-based image.

Figure 6.5. Local searches may result in few matches; if you go to the Internet (Web Collections), you're more likely to find what you're looking for.

graphics/06fig05.gif

You can expand the Results area, as shown in Figure 6.5, by clicking the Expand Results button at the upper left of the Results area. This enables you to see more images at once.

Using Images from the Clip Organizer

After you find the image you want, you can insert it into a slide by clicking it. However, with an image you think you'd like to use a lot or find more quickly, you can copy the image to a specific collection, such as a folder on your computer's hard drive. Even better, if it's an online image, you can download it to a local collection. To move an image to an easy-to-find collection, follow these steps:

  1. In the Results area, move the mouse pointer to the right side of the image and click the drop-down menu.

  2. If the image is already in your local Clip Art collection, choose Copy to Collection. If the image is online, the menu changes. Choose Make Available Offline. PowerPoint displays the Copy to Collection dialog box (see Figure 6.6).

    Figure 6.6. You can copy images from the Web Collection to your hard drive so you have local access to the images.

    graphics/06fig06.gif

  3. At the top of the My Collections folder are Favorites and Unclassified Clips. You can click either of these because the image actually goes to the same real location. You can also click New to create a new folder.

  4. Click OK to copy the image to the specified collection folder.

You now can insert these images in two different ways:

  • From the Clip Organizer When you insert clip art from the task pane, you can search for and select images from your My Collections folders.

  • From file When you choose Insert, Picture, From File, PowerPoint displays the Insert Picture dialog box and by default shows the images and folders of images stored in My Pictures.

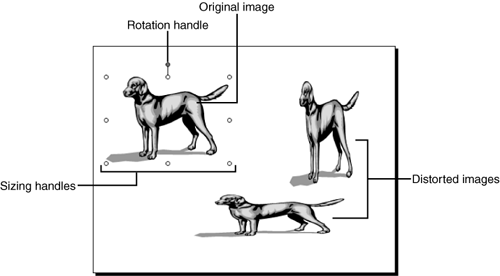
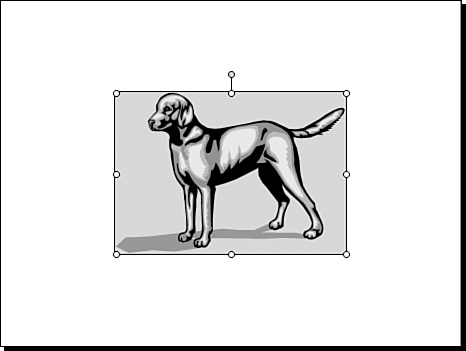
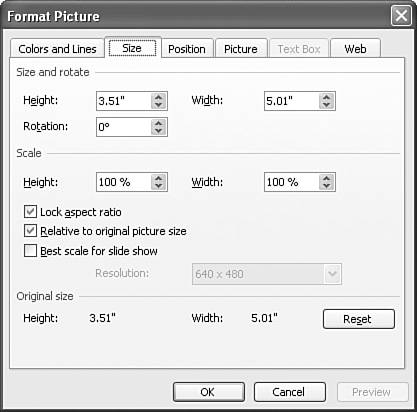
Does all this sound a little confusing? Don't worry. Just remember that you can quickly get to your personalized collection by choosing Insert, Picture, From File.

Modifying Clip Art

You've just learned the most difficult part about using clip art images. Now comes the fun part: changing clip art images so they work for you exactly the way you need them to.

Moving and Sizing Graphic Objects

The most common changes you make to an image are to its size and location. To change the size of an image, first click the image to display the sizing and rotation handles (see Figure 6.7). Then size the image by using these options:

Figure 6.7. Distorting an image can give you many variations from a single clip art image.

graphics/06fig07.gif

  • Click and drag any corner sizing handle to enlarge or reduce the image proportionally.

  • Click and drag a side sizing handle to distort the image horizontally.

  • Click and drag a top or bottom sizing handle to distort the image vertically.

You can come up with some pretty interesting variations such as small, short, and skinny dogs, or large, tall, and fat ones, all from the same image (refer to Figure 6.7).

To move an image, simply position the mouse pointer over the image and when the pointer turns to a four-way arrow, click and drag the image to the desired location. You might need to make several attempts before you get the image in just the right location and at the right size.

Using Snap to Grid

PowerPoint's Snap to Grid feature sometimes helps and sometimes gets in the way of positioning an image exactly where you want it. By default, the screen is invisibly divided into 1/12-inch segments. Thanks to the Snap to Grid feature, when you drop an image, it automatically jumps to the closest grid marker. This can be helpful when you're trying to align several objects at the same horizontal or vertical location. But if you need to nudge an image somewhere between the grids you have two options:

  • Turn off the Snap to Grid feature by choosing View, Grid and Guides and from the dialog box that appears, deselect Snap Object to Grid.

  • Temporarily override the Snap to Grid feature by holding down the Ctrl key and using the arrow keys to move the selected image right, left, up, or down in very tiny increments.

Don't forget that although you normally, and more easily, move images by using the mouse, you can use the keyboard, too.

Rotating an Image

Sometimes the orientation of an image isn't quite right. For example, the dog might be facing the wrong way or might need to be heading up hill.

To rotate an image, click it once to display the sizing and rotation handles (refer to Figure 6.7). Then, drag the rotation handle right or left as desired.

To turn the image completely around, flip the image by following these steps:

  1. Click the image to select it.

  2. graphics/draw.gif Click the Draw button on the Drawing toolbar. PowerPoint displays a menu of options.

  3. Choose Rotate or Flip, Flip Horizontal. PowerPoint flips the image so it's heading in the opposite direction.

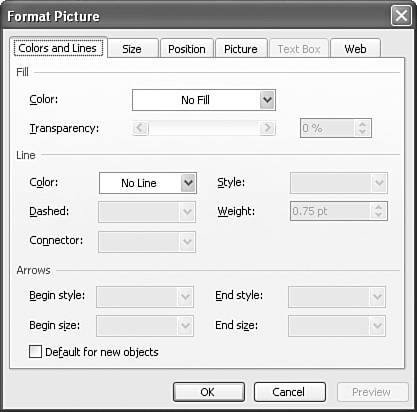
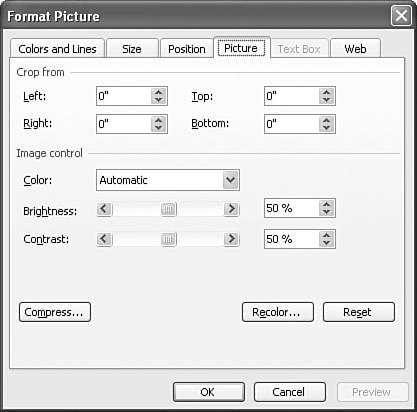
You can also flip an image vertically for example, if you want your dog to lie on its back!

Formatting Graphic Objects

PowerPoint provides literally thousands of clip art images, but sometimes it's hard to find exactly the image you want. For example, you might find the perfect breed of dog, but it's the wrong color.

PowerPoint enables you to format images in a variety of ways, some of which don't really apply here. But let's take a look at a few ways that formatting a picture might be of value to you.

Double-click an image to open the Format Picture dialog box. You can also click the image you want to change and choose Format, Picture or you can right-click the image and choose Format Picture to open the Format Picture dialog box. Although typically the Picture tab displays automatically, let's start with the Colors and Lines tab (see Figure 6.8), which will help us as we talk about other ways of formatting a picture.

Figure 6.8. The Format Picture dialog box is a powerful tool for modifying images and the image boxes that contain them.

graphics/06fig08.jpg

Each image is actually contained inside an invisible box. The Colors and Lines tab enables you to add color or lines to that box. For example, if you add a solid fill color and a line, you essentially frame the image (see Figure 6.9).

Figure 6.9. You can use lines and fills to frame an image.

graphics/06fig09.gif

  • The Size tab (see Figure 6.10) lets you specify the exact size, dimensions, and rotation of an image. You can also choose Lock Aspect Ratio so that changing an image's height, width, or scale automatically changes both height and width proportionally. Nevertheless, with this check box selected, you can still distort an image by dragging a side, top, or bottom sizing handle.

    Figure 6.10. Use the Format Picture dialog box to precisely change an image's size or shape.

    graphics/06fig10.jpg

  • The Position tab enables you to specify the exact location of the image, relative to the top-left corner of the slide or to the center.

  • The Picture tab, which appears first when you are formatting a picture, provides some interesting formatting options (see Figure 6.11). For example, you can use this tab to do the following:

    Figure 6.11. The Picture tab of the Format Picture dialog box lets you crop an image, make it brighter or darker, or even change its colors.

    graphics/06fig11.jpg

  • Crop an image. If you reduce the size of the image's box, you crop or trim the edges of the image. For example, if you crop the bottom by .5" you trim that much off the bottom of the image. This can be useful if there's a part of an image that you really don't want to include in the slide. If you use a negative number, such as 0.5", you actually add that much to the box. This gives you more space between the image and the edge of the box.

  • Change the color of the image to grayscale, black and white, or a washout (faded) effect. Washout is simply a preset of the Brightness and Contrast controls.

  • Click Recolor to display the Recolor Picture dialog box, which enables you to switch certain colors for others (see Figure 6.12). Simply click the color you want to change and then from the New drop-down menus, select the new color. Note that you might have to scroll through a lengthy list of colors to find the one you want to change.

    Figure 6.12. If you don't like the color of a clip art image, just change it!

    graphics/06fig12.gif

  • Use the Reset button to change cropping and image control settings back to the original, but leave recolor changes alone. You can change those back by going to the Recolor Picture dialog box and unchecking the color changes.

Spend some time playing with the picture formatting options. Many of these options are used with other graphic objects as well.

Tip

graphics/tman.gif

When fiddling with colors or other image changes, if you have the opportunity to preview the changes, take it! It's easier to change your mind before exiting a dialog box than it is to fix the changes later.

If the dialog box covers the image you're trying to preview, just click the title bar on the dialog box and drag it to the side.

And don't forget Undo if you make a mistake or want to try something again!


Combining Clip Art and Other Objects

The more objects you add to a screen, the more you have to consider how they relate to each other in terms of size, location, rotation, and so on. Fortunately, PowerPoint enables you to fine-tune these relationships, helping you create a virtual work of art.

Changing the Visual Order of Objects

Each time you add an object to a slide, it's as if you're laying the object on a table. The first object is on the bottom, and the last object is on top. In PowerPoint, objects are said to be to the back (first) or to the front (last). Fortunately, PowerPoint enables you to change the order of your objects.

Suppose you add an image of a cat and then add an image of a dog. Because of the order in which you add them, the dog appears in front of the cat. Because the cat is small, you want it to appear in front of the dog. To change the order of an object, follow these steps:

  1. Select the image you want to change (for example, the cat).

  2. graphics/draw.gif Click the Draw button on the Drawing toolbar and choose Order. You can also right-click the object and choose Order.

  3. Choose the direction you want the object to move: Bring to Front (all the way to the front or to the top of the pile), Send to Back (all the way to the back), or Bring Forward or Send Backward (just one layer forward or backward).

You can repeat these steps with other objects until you have just the right order (see Figure 6.13). Don't forget that you can change the order of any object: image, text box, placeholder, graph, and so on.

Figure 6.13. You can adjust the order of onscreen images to create a three-dimensional look.

graphics/06fig13.gif

Grouping and Ungrouping Objects

After you painstakingly position two or three objects, you might find that as a group, they're out of alignment with the slide's text or with some other critical part of the slide. To move the group of objects all at the same time, you have two options: select them all and move them or group them to make them one object.

To select multiple objects to move (or to copy or delete), follow these steps:

  1. Click the first object to select it. Sizing handles appear to let you know what you've selected.

  2. Hold down the Ctrl key (or the Shift key) and click the second object. Sizing handles now appear on both objects.

  3. Continue with the Ctrl key (or the Shift key) pressed and click other objects. If you accidentally select a wrong object, click it again to deselect it.

  4. Release the Ctrl (or Shift) key.

You can now drag the group of objects to a new location, or otherwise manipulate them the same way you do with just one object.

graphics/draw.gif To keep the group of objects together so you don't have to reselect them each time, follow the steps above to select the objects and then click the Draw button on the Drawing toolbar and choose Group. You can also right-click the group and choose Grouping, Group. PowerPoint then displays only one set of sizing and rotation handles for the entire group.

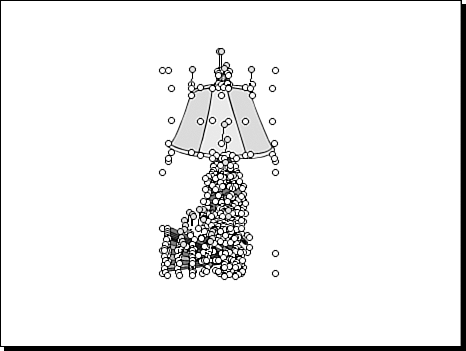
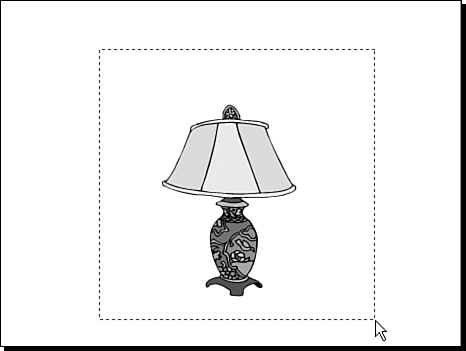
If you want to move or delete a single part of a combined group of objects, you have to ungroup them first. Simply right-click the group and choose Grouping, Ungroup. You can also choose the Ungroup option from the Draw button on the Drawing toolbar.

You probably didn't realize this, but nearly all clip art images consist of groups of drawing images. You can ungroup such images and remove or change parts you don't like. The process is a bit more complex than what I just described, but not terribly so. For example, say you've found the perfect lamp to illustrate your point, but you don't want the fan that comes with it. Just follow these steps to ungroup and modify a clip art image:

  1. Insert the image into a slide.

  2. Select the image.

  3. graphics/draw.gif Click the Draw button on the Drawing toolbar and choose Ungroup. PowerPoint gives you a warning that this is an imported picture, not a group, and asks if you want to convert it to a drawing object.

  4. Click Yes and then choose Draw, Ungroup again. PowerPoint displays a gazillion objects, each with its own set of sizing handles (see Figure 6.14).

    Figure 6.14. Clip art images usually consist of many individual drawing objects that have been grouped together.

    graphics/06fig14.gif

  5. Click each object you want to remove and press Delete (for example, the objects that comprise the fan), until only the image you want remains.

The problem now is that you have half a gazillion objects, and trying to select each to move or size it would be nearly impossible. But here's an easy way to select them all:

  1. Imagine the entire image as if it were sitting in a frame. Click at one corner of the imaginary frame and drag to the opposite corner (see Figure 6.15). Note that you must include all of an object in the frame you drag, or it is not included in the selection.

    Figure 6.15. Click and drag a box around a group of objects to select them all at once.

    graphics/06fig15.gif

  2. Release the mouse button, and sizing handles appear on all the components of the image.

  3. Click the Draw button on the Drawing toolbar, and choose Group. Voilá. You now have just the image you want, and you can move, size, rotate, or format it to your heart's content.


Absolute Beginner's Guide to Microsoft Office PowerPoint 2003
Absolute Beginners Guide to Microsoft Office PowerPoint 2003
ISBN: 0789729695
EAN: 2147483647
Year: 2003
Pages: 154
Authors: Read Gilgen

flylib.com © 2008-2017.
If you may any questions please contact us: flylib@qtcs.net