| Have you ever attended a PowerPoint presentation where, as you enter, you're handed a thick sheaf of pages that contain every slide that will be in the presentation? Often, you sit down, thumb through the slides, and wonder why you bothered to come. Then, to make matters worse, the presenter gets up and reads through the bullets for you. I'd like to say I'm exaggerating, but unfortunately, this scenario is all too common. There has to be a better reason for printing than to give everyone copies of all your slides. Indeed, there are a number of good reasons to print slides. Consider these possibilities: You have 3 slides out of 20 that contain critical information. One is a data chart, another is a table, and the last is a summary list of action items. You make printed copies of only these slides for your audience members to take with them. You've used PowerPoint to create an announcement or a flyer. You print a copy for duplication. You print a draft copy of your entire slide show to proof as you ride the train to work. Because you're not able to make changes to the slides in PowerPoint, you make notes and mark changes on the printouts. This helps you keep perspective. Later, you apply your changes. You print your title slide in color and post a copy at each entrance so attendees know they're in the right session. You've created an artistic rendering for a printed t-shirt, and you print the slide in reverse onto special iron-on paper. You add notes or mark up slides during your presentation, and now you want a printed record of those notes.
You can probably come up with more ideas. The point is, however, that wasting paper by printing full pages of slides as handouts isn't a good reason for printing. In fact, there are also better ways to create handouts than by simply printing slides. Assuming that you've found a really good reason for printing a slide or slides, you follow these steps: Choose File, Print or press Ctrl+P. PowerPoint displays the Print dialog box (see Figure 17.1). Make sure the proper printer is selected. Change printers if necessary from the Name drop-down list box. Select which slides you want to print: All, Current Slide, or Slides (to print specific slides; see the sample page ranges given in Figure 17.1). Figure 17.1. The Print dialog box is the starting point for printing slides in PowerPoint. 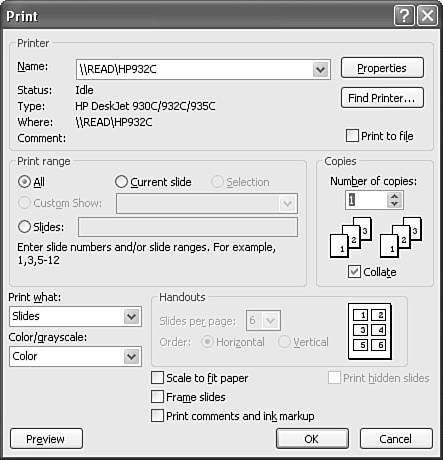 Set the number of copies, and choose how you want multiple copies stacked. By default, PowerPoint prints all the slides in the slide show in their natural color if you have a color printer or in grayscale (shades of gray) if you don't. You can force color slides to print in grayscale or pure black and white by choosing from the Color/ Grayscale drop-down list box. Click OK to print your selection.
The preceding steps are the basics, designed to get a slide or slides printed quickly. However, you have several options that also might come in handy: Perhaps the most useful option is Print Preview, which enables you to see the results before you waste time and money printing on paper. This also lets you try out various print options ahead of time. For example, if you change the paper size, you might need to see how the slide prints on that particular size. Some changes, however, such as mirrored printing, do not display in Print Preview. If you're printing a proofing copy, you can save ink and time by changing your printer's properties to print in draft mode. Click the Properties button, and PowerPoint displays a dialog box that matches the capabilities of your particular printer (see Figure 17.2, which shows options for a color inkjet printer). For example, if you want to print in photographic quality, you could choose Photo Paper and change the quality to Best. Or perhaps you don't want to waste color ink for this draft copy. You could choose to print in black and white. Advanced options, if available, might include the ability to mirror the image (for example, to print it backward on iron-on transfer paper). Figure 17.2. This Properties dialog box enables you to take advantage of your printer's unique capabilities.  You can scale the slide to fit the size paper you've chosen as best it can. You can add a frame a thin black border around a slide's content (see Figure 17.3), by choosing Frame Slides. Especially with overhead transparencies, this can add a touch of professionalism. You can print slides along with markups or annotations you made while making the presentation by choosing Print Comments and Ink Markup. For example, you could make annotations while practicing the show and then print those out and solicit comments from colleagues. You could then make corrections or changes before making the final presentation (see Figure 17.4).
 For information on making annotations or comments on slides while playing a slide show, see p. 258. For information on making annotations or comments on slides while playing a slide show, see p. 258.
Note  | You cannot print all the way to the edge of the paper, regardless of its size. Printers have certain margin limits built into them that force you to leave at least a small margin. |
Tip  | A handy way to keep track of minutes, discussion, or action items is to make annotations on a slide show. When you stop playing the slide show, tell PowerPoint to keep the annotations. Then print the slides that have annotations as a permanent record or reference. |
Figure 17.3. Frames help printed slides stand out.  Figure 17.4. Markups and annotations you make while playing a slide show can be saved and printed.  |