Office Automation Executables
| This section considers each of these three patterns of Office solutions in more detail. Office solutions that use the automation-executable pattern start an Office application in a very straightforward manner: by creating a new instance of the Application object associated with the Office application. Because the automation executable controls the Office application, the automation executable runs code at startup and any time thereafter when executing control returns to the automation executable. When an automation executable uses New to create an Application object, the automation executable controls the lifetime of the application by holding the created Application object in a variable. The Office application determines whether it can shut down by determining the reference count or number of clients that are using its Application object. In Listing 2.1, as soon as New is used to create the myExcelApp variable, Excel starts and adds one to its count of clients that it knows are holding a reference to Excel's Application object. When the myExcelApp variable goes out of scope (when Main exits), .NET garbage collection releases the object, and Excel is notified that the console application no longer needs Excel's Application object. This causes Excel's count of clients holding a reference to Excel's Application object to go to zero, and Excel exits because no clients are using Excel anymore. When you create an Office application by creating a new instance of the Application object, the application starts up without showing its window, which proves useful because you can automate the application without distracting the user by popping up windows. If you need to show the application window, you can set the Visible property of the Application object to TRue. If you make the main window visible, the user controls the lifetime of the application. In Excel, the application will not exit until the user quits the application and your variable holding the Excel Application object is garbage-collected. Word behaves differently; the application exits when the user quits the application even if a variable is still holding an instance of the Word Application object. Listing 2.1 sets the status bar of Excel to say "Hello World" and opens a new blank workbook in Excel by calling the Add method of Excel's Workbooks collection. Chapters 3 through 5"Programming Excel," "Working with Excel Events", and "Working with Excel Objects", respectivelycover the Excel object model in more detail. Listing 2.1. Automation of Excel via a Console Application
Listing 2.1 also illustrates how an automation executable can yield time back to the Office application. A reference to the System.Windows.Forms assembly must be added to the project. After event handlers are connected, System.Windows.Forms.Application.DoEvents() is called in a loop to allow the Excel application to run normally. If the user double-clicks a cell, Office yields time back to the event handler in the automation executable. In the handler for the Double-Click event, the static variable exitXL is set to TRue, which will cause the loop calling DoEvents to exit and the automation executable to exit. You can see the lifetime management of Excel in action by running the automation executable in Listing 2.1 and exiting Excel without double-clicking a cell. Excel will continue to run in a hidden state, waiting for the console application to release its reference to Excel's Application object. Creating a Console Application That Automates WordThis section walks you through the creation of a simple console application that automates Word to create a table specified in wiki text format. A wiki is a kind of online encyclopedia that users can contribute to. For an example, see www.officewiki.net for a wiki that documents the Office primary interop assemblies (PIAs). Wikis use simple, easy-to-edit text files that any visitor to the wiki can edit without having to know HTML. These text files have simple representations of even complex elements such as tables. Our console application will read a simple text file that specifies a table in wiki text format. Then it will automate Word to create a Word table that matches the text file specification. In the wiki text format, a table that looks like Table 2.1 is specified by the text in Listing 2.2.
Listing 2.2. A Wiki Text Representation of Table 2.1
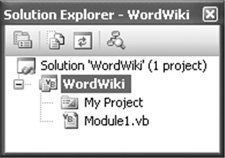
We will use Visual Studio 2005 to create a console application. After launching Visual Studio, choose New Project from the File menu. The New Project dialog box shows a variety of project types. Choose the Visual Basic node from the list of project types, and choose the Windows node under the Visual Basic node. This is slightly counterintuitive because an Office node is available, too, but the Office node shows only VSTO code behind document projects and the VSTO Outlook add-in project. After you choose the Windows node, you will see in the window to the right the available templates. Choose the Console Application template. Name your project and then click the OK button to create your project. In Figure 2.1, we have created a console application called WordWiki. Note that the New Project dialog box can have a different appearance from the one shown in Figure 2.1, depending on the profile you are using. In this book, we assume that you are using the Visual Basic Development Settings profile. You can change your profile by choosing Import and Export Settings from the Tools menu. Figure 2.1. Creating a console application from the New Project dialog box.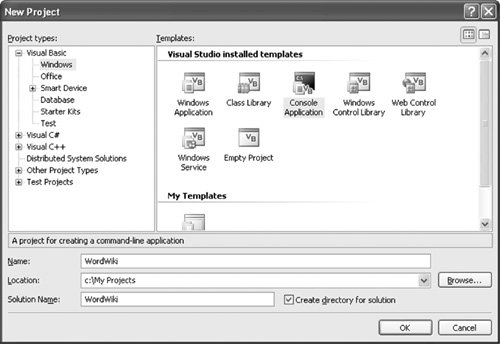 When you click the OK button, Visual Studio creates a console application project for you. Visual Studio displays the contents of the project in the Solution Explorer window, as shown in Figure 2.2. Figure 2.2. The console application project WordWiki shown in Solution Explorer. By default, a newly created console application references the assemblies System, System.Data, and System.Xml. We also need to add a reference to the Word 2003 PIA. We do this by right-clicking the project node in Solution Explorer and choosing Add Reference from the pop-up menu that appears. This shows the Add Reference dialog box in Figure 2.3. Click the COM tab; choose the Microsoft Word 11.0 Object Library to add a reference to the Word 2003 PIA; and then click the OK button. Figure 2.3. Adding a reference to the Microsoft Word 2003 PIA. Visual Studio adds the reference to the Word 2003 PIA (Microsoft.Office.Interop.Word.dll) and adds additional references to the Visual Basic for Applications Extensibility PIA (Microsoft.Vbe.Interop.dll) and the Office 11.0 Object Library PIA (office.dll), as shown in Figure 2.4. These additional PIAs are ones that the Word PIA depends on. Microsoft.Vbe.Interop.dll is the PIA for the object model associated with the VBA editor integrated into Office. Office.dll is the PIA for common functionality shared by all the Office applications, such as the object model for the toolbars and menus. Figure 2.4. When you add the Word 2003 PIA, dependent PIA references are automatically added to the project.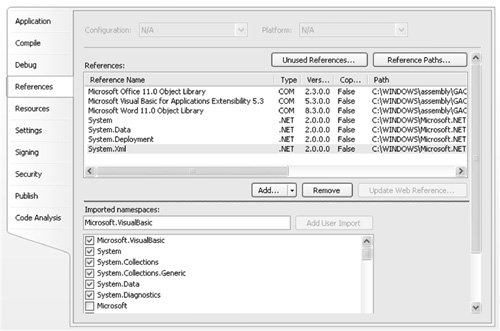 Now that the proper references have been added to the console application, let's start writing code. Double-click Module1.vb in the Solution Explorer window to edit the main source-code file for the console application. Add the following three Imports directives so that you can more easily use types from the Word PIA and the Office 11.0 Object Library PIA, as well as classes in the System.IO namespace. The Office 11.0 Object Library PIA has its types in the Microsoft.Office.Core namespace. The Word PIA has its types in the Microsoft.Office.Interop.Word namespace. Imports Office = Microsoft.Office.Core Imports Word = Microsoft.Office.Interop.Word Imports System.IO We alias some of these namespaces so we do not have to type the entire namespace, such as Microsoft.Office.Interop.Word, every time we want to declare a Word object. With the alias in place, we can type just Word to specify the namespace. We keep an alias namespace in place for Word and Office instead of typing Imports Microsoft.Office.Interop.Word and importing all the types into global scope. This is because Word and Office define hundreds of types, and we do not want all these type names potentially colliding with types we define in our code or with other referenced types. Also, for the purposes of this book, the code is clearer when it says Word.Application rather than Application, so you know what namespace the Application type is coming from. We are ready to write some code that automates Word to create a table after reading a text input file in the wiki table format. Listing 2.3 (on page 58) shows the entire listing of our program. Rather than explain every line of code in that listing, we focus on the lines of code that automate Word. We assume that the reader has some knowledge of how to read a text file in .NET and parse a string via the Split method. We briefly touch on some objects in the Word object model here, but Chapters 6 through 8"Programming Word," "Working with Word Events," and "Working with Word Objects," respectivelycover the Word object model in much more detail. The first thing we do in Listing 2.3 is declare a new instance of the Word application object by adding this line of code to the Main method of our program class: Dim theApplication As New Word.Application Although Word.Application is an interface, we are allowed to create a new instance of this interface because the compiler knows that the Word.Application interface is associated with a COM object that it knows how to start. When Word starts in response to an automation executable creating a new instance of its Application object, it starts without showing any windows. You can automate Word in this invisible state when you want to automate Word without confusing the user by bringing up the Word window. For this example, we want to make Word show its main window, and we do so by adding this line of code: theApplication.Visible = True Next, we want to create a new, empty Word document into which we will generate our table. We do this by calling the Add method on the Documents collection returned by Word's Application object. The Add method takes four optional parameters that we want to omit. The code calls the Add method and omits all four optional parameters: Dim theDocument As Word.Document = theApplication.Documents.Add() With a document created, we want to read the input text file specified by the command-line argument passed to our console application. We want to parse that text file to calculate the number of columns and rows. When we know the number of columns and rows, we use the following line of code to get a Range object from the Document object. When we omit the optional parameters, the Range method will return a range that includes the entire text of the document. Dim range As Word.Range = theDocument.Range() Then we use our Range object to add a table by calling the Add method of the Tables collection returned by the Range object. We pass the Range object again as the first parameter to the Add method to specify that we want to replace the entire contents of the document with the table. We also specify the number of rows and columns we want: Dim table As Word.Table = range.Tables.Add(range, _ | rowCount, columnCount) The Table object has a Cell method that takes a row and column, and returns a Cell object. The Cell object has a Range property that returns a Range object for the cell in question that we can use to set the text and formatting of the cell. The code that sets the cells for a row of the table is shown here. Note that as in most of the Office object models, the indices are 1-based, meaning that they start with 1 as the minimum value rather than being 0-based and starting with 0 as the minimum value: For columnIndex = 1 To columnCount Dim cell As Word.Cell = table.Cell(rowIndex, columnIndex) cell.Range.Text = splitRow(columnIndex) Next Code to set the formatting of the table as shown below sets the table to size to fit contents and bolds the header row. We use the Row object returned by table.Rows(1), which alsohas a Range property that returns a Range object for the row in question. Also, we encounter code that sets the first row of the table to be bolded. One would expect to be able to write the code table.Rows(1).Range.Bold = True, but Word's object model expects an Integer value (0 for false and 1 for true) rather than a Boolean. The Bold property doesn't return a Boolean because the range of text could be all bold, all not bold, or partially bold. Word uses the enumerated constant WdConstants.WdUndefined to specify the partially bold case. ' Format table table.Rows(1).Range.Bold = 1 table.AutoFitBehavior(Word.WdAutoFitBehavior.wdAutoFitContent) Finally, some code at the end of the program forces Word to quit without saving changes: theApplication.Quit(False); If you do not write this code, Word will stay running even after the console application exits. When you show the Word window by setting the Application object's Visible property to TRue, Word puts the lifetime of the application in the hands of the end user rather than the automating program. So even when the automation executable exits, Word continues running. To force Word to exit, you must call the Quit method on Word's Application object. If this program didn't make the Word window visiblefor example, it created the document with the table and then saved it to a file without showing the Word windowit would not have to call Quit, because Word would exit when the program exited and released all its references to the Word objects. To run the console application in Listing 2.3, you must create a text file that contains the text in Listing 2.2. Then pass the name of the text file as a command-line argument to the console application. You can set up the debugger to do this by right-clicking the WordWiki project in Solution Explorer and choosing Properties. Then click the Debug tab and set the Command Line Arguments field to the name of your text file. Listing 2.3. The Complete WordWiki Implementation
|
EAN: 2147483647
Pages: 221