Be consistent with color correcting digital images
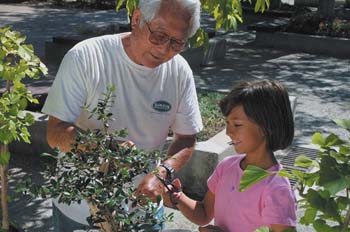
| Have you ever tried to color correct an image and found it to be a frustrating experience? Did you spend hours tweaking the greens in your image only to darken the overall image and lose that verdant color? How many times have you decided to start over halfway through the color-correction process because you can't get the shadows just right? If these are the very reasons you bought this book, then don't worrywe're going to demystify the image-editing process. When editing your digital images, a consistent workflow can make color correction easier and more predictable. Each adjustment you make to an image has ramifications later down the editing trail, so following a reliable editing process can make a huge difference in the final quality of your image and make color correction less of a chore. Perfect balanceThink of it as a checklist; as you complete one type of adjustment, simply move on down the list until you make all of your changes. Since image adjustment is a subjective endeavor, we won't give specific values and settings for modifying your image, but instead we'll provide you with a framework for making your images look their best. We'll break it into four stagesevaluation, tonal range, color balance, and final touches. By understanding how these stages play off one another, you can simplify the color-correction process and get better results. The Zen of image editingThe important thing to remember is that everyone sees things differently. Every digital camera takes a slightly different picture. Every monitor shows the image a little bit differently. These disparities could drive a digital photographer crazy, but remember that image editing is largely a subjective endeavor. What we're going to present is a loose workflow for making the color-correction process easier, not a strict formula that has to be followed to the letter. Once you understand the basics, you can tailor the process to match your own editing style and let your eyes lead you. Step 1: Evaluate your imageThe first step is to take a good look at your image and evaluate its quality. Does it have a good color balance? How is the contrast between the highlights and the shadows? Do the colors look flat or are they oversaturated? Give your image the once-over and get a good idea of what attributes you need to adjust. Take a lookFor example, examine the image in Figure A. One look tells you that this image is a bit too dark, but it has good overall color balance and edge sharpness. There's plenty of detail, but the colors could be slightly more saturated and you could darken the shadows to increase the contrast in the image. How did we decide that? Unfortunately, there's no magic formula. We just take a good look at the image and decide what we want to change. You may think it looks fine or may find other attributes you want to change. Figure A.
Observe the tonal rangeIf you want a slightly more objective opinion, it's a good idea to check out your image's histogram before making any adjustments, which you can view by selecting Image Figure B.
So, what if your image has an unsightly histogram? Perhaps it looks as flat as the Great Plains or leans heavily to the highlight or the shadow side of the graph. This doesn't mean that you can't work with this image, but it might be harder to do. By checking the histogram, you can be ready for any challenges before you begin the process. Step 2: Adjust the tonal rangeAs mentioned earlier, the tonal range represents the highlight, midtones, and shadow details in your image. It's important to adjust tonal range first as you'll be changing the brightness of the pixels as well as the difference between areas of light and dark. By making tonal adjustments first, you eliminate the risk of skewing your color balance later by making the image brighter or increasing/decreasing the contrast. Are you on the level?You can make the most accurate tonal range adjustments in the Levels dialog box because it allows you to adjust either the composite RGB channel or any of the channels individually. There are also a variety of tools for editing, such as the sliders and the Eyedropper tools that can make precise corrections. But the big benefit of the Levels dialog box is the ability to use the histogram as a visual guide as you edit. Brightness and contrastYou can also use the Brightness/Contrast dialog box (Image Figure C.
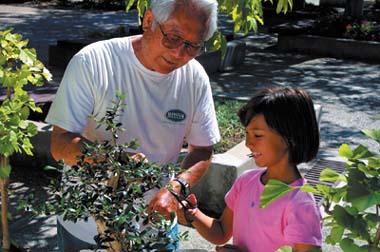
Step 3: Adjust the color balanceNow that we've adjusted our tonal range, we can make changes to our color balance. There are many color-correction tools available in Photoshop's Adjustments menu such as Hue/Saturation, Selective Color, Color Balance, and Replace Color that you can use. There's no recommended order of applying such color corrections, except to try to make your most dramatic changes before your finer adjustments. For example, you'll want to boost the saturation in the image before you use the Color Balance command because the first adjustment will make a larger impact in the image. Figure D shows our image after we applied a generous saturation adjustment, which brought out the green in the leaves and the pink in the girl's shirt. Figure D.
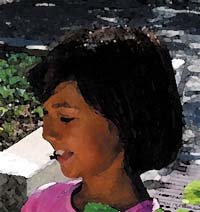
Step 4: Final touchesAt this point, you've corrected the tonal range and balanced your color to make a good-looking image. Now is the time to add any special effects to your image such as Invert, Posterize, or any of Photoshop's many filters. Since you have a quality image to work with, you'll get much better results from any special effects. If you start with an image that needs tonal and color corrections, you won't get nearly the impact, as shown in Figure E. Figure E.With adjustment
Without adjustment
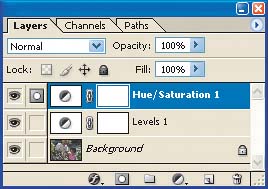
Always sharpen lastAlways sharpen your image last. Sharpening early in the color-correcting process can alter the pixels too much and make it harder to fine-tune the image. By waiting until the end, you can use sharpening to put the final touches on your images just before it goes to print or the web. A note on adjustment layersWhen making image adjustments in Photoshop, it's a good idea to use adjustment layers. Using the menu commands will certainly get the job done, but once you click OK and the adjustment is applied, it isn't easily removed. By using independent adjustments layers, you can turn each adjustment on and off, remove adjustments, or change the intensity of the effect using the Opacity slider in the Layers palette. As a rule of thumb, apply adjustment layers in the same order as the color-correction workflow: tonal adjustments first, followed by color balance and special effects. As shown in Figure F, the adjustments layers are applied from the bottom going up. You can reorder them, but be aware that it could have dramatic effects on your image. Figure F.
Keep it consistentFrom calibrating your images, opening them in Photoshop, managing your growing archive of images, and making them look great, the process of image editing can be intimidating. By following a consistent workflow when editing your images, you'll work more efficiently and produce better, more dependable results. You don't have to follow our procedure completely, but always keep in mind that you'll be more successful if you set yourself up for success. |
 Adjustments
  Levels. A
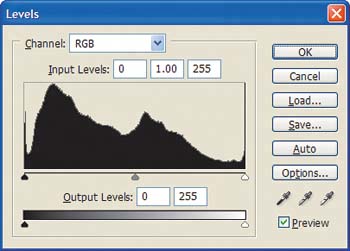


EAN: N/A
Pages: 105