Deploying JDBC Resources
By default, the Geronimo server installs system-database module for JDBC resources. Again, this deployment plan is specific to the Apache Derby database, but it serves as a good example.
Using the Geronimo Deployer
There is a script available in the bin directory for directly accessing the Geronimo deployer. For example, use the following command to deploy the PostgreSQL database plan:
$ ./bin/deploy.sh --user system --password manager deploy \ /path/to/postgresql-plan.xml \ repository/tranql/tranql-connector/1.2/tranql-connector-1.2.rar Using GERONIMO_BASE: /Users/bsnyder/geronimo-1.1 Using GERONIMO_HOME: /Users/bsnyder/geronimo-1.1 Using GERONIMO_TMPDIR: /Users/bsnyder/geronimo-1.1/var/temp Using JRE_HOME: /System/Library/Frameworks/JavaVM.framework/Versions/1.4/Home Deployed postgresql/postgresql/1.0/rar
Upon successful deployment of a plan, the preceding text is output to the command line. But there is also some information available in the var/log/geronimo.log file, as displayed in Listing 13-4.
Listing 13-4: Output from the Deployment of postgresql-plan.xml
02:34:22,299 DEBUG [GBeanSingleReference] Waiting to start postgresql/postgresql/1.0/rar?J2EEApplication=null,j2eeType=ResourceAdapterModule,n ame=postgresql/postgresql/1.0/rar because no targets are running for reference ResourceAdapter matching the patterns postgresql/postgresql/1.0/rar?J2EEApplication=null,ResourceAdapterModule=postgresql /postgresql/1.0/rar,j2eeType=ResourceAdapter,name=postgresql/postgresql/1.0/rar 02:34:22,330 DEBUG [GBeanSingleReference] Waiting to start postgresql/postgresql/1.0/rar?J2EEApplication=null,ResourceAdapterModule=postgresql /postgresql/1.0/rar,j2eeType=ResourceAdapter,name=postgresql/postgresql/1.0/rar because no targets are running for reference JCAResource matching the patterns postgresql/postgresql/1.0/rar?J2EEApplication=null,ResourceAdapter=postgresql/postg resql/1.0/rar,ResourceAdapterModule=postgresql/postgresql/1.0/rar,j2eeType=JCAResou rce,name=postgresql/postgresql/1.0/rar
In addition to the output shown, the Geronimo console can also display the J2EE resource adapters that have been deployed. Figure 13-2 shows an example of this.

Figure 13-2: Geronimo console display of deployed J2EE resource adapters
Notice that, in addition to the standard system-database resource adapter (whose name is geronimo/ system-database/1.1/car), and the activemq resource adapter (whose name is geronimo/ activemq/1.1/car), the PostgreSQL resource adapter deployment plan is also now currently running (whose name is postgresql/postgresql/1.0/rar). But the deployment plan for PostgreSQL is not very scalable. So, what can be done about this situation? The answer lies in the Geronimo console with regard to configuring a database connection pool.
Using the Geronimo Console
The easiest and most expedient manner in which to deploy/configure JDBC resources is through the use of the Geronimo Web console. The console contains a section under the Service heading named Database Pools that contains a wizard for creating JDBC pools. Not only will this wizard walk you through the configuration of the JDBC pool, but it will also download the JDBC driver JAR automatically. Of course, this only will take place for a select list of drivers. The following steps outline how easy it is to use this wizard.
Database Pools
To create a new database pool, click on the link named “Using the Geronimo database pools wizard,” as shown in Figure 13-3.

Figure 13-3: The beginning of the Database Pools Wizard
Create Database Pool (Step 1)
Upon clicking on the link to use the Geronimo Database Pools Wizard, the screen in Figure 13-4 is displayed.

Figure 13-4: Step 1 of the Database Pools Wizard
Table 13-5 describes the available options on this screen.
| Item | Description |
|---|---|
| Name of Database Pool | A unique name to identify the resource group in the Web console and to applications that intend to use the resource group. |
| Database Type | Select the appropriate database type from the list. If the correct database type is not listed, simply select Other from the bottom of the list. |
After providing a name for the pool, click the Next button.
Create Database Pool (Step 2)
The second step to creating a database pool is to provide some metadata about the pool, including the selection of the driver name, the JAR file, the username and password, and so on. Figure 13-5 shows this screen.
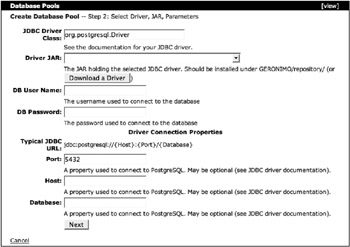
Figure 13-5: Step 2 of the Database Pools Wizard
Table 13-6 describes the parameters on this screen.
| Item | Description |
|---|---|
| JDBC Driver Class | The fully qualified package path for the JDBC driver class to use for this database pool. A default is provided based on the selection of database type on the previous screen, but this is easily changed using the input field on the form. |
| Driver Jar | Choose the appropriate JAR file for the pool that is being created. In this case, select PostgreSQL. The JAR must be placed in the repository directory on the filesystem. This means manually creating the directory hierarchy and placing the JAR file in the repository. After doing this task, simply refresh the page to grab the new list of available JAR files. |
| DB User Name | The database username. |
| DB Password | The database username’s account password. |
| Typical JDBC URL | Example format of the JDBC URL based on the database selected on the previous screen. |
| Port | The network port number on which the database is available. |
| Host | The name or IP address of the machine on which the database is running. |
| Database | The name of the database instance. |
Because PostgreSQL is a very commonly used database, the JDBC drivers are widely available, so click the Download a Driver button to make Geronimo downloads the JDBC driver JAR.
Downloading a JDBC Driver
Using the screen in Figure 13-6, choose the database driver to download from the popup menu labeled Select Driver.
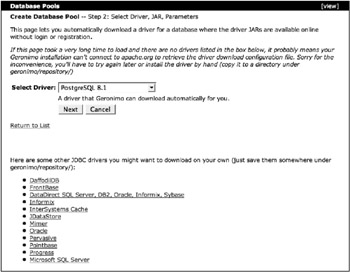
Figure 13-6: Select the appropriate JDBC driver to download
Once the correct JDBC driver type and version combination are selected, click the Next button. A status screen may appear while the driver is being downloaded.
Create Database Pool (Step 2, Again)
Now the Step 2 screen is back, and it is populated with the JDBC driver JAR that was selected for down-loading, as shown in Figure 13-7.
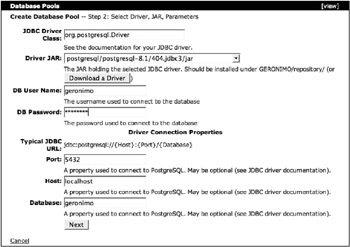
Figure 13-7: After downloading the JDBC driver and providing the required information
Fill in the rest of the information on this screen, and click the Next button to continue to Step 3.
Create Database Pool (Step 3)
In Step 3, the screen in Figure 13-8 will appear with the JDBC URL field populated appropriately.

Figure 13-8: Completing the database pool configuration
Table 13-7 describes the parameters on this screen.
| Item | Description |
|---|---|
| JDBC Connect URL | This is the JDBC URL to use to connect to the PostgreSQL database. |
| Driver Status | The status of the download in the previous step. |
| Pool Min Size | The minimum size of the database pool. |
| Pool Max Size | The maximum size of the database pool. |
| Blocking Timeout | Indicates the timeout period when waiting for a connection to be returned from a pool when all connections in a pool are in use and the pool has already reached its max-size. The default is 5000 milliseconds. |
| Idle Timeout | The amount of time a connection is allowed to go unused before it is automatically closed. The default is 15 minutes. |
Once this information is filled in properly, the connection should be ready for a test.
Test Connection
To test the database pool, click the Test Connection button and the screen in Figure 13-9 will be displayed.

Figure 13-9: Testing the JDBC connection
As long as the Test Result says Connected, the database pool is ready to be deployed. But before deploying the database pool, take a quick look at the deployment plan that is generated. To do this, click the button named Show Plan.
Show Plan
In the Deployment Plan text area is the XML plan that is created from the process of creating the database pool; it is displayed in Figure 13-10.
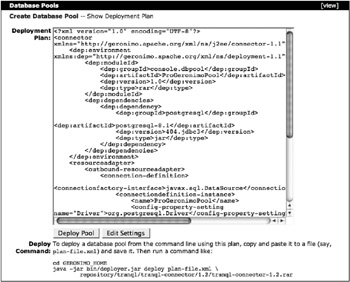
Figure 13-10: The database pool plan
The XML plan displayed in the text area can be manually saved to a file and deployed using the command-line deployer. This allows for many additional uses of the file (such as being checked in to a version control system or manipulated manually).
Now the Deploy Pool button can be clicked to deploy the database pool.
Available Database Pools
Notice that the screen in Figure 13-11 now shows the ProGeronimoPool.
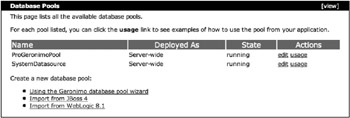
Figure 13-11: The ProGeronimoPool
This screen indicates that the ProGeronimoPool is now ready for use.
Additional Functionality in the Geronimo Console
In addition to creating and configuring brand new database pools, the database pool wizard can also import existing database pool configurations from other application servers. This import process takes place by uploading the configuration files from other application servers to the Geronimo console. While this functionality is not outlined here, a different type of functionality is - the ability to work with a clustered PostgreSQL through the use of Sequoia.
EAN: 2147483647
Pages: 148