Web Container - Jetty or Tomcat
Geronimo comes preconfigured with one of two Web containers: either Jetty or Tomcat. Both containers have been fully J2EE 1.4 certified as part of Geronimo.
The GBean architecture and pluggability of its components allows Geronimo to easily adapt to either container. It is even possible to use them both at the same time via a custom build from source code.
Running Both Jetty and Tomcat at the Same Time?
You may be asking why would anyone want to run both containers at the same time in the application server? Most people wouldn’t, and you normally shouldn’t. In nearly all end-user cases, running both containers at the same time will not be a reasonable configuration for Geronimo. There are situations where you may wish to do timings and testing of the different Web containers at the same time, without the need to work with two different set of binaries. Allowing Geronimo to run both containers at the same time, and still remain certified, demonstrates the flexibility of the Geronimo componentized architecture.
| Important | This ability to run both containers at the same time was a critical capability during the J2EE 1.4 testing for certification (a very long and tedious process) because it allowed Geronimo to certify both containers by switching the configuration and being able to shut off or disable one container, while the other was being tested. Hence the server did not require a redistribution/deployment of GBeans upon testing the different containers, just a change in the config.xml files. |
The config.xml File
The config.xml file holds configurations for manageable attributes of a GBean that allow for customization, relieving you of the need to have to redistribute the GBean plan. Simply by editing this file (when Geronimo is not running), you are able to easily alter the configuration of Geronimo, passing the GBean manageable parameters and telling Geronimo which configuration plans to run. This file is processed by the Geronimo server during startup to determine the GBeans that it will load. Listings 10-1 and 10-2 show examples of the config.xml configurations for the Tomcat and Jetty installations.
Listing 10-1: config.xml Snippet of the Tomcat Container Configuration
... <module name="geronimo/tomcat/1.1/car"> <gbean name="TomcatWebConnector"> <attribute name="host">0.0.0.0</attribute> <attribute name="port">8080</attribute> <attribute name="redirectPort">8443</attribute> </gbean> <gbean name="TomcatAJPConnector"> <attribute name="host">0.0.0.0</attribute> <attribute name="port">8009</attribute> <attribute name="redirectPort">8443</attribute> </gbean> <gbean name="TomcatWebSSLConnector"> <attribute name="host">0.0.0.0</attribute> <attribute name="port">8443</attribute> </gbean> </module> ...
Listing 10-2 shows how to change the adapter used (in the case where your machine has multiple network adapters), and the port on which the Geronimo server listens. The host address of 0.0.0.0 tells Geronimo to listen to all adapters on the machine.
Listing 10-2: config.xml Snippet Jetty Container Configuration
... <module name="geronimo/jetty/1.1/car"> <gbean name="JettyWebConnector"> <attribute name="host">0.0.0.0</attribute> <attribute name="port">8080</attribute> <attribute name="redirectPort">8443</attribute> </gbean> <gbean name="JettySSLConnector"> <attribute name="host">0.0.0.0</attribute> <attribute name="port">8443</attribute> </gbean> </module> ...
As explained in Chapter 5, each one of the <module> entries in config.xml names a plan configuration. The <gbean> entries correlate to the named GBean component in that plan, and the <attribute> element refers to a configurable attribute on the GBean. These attributes will override the settings in the Jetty and Tomcat configuration plans and will take effect the next time the module or server is restarted. The Jetty GBean and attributes will be explained later in this chapter, and the Tomcat GBeans and attributes will be explained in Chapter 11.
Default Configuration
Depending upon which container you selected to run, the default container will be running on port 8080 for HTTP and 8443 for HTTPS. This is easily changed in the config.xml file, as shown earlier. When you start up the Geronimo server from the command line, you should see the ports that the container is running on:
Booting Geronimo Kernel (in Java 1.4.2_11)... Module 1/20 geronimo/rmi-naming/1.1/car started in 1.406s Module 2/20 geronimo/j2ee-server/1.1/car started in .968s Module 3/20 geronimo/j2ee-security/1.1/car started in 1.078s Module 4/20 geronimo/axis/1.1/car started in .078s Module 5/20 geronimo/openejb/1.1/car started in .375s ... Startup completed in 47 seconds Listening on Ports: 1099 0.0.0.0 RMI Naming 1527 0.0.0.0 Derby Connector 4201 0.0.0.0 ActiveIO Connector EJB 4242 0.0.0.0 Remote Login Listener 8009 0.0.0.0 Jetty Connector AJP13 8080 0.0.0.0 Jetty Connector HTTP 8443 0.0.0.0 Jetty Connector HTTPS 9999 0.0.0.0 JMX Remoting Connector 61616 0.0.0.0 ActiveMQ Message Broker Connector Started Application Modules: EAR: geronimo/webconsole-jetty/1.1/car RAR: geronimo/activemq/1.1/car ...
In this case, you can see that Jetty is running and it has its HTTP connector running on port 8080 and its HTTPS connector on 8443. The other way to see which container is running is to view the welcome screen. By launching a browser, you can navigate to the following URL, and you should see a screen similar to Figure 10-1:
http://localhost:8080/

Figure 10-1: Default welcome screen for Web container
Note that the upper-right corner of the browser screen tells you which container is running on the URL/port combination. In this case, it is Jetty 5.1.10.
Configuring Your Container
There are numerous ways to reconfigure your Web container, and, in Geronimo, it offers three ways. These three ways are, in order of increasing difficulty:
-
Via the Web console
-
Editing the config.xml file
-
Changing the GBeans in your assembly with the source code, and then recompiling/building
The Web console usually comes ready to run if you have downloaded a binary distribution. It is also, by far, the easiest way to reconfigure certain commonly modified attributes of server component GBeans.
Adding Connectors via the Web Console
The console allows you to view, edit, and add connectors to your Web applications. It also allows you to start and stop your Web application from your Web browser. General usage and capabilities of the Web console has been covered in Chapter 8. The following discussion repeats just enough of this coverage to assist those readers who are reading this chapter in isolation. You can start the console with the following:
http://localhost:8080/console
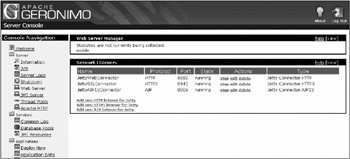
You will be asked to log in. The username is system and the password is manager for a default Geronimo installation. On the left side of the screen is the navigation menu. To view, edit, or add a connector, select the Web Server link under the Server heading, and you should see a screen that lists the connectors for the Web server, as shown in Figure 10-2.

Figure 10-2: Network Listeners portlet
Each connector is a listener for request, servicing a specific protocol, and listening on a specific host:port combination. From this portlet, you are able to edit currently installed connectors. You are able to stop a connector, edit a connector’s configuration, remove a connector, or add a new connector. Each one of the links to the right of the connector allows you to stop, edit, or delete the connector. You may add one of three different kinds of connectors: AJP, HTTP, or HTTPS. Adding a connector will offer you the capability to fill in most of the necessary options to make that connector run.
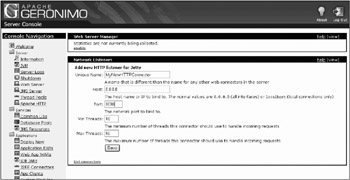
For example, if you wanted to create a new HTTP connector that would listen on port 9090, you would select the Add New HTTP Connector for Jetty link. The Network Listeners portlet will display a screen asking you for necessary information to set up your new HTTP connector, as shown in Figure 10-3.

Figure 10-3: Network Listeners portlet for setting up HTTP
The Unique Name is what you will name your connector. This name should be unique across all connectors. In this example, type in MyNewHTTPConnector for the Unique Name. The Host field is the IP address that you want the connector to respond to. If you have multiple LAN adapters on your machine and want a specific network interface to respond, you would type that IP address in this field. However, you will typically want the connector to listen in on all network interfaces or IP addresses. To do this, your Host should contain 0.0.0.0. The Min Threads and Max Threads fields allow you to set the size of the pool of threads, from a minimum and maximum perspective, that the container can handle. If you expect your site to receive a highly concurrent load of users, you would increase these values.
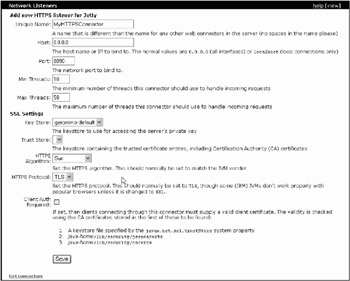
Each of the three types of network connectors will minimally include what was just described for fields. However, the different connector types may ask many more questions for their proper configuration. For example, the HTTPS connector will require more information to set up an SSL configuration. You will need to specify a keystore file, passwords for the keystore and the server, the keystore type, HTTPS algorithm and protocol, and whether client authentication is required (as used for forcing the client to present a valid certificate created by the server). Figure 10-4 shows the fields that are required for the HTTPS connector.

Figure 10-4: Network Listeners portlet for setting up HTTPS
Adding Connectors via the config.xml
Adding connectors via the Web console is clearly the simplest method of adding a connector. One of the byproducts of the Web console’s adding a new connector is that it actually adds an entry into the config.xml file. In the last section, you were shown how to add a new HTTP connector to the Jetty Web connector using the console. The console actually added the following configuration to the config.xml file:
... <module name="geronimo/jetty/1.0/car"> ... <gbean gbeanInfo="org.apache.geronimo.jetty.connector.HTTPConnector" name="geronimo/jetty/1.1/car?ServiceModule=geronimo/jetty/1.1/car,j2eeType=GBean, name=MyNewHTTPConnector"> <attribute name="maxThreads">50</attribute> <attribute name="host">0.0.0.0</attribute> <attribute name="minThreads">10</attribute> <attribute name="port">9090</attribute> <reference name="JettyContainer"> <pattern> <groupId>geronimo</groupId> <artifactId>jetty</artifactId> <version>1.1</version> <type>car</type> <name>JettyWebContainer</name> </pattern> </reference> </gbean> ... </module> ...
Of course, you can also add new connectors by hand to the config.xml file and add the same text as shown here. The GBean is located by Service Module, j2eeType, and the unique name of the module. The gbeanInfo represents the connector Java object that is being used, and the attributes and references are those that are defined for the Java object. A list of the GBeans/connectors can be found in Tables 10-5, 10-6, and 10-7 for Jetty, later in this chapter, and for Tomcat, they can be found in Chapter 11.
EAN: 2147483647
Pages: 148