The assignment
| [ LiB ] |
The assignment
The Football Theme, commissioned in Project 6, was a success. However, the program makers would like a studio version, played by real musicians . You need to prepare a score and printed parts for the session.
Because some of the work required to produce a presentable score may well involve some destructive editing, we are going to work on a copy of the original. Use the example on the CD project10/templt10 as the basis for your work.
Follow these steps:
-
Load project10/templt10 and in your mywork10 folder, save it as a Logic Song File myproj10 or something similar. If you have already worked through Project 6 A Football Theme you will remember that it contained an audio track featuring yours truly on tenor sax. This has been deleted. It was an improvised overdub and will not need scoring anyway. Besides, the company commissioning the music prefers the alternative solo trumpet (there's no accounting for taste!).
-
In the Arrange window, select Track 1, Brass 1, and open the score [Windows > Open Score] (Figure P10.1).
Figure Figure P10.1. Brass 1 score
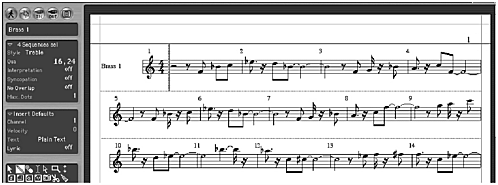
What do you think? Your answers will vary according to how much knowledge of music notation you possess. If you can't read music at all, it will not make much sense. In this case some time studying music theory is the only course of action open to you if you want to work with Logic's Score.
If you have experience reading music at an entry or intermediate level, your answer might be, 'Looks all right to me. The first note is F followed by Bb and C. Yes I can understand that.' In your case this project will help you display a decent, readable score.
If you are an experienced music reader, your reaction will probably be something like, 'Well it is difficult to read because the key signature is missing and the note lengths are incorrectly displayed. There are no dynamic or articulation markings either.'
If you are a professional trumpet player your reaction may well be something like, 'Surely you don't expect me to read this rubbish!' What's needed? A score cleanup.
Follow these steps:
-
In the Arrange window, select Track 1 and glue all the sequences together. Open the score. Well, it's a start! All the extra clef signs and time signatures cluttering the staff have disappeared. What next ?
-
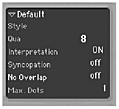
The first thing to change is the Quantization setting in the Display Parameters box, on the left. Because the Global Display Value in the Transport window is set to 1/16, Logic has displayed 16,24 (binary sixteenth notes, ternary sixteenth note triplets) in the Score Display Parameters box. Our smallest note value in this brass part is an 1/8th note, so change it to 8. Scroll the staff and you'll notice that all the unnecessary sixteenth notes and rests have disappeared. Much better!
-
Although accurate, the display in the last two bars will still remain ambiguous to our trumpet player so turn Interpretation ON. Better still. We're getting there! Still no key signature though.
NOTE
There are two ways of displaying the score: Linear view with a faster redraw for editing (Page Edit unticked) and Page view for layout. Use the Page view icon ( Figure P10.2 ) to toggle between the two.
Figure Figure P10.2. Page view icon

-
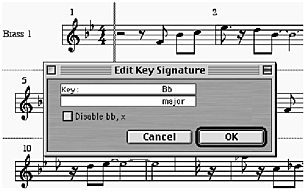
Double-click between the clef and time signature, and in the resulting dialog box, change the key to Bb major (two flats). All the unnecessary accidentals disappear. Wonderful! (Figure P10.3).
Figure Figure P10.3. Editing the key signature
-
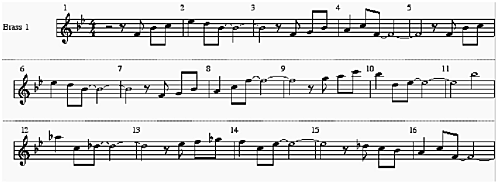
Save Song compare with project10/1 (Figure P.10.5).
Figure Figure P10.5. Project10/1
The score parameters should now look like those in Figure P10.4. Syncopation and No Overlap have been left off (they don't concern us here).
Figure Figure P10.4. Score parameters
Let's move on. Follow these steps:
-
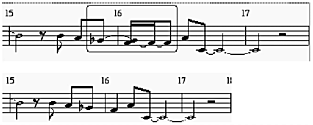
Select Track 2, glue all the sequences together and open the Score Editor. In bars 15/16 and 31/32 we have a case of overlapping notes (Figure P10.6a). In the Display Parameters box, turn No Overlap ON. The overlapping notes are cured (Figure P10.6b). Turn Interpretation ON and change the Quantize Display to 8 (not strictly necessary because everything displays fine at 16,24). Note, Logic has changed the key signature to Bb major automatically.
Figure Figures P10.6a and b. Overlapping notes, before and after
-
Select Track 3, glue all the sequences together and open the Score Editor. This time just turn on Interpretation in the Display Parameters box. Everything is cured, including the overlapped notes. Actually, using Interpretation alone would have sufficed on the other two brass tracks but I wanted to explain how the individual functions affect the display.
-
Select Track 4, glue the sequences together and open the Score Editor. Again turning on Interpretation is all that's required for a readable display. That's the brass section done.
-
Save Song compare with project10/2.
-
Select Track 6 (bass) and open the score. Oh dear! This is enough to drive any self-respecting bass player completely crackers! It's a jumble . Parts like this have been handed out though, believe me! (Figure P10.7).
Figure Figure P10.7. Bass staff

-
In the Arrange window, glue the sequences together, and in the Score Edit window turn on Interpretation in the Display Parameters box. Note that Bass has been selected as Style in the parameter box. This ensures the bass staff will display one octave higher than the bass actually sounds. The result is much improved (Figure P10.8).
Figure Figure P10.8. Bass staff, much improved

-
Save Song compare with project10/3.
Conventional scores do not have separate drum staves. We have two drum tracks (kick and snare ) plus a whistle on the Referee track. Let's combine them.
-
In the Arrange window, glue and merge the two drum tracks (kick and snare) sequences together to make a single track. Leave the Referee out of this for the moment. We'll deal with him later!
-
Open the Score Edit window and in the Display Parameters box, change the Style from Bass to #Drums. A drum clef appears and the drum beats are remapped on the staff. Turn on Interpretation and we have a very presentable drum part (Figure P10.9).
Figure Figure P10.9. Drum part

-
Close the score, and in the Arrange page delete the now empty, drum track. Be careful not to delete the Referee track.
-
Save Song compare with project10/4.
On to the guitar. Follow these steps:
-
Select Track 5 (guitar) and open the score (Figure P10.10a). Well we can't give that to a guitar player. He'll fall about laughing! Apart from it being a jumble, what he requires here is a chord sheet. How do we do that? There are various methods . Here's one way to do it.
Figure Figure P10.10a. Guitar score

-
In the Arrange window, glue the sequences together, and in the Score Edit window turn on Interpretation in the Display Parameters box. That's the display fixed. Compare to Figure P10.10b.
Figure Figure P10.10b. A cleaner guitar score

-
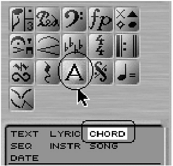
In the Part box click on 'A' to bring the Text Objects to the top of the menu (Figure P10.11). Drag the Chord object on to the staff and insert it at the beginning of bar 2 (2.1.1) beneath the staff. A text cursor appears.
Figure Figure P10.11. Part box
-
Type Bb (upper case lower case) and press 'Enter.' Logic redraws this as a B flat chord symbol (Figure P10.12).
Figure Figure P10.12. Bb chord symbol

- Enter the remaining chords. Type exactly as listed and Logic will automatically interpret the chord symbol.
Here's the full list.
NOTE
(At bar 2 type Bb)
At bars 4 and 8 type F
At bar 6 type Bb
At bar 10 type Cm
At bar 12 type Db/Gb
At bar 14 type Gb
At bar 16 type F
-
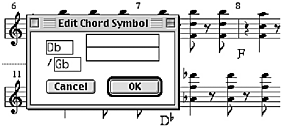
When you reach bar 12, type the Db first then double-click on the chord symbol and up pops an edit window (Figure P10.13). Here you can enter the bass note Gb.
Figure Figure P10.13. Chord Edit window
-
Select all the chord symbols they will blink and copy and paste them to bar 18.
Things are much clearer but we don't need the note display as well as chord symbols. We could leave them, it doesn't really matter. Although a little time-consuming , it's better to delete them.
-
Delete all the notes except the bottom note on each stem.
-
Open the Matrix Edit window [Windows > Open Matrix Edit] and use the keyboard to select all the G notes (Figure P10.14). Drag them down to F (bottom space on the staff). Do this with the other remaining notes until all the notes are F.
Figure Figure P10.14. Selecting notes

-
Back in the Score view, select all the notes they blink and from the Part box, drag a slash note-head symbol onto the first F. All the notes change to a slash symbol (Figure P10.15).
Figure Figure P10.15. Changing note heads

NOTE
When you insert chord symbols make sure they are at the correct bar position. Watch the Info Line above the staff.
NOTE
Aquick way to alter notes of the same pitch in a sequence: In the Matrix Edit window, select the note(s) you wish to change on the keyboard. All the notes in the sequence will be selected. Simply drag them all to the new pitch.
-
Save Song compare with project10/5.
NOTE
To apply accents and other symbols to notes, drag them from the symbols group in the Part box onto the note heads. Logic will snap them in place. The symbols will remain in position even if you move or transpose them.
Musicians need more than just notes on the staff to correctly interpret a written piece of music. Articulation markings are particularly important.
-
Return to Track 1 Brass 1 / Tpt 1, and open the score.
-
Click on the first note in bar 34 (Bb4). A glance at the Info line above will tell you that this note received more velocity than the note following. So did the notes at 34. 2. 3.1 (Ab4) and 34.1.1. (G). They were clearly accented and we need to point this out to the trumpet player, so:
-
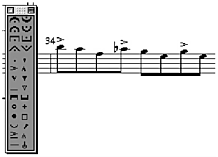
Select an accent (>) from the symbols group in the Part box and drag it onto those notes (Figure P10.16).
Figure Figure P10.16. Applying accents
-
Save Song compare with project10/6.
-
Return to the drums Track 8 and open the score. In the treble clef, the whistle is represented as the note B. Changing the Style to #Drums will cause it to disappear altogether so drag it down to G, below the staff. Change the Style to #Drums and it changes to a cymbal note head. That's OK, we can indicate to the player that a whistle is required by entering text with the Text tool (Figure P10.17).
Figure Figure P10.17. The whistle

-
Merge the whistle sequence with the drums above on Track 7.
-
Save Song compare with project10/7.
It's time to do some layout work, so:
-
In the Arrange window, ensure that all the sequences are glued together. Make them start and end together too, otherwise bars will be missing on the full score. Do this by dragging the corners of the objects.
-
In the Arrange window, Select All [Edit > Select All].
-
Open the score. From the score, change the view to Page Edit. Doubleclick in the Instrument Set box, or use the menu [Layout > Instrument Sets...]. The Instrument Set window opens (Figure P10.18).
Figure Figure P10.18. Instrument Set box and Instrument Set window

-
In the Instrument Set window, rename the set Full Score. In the Full Name column enter names for the brass section Trumpet 1, 2, 3 and Solo Trumpet and names for the rhythm section Guitar, Bass and Drums. Enter abbreviated names in the Short Name column.
-
Use the Brackets and Bar Lines column to separate the brass section from the rhythm section. Drag the brackets with the mouse. This can also be done on the score itself.
-
Save Song compare with project10/8.
We are almost finished with the score. Just a few details to tidy up.
-
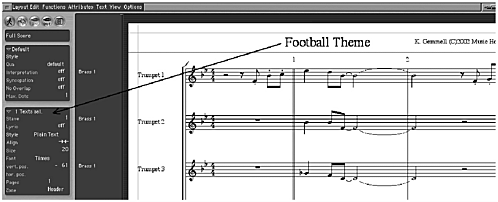
Using the Text tool, enter the title Football Theme in the Header section, at the top of the page. When you have finished you will see an Event Parameter box appear on the left (Figure P10.19). Increase the Size parameter to 20 for a nice clear title. Change the font if you wish. I have left everything as Times. The text can be centered by choosing Text > Align > Page right.
Figure Figure P10.19. Title and Text Event Parameter box
-
Save Song compare with project10/9.arr.
On viewing project10/9 you will see that a number of other changes have taken place.
-
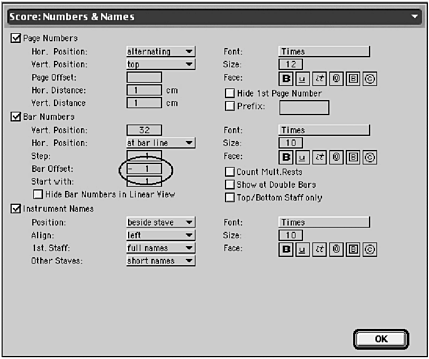
The bar numbers have been offset click on bar numbers to reveal the Song Settings dialog box (Figure P10.20) or use [Options > Settings > Score Numbers & Names...]. Bar and page number settings can be changed here as well as font and instrument name settings.
Figure Figure P10.20. Song Settings dialog box
-
Double bar lines have been inserted at bars 1 and 17 use Repeat Signs and Bar Lines in the Part box (Figure P10.21).
Figure Figure P10.21. Repeat Signs and Bar Lines

-
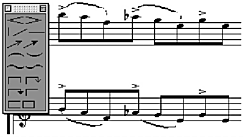
Slurs have been used in the brass parts at bar 33 use Slurs, Crescendi, Lines, Arrows in the Part box (Figure P10.22). After insertion, use the 'handles' small black squares to change their shape.
Figure Figure P10.22. Slurs, Crescendi, Lines, Arrows
-
In bar 32 you'll see a change in the notation (Figures P10.23a and P10.23b). This was changed because, unlike a GM sound module, the leap from Bb to top C on a real trumpet may prove difficult!
Figure Figure P10.23a and b. Trumpet notation before and after alteration

NOTE
Zoom in when inserting and positioning slurs. It's much easier.
-
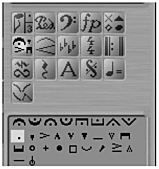
Staccato marks and accents have been inserted in the brass parts use Symbols attached to Notes in the Part box (Figure P10.24).
Figure Figure P10.24. Symbols attached to notes
NOTE
To enter multiple note symbols, select all the notes you wish to change and drag a symbol from the Part box to one of the notes. All the selected notes receive the same symbol.
Change your version accordingly . A lot more can be done but by now I'm sure you've got the picture.
We will now prepare the Trumpet 1 part.
-
In the Arrange window, select Track 1 and open the score. Use Page Edit view. Looks pretty good already doesn't it? However, if you read the previous chapter 'Knowing the score,' you will remember the trumpet player complaining that his part had not been transposed. Our Trumpet 1 part is in Bb at the moment. It will have to be transposed up a tone for performance purposes.
-
From the drop-down menu in the Score Parameter box, select Style > Trumpet in Bb (Figure P10.25).
Figure 10.25. Transposing the Trumpet 1 part

Hey presto! the Trumpet 1 score has been transposed to the key of C.
-
Save Song compare with project10/10.
NOTE
In real life, keep your players happy. Don't give them impossible things to play that may well sound good on a synthesizer. Use high notes sparingly (all the more effective). Big leaps, particularly on brass instruments are best avoided if you want a smooth session. Rule of thumb keep it simple.
NOTE
Some writers prefer a transposed score, with all the instruments viewed in the keys that the actual players will read them. Others, myself included, prefer to view their scores in concert pitch.
NOTE
Transposing the Trumpet part will also transpose that part on the Full Score. To view the score at concert pitch, transpose it back again.
| [ LiB ] |