3.1 General-Purpose Actions
| JSTL provides four general-purpose actions:
The actions listed above represent the most fundamental JSTL actions. Each of those actions is discussed in the following sections. The <c:out> ActionThe JSTL expression language (EL), which is discussed in "The JSTL Expression Language" on page 38, is not incorporated into JSP 1.2 or earlier versions. [1] Currently, you can only use Java code in JSP expressions, scriptlets, and declarations; for example, you can access the Host request header with a JSP expression like this:
<%= request.getHeader("host") %> Because JSP does not currently provide support for the EL, JSTL includes a <c:out> action, which evaluates an EL expression, coerces the resulting value to a string, and forwards that string to the current JspWriter . The <c:out> action is the EL equivalent of a JSP expression; for example, you can use <c:out> to access the Host request header like this: <c:out value='${header.host}'/> The preceding code fragment uses the JSTL header implicit object to access the Host request header. [2] The two preceding code fragments produce identical results.
The <c:out> action is easy to use, as the preceding code fragment illustrates. There are two ways that you can use <c:out>; here is one syntax: [3]
<c:out value [default] [escapeXml]/> The value attribute, which is required, can be an EL expression or a string. The default attributewhich replaces the value attribute if the value evaluates to null is handy when you try to access a value that might not exist, for example: Name: <c:out value='${param.name}' default='Not Specified'/> The preceding code fragment tries to access a request parameter named name ; if that request parameter does not exist, the <c:out> action will send the string Not Specified to the current JspWriter . You can also specify the default value in the body of the <c:out> action with this syntax: <c:out value [escapeXml]> default </c:out> If you don't specify a default value, the default value itself defaults to an empty string; for example: Name: <c:out value='${param.name}'/> The <c:out> action in the preceding code fragment will not produce any output if the name request parameter does not exist or evaluates to null . By default, <c:out> converts certain characters to XML escape sequences, as shown in Table 3.1. Table 3.1. <c:out> Default Character Conversions
Sometimes, however, you don't want those characters to be converted, for example: <c:set var='opt1' value='Red'/> <c:set var='opt2' value='Blue'/> <c:set var='opt3' value='Green'/> <form> <select> <c:out value='<option value=${opt1}>${opt1}</option>' escapeXml='false' /> <c:out value='<option value=${opt2}>${opt2}</option>' escapeXml='false' /> <c:out value='<option value=${opt3}>${opt3}</option>' escapeXml='false' /> </select> </form> The preceding code fragment generates an HTML select element with scoped variables created by the <c:set> action. [4] In that case, you don't want to escape the < and > characters because the select elements will not be properly generated. Because the <c:out> actions in the preceding code fragment set the escapeXml attribute to false , those characters will not be converted to their corresponding XML escape sequences.
The JSTL runtime library has a <c_rt:out> action that corresponds to the <c:out> action from the expression language library. Instead of specifying an EL expression for the value attribute, as is the case for <c:out>, a Java expression is specified for the <c_rt:out> action's value attribute, like this: <c_rt:out value='<%= new Integer(5) %>'/> The <c_rt:out> action is provided only for symmetry between the JSTL RT and EL libraries. [5] In practice, that action is rarelyif everused because it's simpler to just specify a JSP expression; for example:
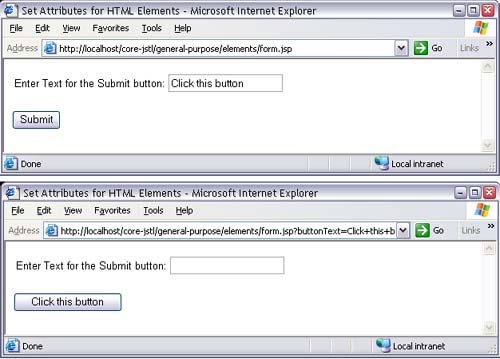
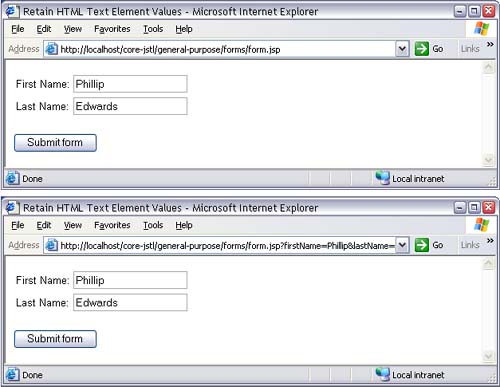
<%= new Integer(5) %> The preceding JSP expression is equivalent to the previous code fragment that uses the <c_rt:out> action. Now that we have a basic understanding of the <c:out> action, let's take a look at three situations in which that action is especially useful: setting attributes for HTML elements, retaining values for HTML text elements, and accessing properties of beans and maps. Setting Attributes for HTML ElementsYou can use <c:out> to specify attributes for HTML elements; for example, the JSP page shown in Figure 3-1 uses <c:out> to set the value of the submit button to whatever value you specify in the textfield. Figure 3-1. Setting HTML Element Attributes with <c:out> The top picture in Figure 3-1 shows the JSP page after it's first loaded and a user has entered a string in the textfield. The bottom picture shows the JSP page after the user has subsequently activated the submit button. The JSP page shown in Figure 3-1 is listed in Listing 3.1. In the preceding JSP page, the value for the submit button is specified with a <c:out> action. The value specified for that action is the value of the buttonText request parameter. Notice that the <c:out> action also specifies a default value, which is used when the buttonText request parameter does not exist, as illustrated by the top picture in Figure 3-1. When you use <c:out> to specify a value for a tag (HTML or otherwise ) attribute, you must quote the <c:out> action and its attribute values. You can use single quotes to quote the <c:out> action and double quotes to quote that action's attribute value as is the case for the preceding JSP page, or vice versa; for example: <input type='submit' value= " <c:out value='${param.buttonText}' default='Submit'/> " /> As you can see from Figure 3-1, the textfield in the preceding JSP page does not retain its value when the page is reloaded. It's often desirable for HTML elements to retain their values; for example, when a form that's not properly filled out is redisplayed. You can use the <c:out> action to retain HTML text element values, as discussed in the next section. Listing 3.1 Set HTML Element Attributes<!DOCTYPE HTML PUBLIC "-//W3C//DTD HTML 4.0 Transitional//EN"> <html> <head> <title>Set Attributes for HTML Elements</title> </head> <body> <%@ taglib uri='http://java.sun.com/jstl/core' prefix='c' %> <%-- Because the following form has no action, this JSP page will be reloaded when the form is submitted --%> <form> <table> <tr> <td>Enter Text for the Submit button:</td> <td><input name='buttonText' type='text'></td> </tr> </table> <p><input type='submit' value= '<c:out value="${param.buttonText}" default="Submit"/>' /> </form> </body> </html> Retaining Values for HTML Text ElementsFigure 3-2 shows a JSP page that retains its textfield's values when the page is reloaded. The top picture in Figure 3-2 shows the JSP page when it's first loaded and the user has entered values for the First Name and Last Name textfields . The bottom picture shows the same JSP page after the user has activated the submit button and the page has been reloaded. Figure 3-2. Retaining Values for HTML Text Elements with <c:out> The JSP page shown in Figure 3-2 is listed in Listing 3.2. The preceding JSP page uses <c:out> actions to access the values previously specified for the textfields. Those values are used to set the textfield's value attributes so that the textfields retain their values when the page is reloaded. The JSP pages discussed in the two previous sections use <c:out> actions to access request parameters. Another popular use for <c:out> is accessing bean properties, which is discussed in the next section. Listing 3.2 Retaining HTML Text Element Values<!DOCTYPE HTML PUBLIC "-//W3C//DTD HTML 4.0 Transitional//EN"> <html> <head> <title>Retain HTML Text Element Values</title> </head> <body> <%@ taglib uri='http://java.sun.com/jstl/core' prefix='c' %> <%-- Because the following form has no action, this JSP page will be reloaded when the form is submitted --%> <p><form> <table> <tr> <td>First Name:</td> <td><input type='text' name='firstName' value=' <c:out value="${param.firstName}"/> '/> </td> </tr> <tr> <td>Last Name:</td> <td> <input type='text' name='lastName' value=' <c:out value="${param.lastName}"/> '/> </td> </tr> </table> <p><input type='submit' value='Submit form'/> </form> </body> </html> Accessing Bean PropertiesIt's easy to access bean properties with <c:out>, but to illustrate that feature, we need to have a bean that we can access. Listing 3.3 lists a simple color preference bean that stores background and foreground colors. Instances of that bean are used throughout this chapter. Listing 3.3 WEB-INF/classes/beans/ColorPreferences.java package beans; public class ColorPreferences { private String background = "white", foreground = "black"; public void setForeground(String foreground) { this.foreground = foreground; } public String getForeground() { return foreground; } public void setBackground(String background) { this.background = background; } public String getBackground() { return background; } } The color preference bean listed above provides JavaBeans-compliant setter and getter methods for its background and foreground colors. The JSTL expression language lets you access bean properties through accessor methods that conform to the JavaBeans specification, but it does not provide support for invoking random methods on an object. [6]
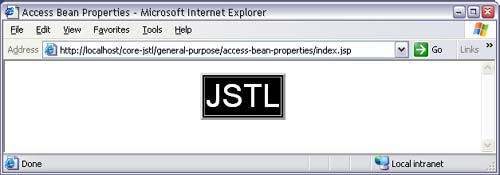
The color preference bean listed above is used in the JSP page shown in Figure 3-3 to set foreground and background colors for an HTML table. Figure 3-3. Accessing Bean Properties with <c:out> The JSP page shown in Figure 3-3 is listed in Listing 3.4. The preceding JSP page uses <jsp:useBean> to create a color preference bean and store that bean in page scope. The body of the <jsp:useBean> action contains <jsp:setProperty> actions that set the bean's background and foreground colors. Subsequently, the JSP page creates an HTML table and specifies the background color for that table with the <c:out> action, which accesses the bean's background color. The color of the text displayed in the table is also set with a <c:out> action that accesses the bean's foreground color. Notice that the first <c:out> action in the preceding JSP page accesses the bean without specifying its scope, whereas the second <c:out> action explicitly specifies the bean's scope by accessing the bean with the pageScope JSTL implicit object. When you access a bean with an EL expression, you don't have to specify that bean's scope, so the second <c:out> action in the preceding JSP page could have accessed the bean's foreground color with ${bean.foreground} . The only reason the second <c:out> action explicitly specified that bean's scope was to show you that it can be done. Sometimes, if you have beans that have the same name and reside in different scopes, you may have to explicitly specify a bean's scope. [7]
The preceding JSP page uses <jsp:setProperty> in conjunction with <jsp:useBean>. Instead of using <jsp:setProperty>, you can use the <c:set> action, which allows you to use the expression languagethat's something that you currently cannot do with <jsp:setProperty>. The <c:set> action is discussed in the next section. Listing 3.4 Access Bean Properties<!DOCTYPE HTML PUBLIC "-//W3C//DTD HTML 4.0 Transitional//EN"> <html> <head> <title>Access Bean Properties</title> </head> <body> <%@ taglib uri='http://java.sun.com/jstl/core' prefix='c'%> <%-- Create a color preferences bean and store it in page scope --%> <jsp:useBean id='bean' class='beans.ColorPreferences'> <%-- The following <jsp:setProperty> actions are invoked when the bean is created, which happens every time this page is accessed because the bean resides in page scope --%> <%-- Set the bean's background color --%> <jsp:setProperty name='bean' property='background' value='black'/> <%-- Set the bean's foreground color --%> <jsp:setProperty name='bean' property='foreground' value='white'/> </jsp:useBean> <%-- Create a table with the background color stored in the bean's background property --%> <table align='center' border='3' bgcolor=' <c:out value="${bean.background}"/> '> <tr> <td> <%-- Create table data with the font color stored in the bean's foreground property --%> <font size='7' color=' <c:out value="${pageScope.bean.foreground}"/> '> JSTL </font> </td> </tr> </table> </body> </html> The <c:set> ActionThe <c:set> action is quite versatile; it lets you do the following:
The <c:set> action supports four syntaxes; two of those syntaxes let you manipulate scoped variables and the other two let you manipulate beans or maps. You can set or remove a scoped variable with the following syntax: [8]
<c:set value var [scope]/> The mandatory var and value attributes specify the name of the scoped variable and its value, respectively. Optionally, you can specify the variable's scope with the scope attribute. By default, <c:set> stores scoped variables in page scope. The following code fragment stores the HTTP request methodeither GET , POST , PUT , HEAD , DELETE , OPTIONS , or TRACE in a scoped variable stored in request scope: <c:set var='aScopedVariable' scope='request' value='${pageContext.request.method}'/> You can access the scoped variable referenced in the preceding code fragment with <c:out>, like this: <c:out value='${aScopedVariable}'/> If you specify the var attribute and a null value for the value attribute, <c:set> will delete the specified scoped variable, for example: <c:set var='aScopedVariable' value='${null}'/> The preceding code fragment removes the scoped variable named aScopedVariable from page scope. You can also specify the value for <c:set> in the action's body with this syntax: <c:set var [scope]> value </c:out> The syntax listed above is most useful when you want to store output from another action, for example: <c:set var='substring'> <str:substring start='3' end='7'> 0123456789 </str:substring> </c:set> <c:out value='${substring}'/> The preceding code fragment uses Apache's Jakarta String Tag Library to extract a substring from the string 0123456789 . [9] The <c:set> action stores the output from the <str:substring> action in a page-scoped variable named substring . Subsequently, <c:out> displays the value of the substring scoped variable. The output from the preceding code fragment is 3456 .
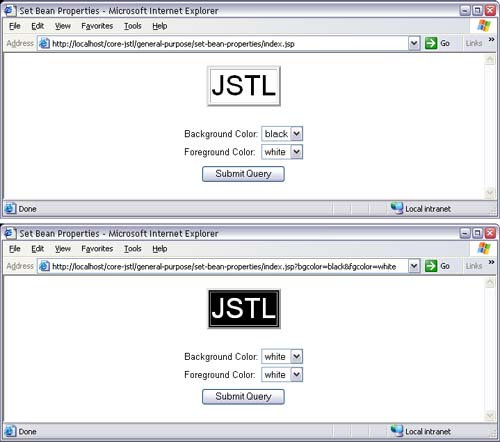
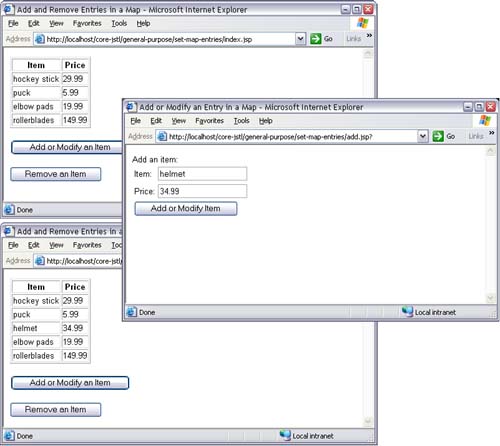
Setting Bean Properties and Map EntriesYou can set a bean's property with this <c:set> syntax: <c:set target property value/> In the preceding syntax, the target attribute is a reference to a bean, the property attribute is the name of the bean's property, and the value attribute represents the property's value. You can also specify the property value in the body of the <c:set> action with this syntax: <c:set target property> value </c:set> Besides setting bean properties, you can also use the two preceding <c:set> syntaxes to set, remove, and modify entries in a map. In that case, the target attribute is a reference to a map, the property attribute represents the key for the map entry, and the value attribute represents the map entry's value. The following sections"Setting Bean Properties" and "Setting Compound Bean Properties"show you how to use <c:set> to set bean properties, and "Adding, Removing, and Modifying Map Entries" on page 119 shows you how to add, remove, and modify map entries. Setting Bean PropertiesFigure 3-4 shows a JSP page that lets you specify a color preference bean's foreground and background colors. That bean's colors are used to set the foreground and background colors for the table shown in Figure 3-4. The top picture in Figure 3-4 shows the JSP page when it's first loaded and a user has selected background and foreground colors, and the bottom picture shows the JSP page after the user has activated the submit button. Figure 3-4. Setting Bean Properties with <c:set>. Because the textfields do not retain their values, the values specified in the textfields in the bottom picture are out of sync with the table displayed above them. The JSP page shown in Figure 3-4 is listed in Listing 3.5. Listing 3.5 Setting Bean Properties<!DOCTYPE HTML PUBLIC "-//W3C//DTD HTML 4.0 Transitional//EN"> <html> <head> <title>Set Bean Properties</title> </head> <body> <%@ taglib uri='http://java.sun.com/jstl/core' prefix='c' %> <%-- Create a color preferences bean and store it in page scope --%> <jsp:useBean id='bean' class='beans.ColorPreferences'/> <%-- If there are no bgcolor or fgcolor request parameters (as is the case when this page is first loaded), the following <c:set> actions set the bean's properties to null --%> <%-- Set the bean's background property to the value of the bgcolor request parameter --%> <c:set target='${bean}' property='background' value='${param.bgcolor}'/> <%-- Set the bean's foreground property to the value of the fgcolor request parameter. Notice that the action's value is specified in the body of the action, for no other reason than to show it can be done. --%> <c:set target='${bean}' property='foreground'> <c:out value='${param.fgcolor}'/> </c:set> <table align='center'> <tr> <td colspan='2' align='center'></td> <%-- Create a table with the background color stored in the bean's background property --%> <table border='3' align='center' bgcolor='<c:out value=" ${bean.background} "/>'> <tr> <td> <%-- Create table data with the font color stored in the bean's foreground property --%> <font size='7' color='<c:out value=" ${bean.foreground} "/>'> JSTL </font> </td> </tr> </table><p> </td> </tr> <tr> <%-- Because the following form has no action, this JSP page will be reloaded when the form is submitted --%> <form> <table align='center'> <tr> <td>Background Color:</td> <td> <%-- Create the HTML select element for background color --%> <select name='bgcolor'> <option value='white'>white</option> <option value='black'>black</option> </select> </td> </tr> <tr> <td>Foreground Color:</td> <td> <%-- Create the HTML select element for foreground color --%> <select name='fgcolor'> <option value='white'>white</option> <option value='black'>black</option> </select> </td> </tr> <tr> <table align='center'> <tr> <td><input type='submit'></td> </tr> </table> </tr> </table> </form> </tr> </table> </body> </html> The preceding JSP page uses <jsp:useBean> to create a color preference bean. Subsequently, two <c:set> actions are used to set the bean's background and foreground colors with the values specified in the page's form. The JSP page then uses that bean to set the background color for its table and the font color for the table's text. Finally, the JSP page creates the form that lets you select foreground and background colors. Two things are noteworthy about the preceding JSP page. First, the JSP page could dispense entirely with the color preference bean by using the bgcolor and fgcolor request parameters to set the table's background color and the font foreground color, respectively; instead, the JSP page stores the request parameters in a bean and uses that bean to set the table's background color and the font color. The only reason for using the bean is to illustrate how you can use <c:set> to set a bean's properties. Second, solely for the sake of illustration, the <c:set> actions that set the bean's background and foreground colors use both syntaxes discussed in "Setting Bean Properties and Map Entries" on page 112, even though it was not necessary to do soboth actions could use the same syntax. The first <c:set> action uses the value attribute like this: <c:set target='${bean}' property='background' value='${param.bgcolor}'/> The second <c:set> action specifies its value in its body like this: <c:set target='${bean}' property='foreground'> <c:out value='${param.fgcolor}'/> </c:set> You should note that you cannot use <c:out> for a JSTL action's attribute; for example, the following code fragment will not produce the same result as the previous two code fragments: <%-- This code fragment won't produce desirable results --%> <c:set target='${bean}' property='foreground' value='<c:out value="${param.fgcolor}"/>'/> If you set the foreground color to black, the preceding code fragment will set the bean's foreground property to the string <c:out value="black"/> , which will not be interpreted by the table as the color black. You might think that this behavior is a bug, but it's valid because the value attribute is interpreted as an EL expression, so the expression ${param.fgcolor} is interpreted as black and embedded into the rest of the string specified for the value attribute. Note that this behavior is in contrast to using <c:out> to specify an attribute of an HTML tag, which works as expected and is discussed in "Setting Attributes for HTML Elements" on page 104. Finally, Figure 3-4 on page 113 might be rather puzzling at first glance because the textfields do not retain their values, so the bottom picture in Figure 3-4 displays white in the Background Color select element, even though the background color for the table is black in that picture. As "Retaining Values for HTML Text Elements" on page 106 illustrated, it's a simple matter to retain values in textfields; however, retaining values for HTML select elements is more of a challenge. See "Retaining Values for HTML Option Elements" on page 129 for more information about how you can retain values for HTML option elements. Most of the time the beans that you use in Web applications are compound, meaning one bean contains a reference to another. As is the case for simple beans, it's easy to access properties for compound beans, as the next section illustrates. Setting Compound Bean PropertiesThis section shows you how to use <c:set> to set properties for compound beans, which are beans that contain references to other beans, but before we can illustrate that approach, we need a compound bean. Listing 3.6 lists a simple Name bean that stores first and last names . Listing 3.6 WEB-INF/classes/beans/Name.java package beans; public class Name { private String first, last; public void setFirst(String first) { this.first = first; } public String getFirst() { return first; } public void setLast(String last) { this.last = last; } public String getLast() { return last; } } The name bean listed above is a compound bean because it contains references to strings. Name beans are referenced by another compound bean Subscriber listed in Listing 3.7. Listing 3.7 WEB-INF/classes/beans/Subscriber.java package beans; public class Subscriber { private Name name; private String email; public void setName(Name name) { this.name = name; } public Name getName() { return name; } public void setEmail(String email) { this.email = email; } public String getEmail() { return email; } } Listing 3.8 illustrates how you can access the first and last names of a subscriber. Listing 3.8 Setting Nested Bean Properties <!DOCTYPE HTML PUBLIC "-//W3C//DTD HTML 4.0 Transitional//EN"> <html> <head> <title>Setting Nested Bean Properties</title> </head> <body> <%@ taglib uri='http://java.sun.com/jstl/core' prefix='c' %> <jsp:useBean id='name' class='beans.Name'> <c:set target='${name}' property='first' value='John'/> <c:set target='${name}' property='last' value='Tate'/> </jsp:useBean> <jsp:useBean id='subscriber' class='beans.Subscriber'> <c:set target='${subscriber}' property='name' value='${name}'/> </jsp:useBean> <c:out value=' ${subscriber.name.first} '/> <c:out value=' ${subscriber.name.last} '/> </body> </html> The preceding JSP page uses <jsp:useBean> to create a name bean and sets the first and last name properties for that bean with the <c:set> action. Subsequently, the JSP page creates a subscriber bean and uses <c:set> to specify the subscriber's name. Finally, two <c:out> actions display the subscriber's first and last names with the EL expressions ${subscriber.name.first} and ${subscriber.name.last} . The output of the JSP page is John Tate . Adding, Removing, and Modifying Map EntriesIn addition to using <c:set> to set bean properties, you can also use it to add, remove, and modify entries in a map. [10] Figure 3-5 shows a simple Web application that lets you do just that.
Figure 3-5. Adding a Map Entry to a Map with <c:set> The top picture in Figure 3-5 shows a JSP page that displays key/value pairs stored in a hashtable, which is just one of many kinds of Java maps. [11] The JSP page has two buttons corresponding to JSP pages that allow you to add, modify, or remove entries from the map. The middle picture shows the JSP page that's loaded if you activate the Add or Modify an Item button in the JSP page shown in the top picture. The bottom picture shows the result of activating the Add or Modify Item button in the JSP page shown in the middle picture. As you can see, the item and pricein this case a helmet that costs $34.99is added to the hashtable.
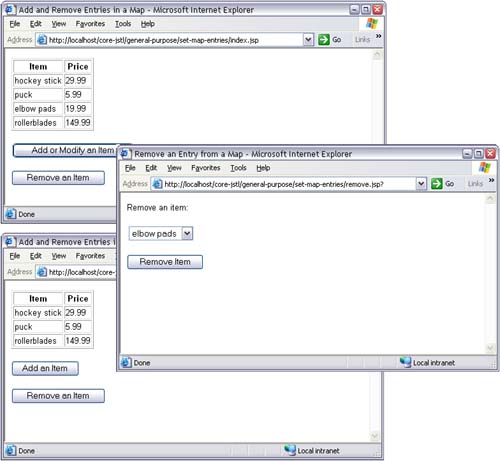
The JSP page shown in the top picture in Figure 3-5 is listed in Listing 3.9. Listing 3.9 index.jsp<!DOCTYPE HTML PUBLIC "-//W3C//DTD HTML 4.0 Transitional//EN"> <html> <head> <title>Add and Remove Entries in a Map</title> </head> <body> <%@ taglib uri='http://java.sun.com/jstl/core' prefix='c' %> <%-- Create a hash map and store it in session scope --%> <jsp:useBean id='map' class='java.util.HashMap' scope='session'> <%-- Add initial key/value pairs stored in the hash map. The following <c:set> actions are only invoked when the hash map is created. --%> <c:set target='${map}' property='inline skates' value='149.99'/> <c:set target='${map}' property='hockey stick' value='29.99'/> <c:set target='${map}' property='elbow pads' value='19.99'/> <c:set target='${map}' property='puck' value='5.99'/> </jsp:useBean> <%-- Add an entry to the map, modify an existing entry, or remove an entry, all with the following <c:set> action, depending on the values of the key and value request parameters. Those request parameters are set by add.jsp and remove.jsp, which are invoked depending on which button is selected from this page. --%> <c:set target='${map}' property='${param.key}' value='${param.value}'/> <table border='1'> <tr> <th>Item</th> <th>Price</th> </tr> <%-- Use <c:forEach> to create an HTML table that shows the map entries --%> <c:forEach var='entry' items='${map}'> <tr> <td><c:out value='${entry.key}'/></td> <td><c:out value='${entry.value}'/></td> </tr> </c:forEach> </table> <form action='add.jsp'> <input type='submit' value='Add or Modify an Item'/> </form> <form action='remove.jsp'> <input type='submit' value='Remove an Item'/> </form> </body> </html> The preceding JSP page uses <jsp:useBean> to create a hashtable and store it in session scope. The body of the <jsp:useBean> action contains <c:set> actions that add the initial key/value pairs to the hash map. Two things are noteworthy about those <c:set> actions. First, those actions are executed only when the hash map is created by <jsp:useBean> because they reside in the body of that <jsp:useBean> action. Second, you cannot replace those <c:set> actions with <jsp:setProperty> actions because <jsp:setProperty> can set existing properties only in a bean; <jsp:setProperty> cannot add key/value pairs to a hash map. After the hash map has been created and the initial key/value pairs have been added, a <c:set> action accesses request parameters that it uses to add, modify, or remove an entry in the hashtable. Those request parameters are set by the JSP pages ( add.jsp and remove.jsp ) that are loaded when one of the submit buttons in the preceding JSP page is activated. The first time that JSP page is loaded, the key and value request parameters are not specified, so the <c:set> action does nothing. Although the <c:forEach> action has not yet been discussed in this book, it is used in the preceding JSP pagein the interest of simplicityto create the HTML table. You can read more about the <c:forEach> action in "The <c:forEach> Action" on page 154. If you activate the Add or Modify an Item button in the preceding JSP page, add.jsp will be loaded in the browser. That JSP page is listed in Listing 3.10. Listing 3.10 add.jsp<!DOCTYPE HTML PUBLIC "-//W3C//DTD HTML 4.0 Transitional//EN"> <html> <head> <title>Add or Modify an Entry in a Map</title> </head> <body> <form action='index.jsp'> Add an item:<br> <table> <tr> <td>Item:</td> <td><input type='text' name='key'/></td> </tr><tr> <td>Price:</td> <td><input type='text' name='value'></td> </tr><tr> <td colspan='2'> <input type='submit' value='Add or Modify Item'/> </td> </tr> </table> </form> </body> </html> The preceding JSP page contains a form whose action is the JSP page listed in Listing 3.9. The preceding JSP page contains textfields that set the key and value request parameters used by the <c:set> action in Listing 3.9 to modify the hashtable. In addition to creating a new entry in the hashtable created by the JSP page listed in Listing 3.9, you can also use the Web application shown in Figure 3-5 to modify an existing entry in the hashtable, as illustrated in Figure 3-6. Figure 3-6. Modifying a Map Entry's Value with <c:set> Figure 3-6 is nearly identical to Figure 3-5 on page 119, except Figure 3-6 shows how you can modify an existing entry in the hashtable by specifying an item name that already exists. In Figure 3-6, that item is puck , and its value is changed from 5.99 to 8.99 . Figure 3-7 shows how you can use <c:set> to remove an entry from a map. The top picture in Figure 3-7 shows the JSP page listed in Listing 3.9 on page 120 and the middle picture shows the JSP page remove.jsp that's loaded when you activate the Remove an Item button in the JSP page shown in the top picture. If you activate the Remove Item button in the JSP page shown in the middle picture, the JSP page shown in the top picture is reloaded and is passed the name of the selected item as the key request parameter and null for the value request parameter. As you can see from the bottom picture in Figure 3-7, the item selected in the JSP page shown in the middle picture is removed from the hashtable. Figure 3-7. Removing a Map Entry from a Map with <c:set> The JSP page shown in the middle picture in Figure 3-7 is listed in Listing 3.11. The preceding JSP page, like the JSP page listed in Listing 3.9 on page 120, uses the <c:forEach> action in the interest of simplicity to create the HTML option elements for the select element. See "The <c:forEach> Action" on page 154 for more information about the <c:forEach> action. The preceding JSP page stores the select element's name in the key request parameter and creates a hidden field whose name is value and whose value is null . When the Remove Item button is activated in the JSP page, the JSP page listed in Listing 3.9 on page 120 is loaded and passed the key and value request parameters. Those parameters are used by <c:set> to remove the selected item from the hashtable. Listing 3.11 remove.jsp <!DOCTYPE HTML PUBLIC "-//W3C//DTD HTML 4.0 Transitional//EN"> <html> <head> <title>Remove an Entry from a Map</title> </head> <body> <%@ taglib uri='http://java.sun.com/jstl/core' prefix='c' %> <form action='index.jsp'> Remove an item:<p> <table> <tr> <td> <select name='key'> <c:forEach var='entry' items='${map}'> <option value='<c:out value="${entry.key}"/>'> <c:out value='${entry.key}'/> </option> </c:forEach> <select> </td> </tr> </table> <p><input type='submit' value='Remove Item'/> <text type='hidden' name='value' value='<c:out value=" ${null} "/>'/> </form> </body> </html> The <c:remove> ActionAs we saw in "The <c:set> Action" on page 111, you can use <c:set> to create scoped variables. Sometimes it's necessary to remove those variables, as evidenced by the example discussed in "Using Conditional and General-Purpose Actions Together" on page 137. JSTL provides a <c:remove> action that removes a scoped variable. You use that action with this syntax: [12]
<c:remove var [scope]/> You must specify the name of the scoped variable that you want to remove with the var attribute. Optionally, you can specify that variable's scope with the scope attribute. If you don't specify the scope attribute, <c:remove> will search the page, request, session, and application scopesin that orderfor a scoped variable with the name that you specified with the var attribute; <c:remove> removes the first variable that it finds with that name. The <c:catch> ActionJSP pages usually handle page-specific exceptions with the JSP page directive by specifying the errorPage attribute like this: <%@ page errorPage=' relative URL ' %> If an exception is thrown in a JSP page that has a page directive like the one listed above, the JSP container forwards control to the error page specified by the relative URL. Error pages specify a JSP page directive of their own, like this: <%@ page isErrorPage='true' %> JSP error pages have access to an exception variable that references the exception thrown by the original JSP page. The exception handling mechanism described above is sufficient for handling exceptions in many situations, but sometimes it's convenient to handle exceptions in the page where those exceptions are thrown. The <c:catch> action lets you do just that. Here's the syntax for the <c:catch> action: [13]
<c:catch [var]> body content, presumably with nested actions that can throw exceptions </c:catch> The <c:catch> action has one optional attribute var that specifies the name of a page-scoped variable. If an exception is thrown in the body of a <c:catch> action, <c:catch> stores the exception in that scoped variable. You can subsequently access that scoped variable only in the page on which the corresponding <c:catch> action resides. If you don't specify the var attribute, exceptions are caught but not saved. JSTL goes to great lengths to avoid exceptions; for example, if you specify null for the <c:out> action's value, that action will not throw an exception; instead, it will not produce any output. In fact, none of the actions that we have discussed so far in this book throw an exception, so we must introduce an action that we have not yet discussed<c:import>that throws an exception to illustrate the <c:catch> action. The <c:import> action, which is discussed in "The <c:import> Action" on page 201, lets you import a resource from your Web application, a foreign context, or an external URL, but if you specify a URL that does not exist, <c:import> will throw an exception. The following code fragment, which attempts to import a nonexistent resource with <c:import>, throws an exception. <c:catch var=' urlException '> <c:import url='http://aNonexistentURL.com'/> </c:catch> <c:if test='${not empty urlException }'> Sorry, couldn't find: <c:out value='${ urlException.message }'/> </c:if> In the preceding code fragment, the <c:catch> action catches the exception thrown by <c:import> and stores it in a page-scoped variable named urlException . Subsequently, the code fragment uses that variable to print an error message. Besides <c:import>, the preceding code fragment uses another action<c:if>that we have not yet formally discussed. That action, along with JSTL's other conditional actions, is discussed in the next section. |

EAN: N/A
Pages: 124