Database Creation
3 4
SQL Server provides three methods for creating a database: the Create Database Wizard, SQL Server Enterprise Manager, and T-SQL commands that can be saved in a file and run as a script. All three methods will be described in the sections that follow.
The Create Database Wizard has some limitations you should be aware of. The wizard places all data files it creates on a single drive in one folder that you specify. You cannot put data files in different physical locations (neither on different drives nor in different folders) if you use the wizard. You can place log files on a drive or in a folder separate from the data files but, again, in only one physical location. User-defined filegroups cannot be specified, and all files inherit the same growth options. Because of these limitations, the Create Database Wizard is the best choice if you need only a primary data file and a transaction log file in your database. (On the other hand, you can always add files and filegroups to the database later if you need them.)
You should use Enterprise Manager or a T-SQL script to create your database if you have secondary data files that you want to place on a disk drive different from that containing the primary data file, if you want to add user-defined filegroups, or if you need different growth options for the various files.
Using the Create Database Wizard
For novice database builders, the Create Database Wizard might be the easiest method; if it fits your needs despite the limitations mentioned earlier, by all means, use it. Follow these steps to use the Create Database Wizard to create a database:
- Start SQL Server Enterprise Manager, and select the server on which you want to create your database. To select the server, begin by expanding the Microsoft SQL Servers folder. (Click the plus sign to the left of the folder name.) Expand the SQL Server Group folder, and then click the name of the server you want to use. From the Tools menu, select Wizards. Expand Database, as shown in Figure 9-4.
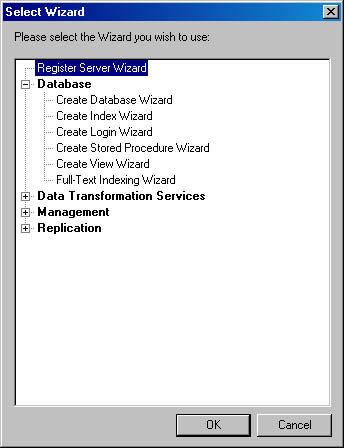
Figure 9-4. The Select Wizard screen.
- Double-click Create A Database to begin the Create Database Wizard, which is shown in Figure 9-5.
Figure 9-5. The Create Database Wizard welcome screen.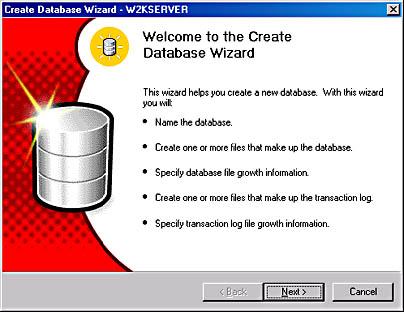
- Click Next to go to the Name The Database And Specify Its Location screen, as displayed in Figure 9-6. Type the name of the database you want to create and the path locations where you want to store your data files and your log files. These locations must contain a valid drive and a folder that already exists on your local system. If you click the browse […] button to the right of one of the bottom two text boxes, you can search for and select a folder. Once you have named your database and located the path where the data and log files should be, click Next to continue.
Figure 9-6. The Name The Database And Specify Its Location screen.
NOTE
The remainder of the figures in this section show the creation of a database named MyDB that has a primary data file on C:\mssql2k\MSSQL\data and one log file on D:\mssql2k\MSSQL\data. - The Name The Database Files screen is displayed (Figure 9-7). In this screen, you can type the name and initial size for each of your database files. The primary database file is automatically created and given the database name as a prefix in its name. You can either accept this name or type a different one. The primary data file has an .mdf extension. If you have some idea of how big your database files should be, type an initial-size value now. Otherwise, leave the default size; you can modify it later using Enterprise Manager or the ALTER DATABASE command. Any files you create in addition to the first, or primary, file will be secondary files and will automatically be given the .ndf extension. All files created here will be placed in the primary filegroup. There is no option to create user-defined filegroups with the Create Database Wizard.
In our example, we left the default primary file, MyDB_Data, and we added a secondary file, MyDB_Data2. Both these files will be placed in the same location you specified in step 3. (Do not continue if putting all data files on the same drive and in the same folder and filegroup is not what you want. Instead, use one of the other methods shown in the following sections for creating a database.) Click Next to continue.
Figure 9-7. The Name The Database Files screen.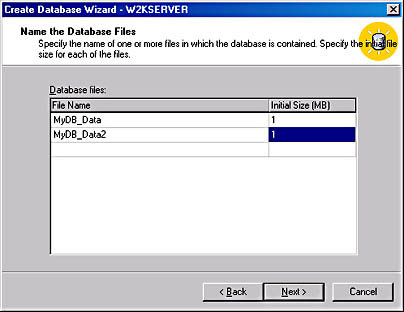
- The Define The Database File Growth screen is displayed (Figure 9-8). As mentioned earlier in this chapter, SQL Server can automatically increase the size of your database as needed, which helps to reduce maintenance overhead. In general, you should select the automatic file growth feature (Automatically Grow The Database Files) because it requires little performance overhead; otherwise, you will need to manually adjust the size of your database, as necessary. If you click Automatically Grow The Database Files, you can specify how the database file should increase: either in fixed megabyte chunks or as a percentage of its current size. Remember that the database file will grow only as needed. You can also restrict the database to a maximum size or let it grow without restriction. The settings in this screen will apply to each database file you created in step 4. You cannot use the Create Database Wizard to configure growth settings for individual files. Click Next to continue.
Figure 9-8. The Define The Database File Growth screen.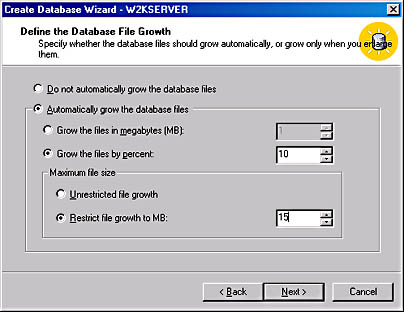
- The Name The Transaction Log Files screen appears. This screen looks the same as the Name The Database Files screen, but this version is for the log file. Be careful to not get the screens mixed up.
As you did in step 4 for your database files, type the name and initial size for your transaction log. (Remember that a transaction log contains a record of all database modifications for recoverability in case of system failure.) The first transaction log file is automatically created and given the database name as a prefix in its name. You can accept this name or type a different one. The transaction log data is stored in a file with the .ldf extension. You can add more log files on different drives, if needed. If you have some idea of how big the transaction log will be, type a value now. Otherwise, keep the default size; you can modify it later using Enterprise Manager or the ALTER DATABASE command. Click Next to continue.
- The Define The Transaction Log File Growth screen is displayed. This screen looks the same as the Define The Database File Growth screen, but here we are defining growth options for the log file. As you could in step 5, you can select Automatically Grow The Database Files, and if you want, you can specify the growth parameters and maximum file size. Click Next to continue.
- The Completing The Create Database Wizard screen, shown in Figure 9-9, is displayed. Review the information you have specified for your new database. If it is acceptable, click Finish to complete your database creation; otherwise, click Back and make any necessary changes.
Figure 9-9. The Completing The Create Database Wizard screen.
- Once your database has been created, a Create Database Wizard message box appears to inform you that the database has been successfully created. Click OK to close this message box.
- Another message box appears, asking whether you would like to create a maintenance plan for your new database. Creating a maintenance plan is recommended to ensure that your database performs well, is regularly backed up in case of system failure, and is checked for inconsistencies. But because we won't cover maintenance plans until Chapter 30, click No to finish.
Using Enterprise Manager
SQL Server Enterprise Manager enables you to create more complex databases than does the Create Database Wizard. You can specify growth options for each file created, rather than for all the files as a group, and you can create user-defined filegroups. To create a database using Enterprise Manager, complete the steps outlined in the following list. In this example, we will create a sample database named MyDB, with a primary data file, three secondary data files (which reside in the same user-defined filegroup), and one log file.
- Open Enterprise Manager. In the left pane, expand the SQL Server group that contains the name of the server you want to build the database on, and then expand the server node itself. Then right-click the Databases folder and choose New Database.
- The Database Properties window opens, with the General tab in front, as shown in Figure 9-10. Type the name of the database in the Name box.
Figure 9-10. The General tab of the Database Properties window.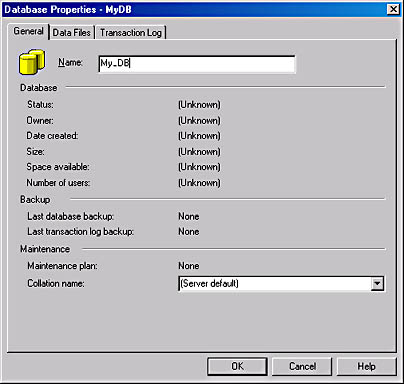
- Click the Data Files tab. As shown in Figure 9-11, Enterprise Manager automatically creates the primary data file, with the name of your database as a prefix and with PRIMARY as the filegroup. You can change the name, location, and size of the primary file, but you cannot change the filegroup for the primary data file. Type the filename (logical name), location (physical name), size, and filegroup for each data file you want to create. For each data file other than the primary file, you can type a user-defined filegroup name, and that filegroup will be created for you. In our example, we created the secondary data file MyDB_Data2 in the filegroup My_FG.
Figure 9-11. The Data Files tab of the Database Properties window.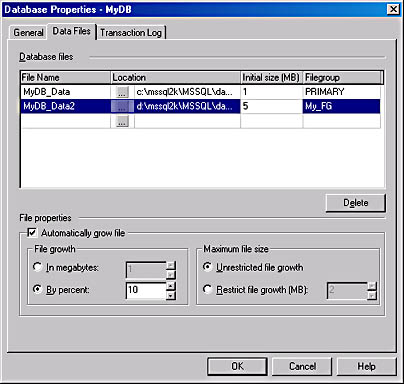
The location for each file is by default the folder on the drive on which SQL Server is installed. You can change this setting by typing a new path or by using the browse button.
- In the File Properties area at the bottom of the window, you can select automatic-growth options on a per-file basis. Select the name of the file for which you want to set growth options. Select the Automatically Grow File check box to enable automatic growth for that file. You can then specify the growth increment in megabytes or as a percentage of free space left in the file. You can also specify a maximum file size by clicking Restrict File Growth and entering a limit in megabytes, or you can leave the file size unrestricted. You can set these options as you create each file, or you can leave the defaults and set them later using the Enterprise Manager Database Properties window. If you need to delete a file from the list, select the name of the file and press the Delete key.
- After you have finished configuring all the data files, click the Transaction Log tab in the Database Properties window to configure the transaction log files. Log files are configured in the same way as data files, except that you cannot select a filegroup for log files because they do not belong to any filegroup. Type the filename (logical name), the location (physical name), and the initial size for the log file or files. Also, choose the automatic-growth options for the log files as described step 4 for data files.
- When you have all the files defined as you want them, click OK. SQL Server will create the database. Go back to Enterprise Manager and click the Databases folder for the server you just added a database to. In the right pane of Enterprise Manager, you'll see that SQL Server has added an icon for that database.
Using T-SQL Commands
You might prefer to create or alter your databases by using T-SQL commands or scripting rather than by using a graphical user interface (GUI). Creating your own scripts can be useful when you create databases. Let's say you create the database but then realize you specified the wrong location for a file. You can drop the database and start over. If you used a T-SQL script to create the database, you will be able to edit it and rerun it quickly, instead of having to reenter all the data into a GUI. You can also run the same script if you need to create the database on another system, such as a warm backup system.
On the other hand, Enterprise Manager can be used to generate T-SQL scripts for database creation (as well as for the creation of all database objects) but only after a database has already been created. The Enterprise Manager scripts will include all of the current database option settings, which can be useful; therefore, you might prefer to use the generated scripts. Whether you decide to write your own scripts or to use generated scripts, it is good to understand the T-SQL code used to create a database. In this section, we will review the T-SQL commands for creating a database. These commands can be typed into a file to create a script. Specifically how to create and run a script is explained in Chapter 13.
REAL WORLD A Simple Database
In the following example, we'll create a database named MyDB that contains a primary data file (MyDB_root); one secondary data file (MyDB_data1), which remains in the primary filegroup by default; and one transaction log file (Log_data1). The SQL statements for creating the MyDB database are shown here:
CREATE DATABASE MyDB ON (NAME = MyDB_root, --Primary data file FILENAME = 'c:\mssql2k\MSSQL\data\mydbroot.mdf', SIZE = 8MB, MAXSIZE = 9MB, FILEGROWTH = 100KB), (NAME = MyDB_data1, --Secondary data file FILENAME = 'c:\mssql2k\MSSQL\data\mydbdata1.ndf', SIZE = 1000MB, MAXSIZE = 1500MB, FILEGROWTH = 100MB) LOG ON (NAME = Log_data1, --Log file FILENAME = 'e:\log_files\logdata1.ldf', SIZE = 1000MB, MAXSIZE = 1500MB, FILEGROWTH = 100MB)
Notice that, in this example, the primary and secondary data files are both on the C drive and the log file is on the E drive. As mentioned, you should always physically separate data files from log files to improve disk I/O performance.
Also, notice that the recommended file extensions—.mdf, .ndf, and .ldf—were used. The SIZE, MAXSIZE, and FILEGROWTH options can be specified in kilobytes or megabytes; the default is megabytes.
MORE INFO
To learn more about the CREATE DATABASE statement, check the Books Online index for the topic "Create Database."
REAL WORLD A More Complex Database
The database example in this section is based on a system with several disk drives or several arrays of disks (in a RAID system). The term "disk" will be used to refer to either a single disk drive or an array of disk drives acting as a RAID volume. Several files are created, each on a separate disk. Each file is placed in one of two filegroups. Our database will be named "Sales" and will contain the following files:
- A primary data file, Sales_root.mdf
- Three secondary data files, customer_data1.ndf, customer_data2.ndf, and customer_data3.ndf, in the filegroup customers_group
- Two secondary data files, product_data1.ndf and product_data2.ndf, in the filegroup products_group
- One log file, log_data1.ldf
The code for creating the Sales database is shown here. Because we will be creating user-defined filegroups, we will include the keyword FILEGROUP with this CREATE DATABASE command.
CREATE DATABASE Sales ON PRIMARY --Explicitly states primary --filegroup (optional). (NAME = Salesroot, --Primary data file FILENAME = 'c:\mssql2k\MSSQL\data\salesroot.mdf', SIZE = 8MB, MAXSIZE = 10MB, FILEGROWTH = 1MB), FILEGROUP customers_group --Filegroup for next files (NAME = customer_data1, --Secondary data file FILENAME = 'd:\mssql2k\MSSQL\data\customerdata1.ndf', SIZE = 800MB, MAXSIZE = 1000MB, FILEGROWTH = 100MB), (NAME = customer_data2, --Secondary data file FILENAME = 'e:\mssql2k\MSSQL\data\customerdata2.ndf', SIZE = 800MB, MAXSIZE = 1000MB, FILEGROWTH = 100MB), (NAME = customer_data3, --Secondary data file FILENAME = 'f:\mssql2k\MSSQL\data\customerdata3.ndf', SIZE = 800MB, MAXSIZE = 1000MB, FILEGROWTH = 100MB), FILEGROUP products_group --Filegroup for next files (NAME = product_data1, --Secondary data file FILENAME = 'g:\mssql2k\MSSQL\data\product_data1.ndf', SIZE = 500MB, MAXSIZE = 700MB, FILEGROWTH = 100MB), (NAME = product_data2, --Secondary data file FILENAME = 'h:\mssql2k\MSSQL\data\product_data2.ndf', SIZE = 500MB, MAXSIZE = 700MB, FILEGROWTH = 100MB) LOG ON (NAME = logdata1, --Log file FILENAME = 'i:\log_files\logdata1.ldf', SIZE = 800MB, MAXSIZE = 1000MB, FILEGROWTH = 200MB)
As the comments in this code indicate, the primary filegroup can be explicitly stated before the primary data file is defined. The primary filegroup is the default. The other two filegroups, customers_group and products_group, are defined immediately before the files that will be placed in them. All of the files listed after a filegroup definition will be placed in that filegroup until another filegroup is defined or the LOG ON clause is reached.
Also, notice the drive letters for each file. Each file is created on a different disk to allow data to be spread across disks when the tables and indexes are created in the filegroups. For instance, a table created in the customers_group filegroup will have its data striped across the disks that hold the customer_data1.ndf, customer_data2.ndf, and customer_data3.ndf files. The log file is also on a separate disk, with no data files, to allow the log to perform sequential writes.
If you do not want SQL Server to automatically grow a file, set FILEGROWTH=0 so that the file will be allowed to fill only its initial size. You might choose this setting if you have a table that is static—in other words, a table that does not grow. In this case, MAXSIZE would not need to be specified in the statement. The maximum size would be the initial SIZE setting.
NOTE
If you're familiar with SQL Server versions 6.5 and earlier, you'll notice that you no longer use the DISK INIT command to create logical devices before creating the database. The use of files replaces logical devices.
EAN: N/A
Pages: 264