Creating Triggers
3 4
Now that you know what triggers are and when they are used, let's move on to the specifics of creating triggers. In this section, we'll look first at the T-SQL method of creating triggers and then at the Enterprise Manager method. To use Enterprise Manager to create triggers, you will need to know T-SQL coding, just as you do when you use Enterprise Manager to create other types of stored procedures.
Using the CREATE TRIGGER Statement
To use T-SQL to create a trigger, you use the CREATE TRIGGER statement. (The Enterprise Manager method uses this statement as well.) The basic syntax of the CREATE TRIGGER statement is as follows:
CREATE TRIGGER trigger_name ON {table | view} [WITH ENCRYPTION] {FOR | AFTER | INSTEAD OF} {[DELETE] [,] [INSERT] [,] [UPDATE]} [WITH APPEND] [NOT FOR REPLICATION] AS sql_statement [...n] As you can see, you can create a trigger for an INSERT, an UPDATE, a DELETE, an INSTEAD OF, or an AFTER statement or for any combination of the five. You must specify at least one option with the FOR clause. This clause indicates which type of data modification event (or types of events), when performed on the specified table, will cause the trigger to fire.
The SQL statements after the AS keyword will be performed when the trigger is called. You can include multiple statements here, including programming constructs such as IF and WHILE. The following statements are not allowed in a trigger definition:
- ALTER DATABASE
- CREATE DATABASE
- DISK INIT
- DISK RESIZE
- DROP DATABASE
- LOAD DATABASE
- LOAD LOG
- RECONFIGURE
- RESTORE DATABASE
- RESTORE LOG
Using the deleted and inserted Tables
As mentioned, you have access to two temporary tables, the deleted and inserted tables, when you create a trigger. They are referred to as tables, but they are different from true database tables. They are stored in memory—not on disk.
The two tables have the same structure (the same columns and types of data) as the table on which the trigger is defined. The deleted table holds copies of rows affected by the execution of a DELETE or an UPDATE statement. The rows that are deleted from the trigger table are transferred to the deleted table. The data in the deleted table can then be accessed within the trigger. The inserted table holds copies of the rows added to the trigger table by the execution of an INSERT or UPDATE statement. The rows are added simultaneously to the trigger table and the inserted table. Because an UPDATE statement is treated as a DELETE followed by an INSERT, when an UPDATE statement is used, the old row values are copied into the deleted table and the new row values are copied into the trigger table and the inserted table.
If you try to examine the contents of the deleted table within a trigger that fires because an INSERT statement executes, the table will be empty, but no error will occur. The execution of an INSERT statement will not cause any row values to be copied into the deleted table. Similarly, if you attempt to examine the contents of the inserted table within a trigger that fires because a DELETE statement executes, you will see that the inserted table is empty. The execution of a DELETE statement will not cause any row values to be copied into the inserted table. Again, you will not cause an error to occur by looking at these tables when they are empty; so if you want to use the tables to see the effect of a modification, make sure you choose the correct table to access within your triggers.
NOTE
The values in the inserted and deleted tables are accessible only within the trigger. Once the trigger is completed, these tables are no longer accessible.
Creating Your First Trigger
To see how a trigger functions, let's create a simple table with a trigger defined on it that prints a statement whenever an update occurs. The T-SQL code for creating this table is as follows:
USE MyDB GO CREATE TABLE Bicycle_Inventory ( make_name char(10) NOT NULL, make_id tinyint NOT NULL, model_name char(12) NOT NULL, model_id tinyint NOT NULL, in_stock tinyint NOT NULL, on_order tinyint NULL, ) GO IF EXISTS (SELECT name FROM sysobjects WHERE name = "Print_Update" AND type = "TR") DROP TRIGGER Print_Update GO CREATE TRIGGER Print_Update ON Bicycle_Inventory FOR UPDATE AS PRINT "The Bicycle_Inventory table was updated" GO
To test our trigger, let's insert a row into the table and then update it:
INSERT INTO Bicycle_Inventory VALUES ("Trek",1,"5500",5,1,0) GO UPDATE Bicycle_Inventory SET make_id = 2 WHERE model_name = "5500" GO The message "The Bicycle_Inventory table was updated" is returned because the execution of the UPDATE statement fired the trigger. In this example, we defined our trigger to display a message so we could see that the trigger was executed. Normally, you do not want a trigger to return output. In certain circumstances, however, you might find it helpful to have a trigger that returns output. For example, suppose you create an UPDATE trigger that executes its statements only if a specified column receives a certain value, but the update does not appear to be working correctly. If you add a PRINT statement within the trigger that prints the column's value before the other trigger statements are executed, it might help in determining whether the problem lies in the logic of the trigger or in the data being updated.
Creating a DELETE Trigger
Now let's look at a more complex example—a DELETE trigger that cascades changes through related tables. We'll create a trigger that will delete rows from the sales, roysched, and titleauthor tables of the pubs database when a corresponding row is deleted from the titles table. We'll use the deleted table to indicate which rows to delete from the related tables. (Remember that when a row is deleted from a trigger table, it is copied to the deleted table; then you can examine the contents of the deleted table and delete all corresponding entries in the other tables.) For this trigger to work, we would have to drop the FOREIGN KEY constraints from the titleauthor, roysched, and sales tables that reference the title_id column in the titles table. In this example, let's create the trigger as if these FOREIGN KEY constraints did not exist. If you do attempt to delete a row from the titles table without removing the FOREIGN KEY constraints, you will get an error message from SQL Server, and the delete will fail.
NOTE
If you don't mind altering your pubs database, try deleting the FOREIGN KEY constraints on your own and then creating this trigger. It's easiest to delete FOREIGN KEY constraints by using a database diagram in Enterprise Manager. (This process is explained in Chapter 16.) Be sure to delete the FOREIGN KEY constraints that reference title_id.
The T-SQL code for this trigger is shown here:
USE pubs GO IF EXISTS (SELECT name FROM sysobjects WHERE name = "Delete_Title" AND type = "TR") DROP TRIGGER Delete_Title GO CREATE TRIGGER Delete_Title ON titles FOR DELETE AS DELETE sales FROM sales, deleted WHERE sales.title_id = deleted.title_id PRINT "Deleted from sales" DELETE roysched FROM roysched, deleted WHERE roysched.title_id = deleted.title_id PRINT "Deleted from roysched" DELETE titleauthor FROM titleauthor, deleted WHERE titleauthor.title_id = deleted.title_id PRINT "Deleted from titleauthor" GO
To test the trigger, use a DELETE statement such as this:
DELETE titles WHERE title_id = "PC1035" GO
If you execute this DELETE statement, the trigger will fire (assuming that you deleted the foreign key relationships mentioned earlier). You'll see the rows-affected message for the data modification event on the titles table, followed by the messages specified in the three PRINT statements from the trigger and the number of rows affected in the other three tables; this output is shown here:
(1 row(s) affected) Deleted from sales (5 row(s) affected) Deleted from roysched (1 row(s) affected) Deleted from titleauthor (1 row(s) affected)
Another use of the deleted table in a trigger is to save all deleted rows from a table to a backup table for later data analysis. For instance, to store the deleted rows from the roysched table in a new table called roysched_backup, use the following code:
USE pubs GO CREATE TABLE roysched_backup ( title_id tid NOT NULL, lorange int NULL, hirange int NULL, royalty int NULL ) CREATE TRIGGER tr_roysched_backup ON roysched FOR DELETE AS INSERT INTO roysched_backup SELECT * FROM deleted GO SELECT * FROM roysched_backup GO
Notice that we gave the backup table the same column names and data types as we gave the original table. You can use different column names for roysched_backup, but you should use the same data types for the two tables to ensure compatibility.
Creating an INSERT Trigger
In this example, we'll create an INSERT trigger (a trigger that fires when an INSERT statement executes) on the sales table. This trigger will update the ytd_sales column in the titles table when a row is inserted into sales, by adding to it the value that was inserted into the sales table's qty column. The trigger queries the inserted table to obtain the qty value that was inserted into the sales table. We'll include a SELECT * statement in the trigger that will show us what the inserted table contains. Here is the T-SQL code for this trigger:
USE pubs GO IF EXISTS (SELECT name FROM sysobjects WHERE name = "Update_ytd_sales" AND type = "TR") DROP TRIGGER Update_ytd_sales GO CREATE TRIGGER Update_ytd_sales ON sales FOR INSERT AS SELECT * FROM inserted UPDATE titles SET ytd_sales = ytd_sales + qty FROM inserted WHERE titles.title_id = inserted.title_id GO
Notice that we used the FROM table_source (FROM inserted) clause in the UPDATE statement to indicate that the qty value should come from the inserted table. Now run the following INSERT statement to view the results from this trigger:
INSERT INTO sales VALUES(7066, 1, "March 7, 2000", 100, "Net 30", "BU1111") GO
You will see the following results. The first set of results shows the row selected from the inserted table, and the second "1 row(s) affected" message is from the UPDATE statement.
stor_id ord_num ord_date qty payterms title_id ––––––– ––––––– ––––––––––––––––––––––– ––– –––––––– –––––––– 7066 1 2000-03-07 00:00:00.000 100 Net 30 BU1111 (1 row(s) affected) (1 row(s) affected)
Creating an UPDATE Trigger
Next let's create an UPDATE trigger that will check the price column when the titles table is updated to verify that the price of a book has not increased by more than 10 percent. If it has, a ROLLBACK statement is issued that will roll back the trigger and the statement that called it. If the trigger fires from within a larger transaction, the entire transaction will be rolled back. The deleted and inserted tables are used in this example to test for the price change. The trigger definition is shown here:
USE pubs GO IF EXISTS (SELECT name FROM sysobjects WHERE name = "Update_Price_Check" AND type = "TR") DROP TRIGGER Update_Price_Check GO CREATE TRIGGER Update_Price_Check ON titles FOR UPDATE AS DECLARE @orig_price money, @new_price money SELECT @orig_price = price from deleted PRINT "orig price =" PRINT CONVERT(varchar(6),@orig_price) SELECT @new_price = price from inserted PRINT "new price =" PRINT CONVERT(varchar(6),@new_price) IF (@new_price > (@orig_price * 1.10)) BEGIN PRINT "Rollback occurred" ROLLBACK END ELSE PRINT "Price is OK" GO
To test this trigger, first run the following statements to check the current price of the book whose title ID is BU1111:
SELECT price FROM titles WHERE title_id = "BU1111" GO
The price is $11.95. Next, attempt to increase the price by 15 percent, using this statement:
UPDATE titles SET price = price * 1.15 WHERE title_id = "BU1111" GO
You will see the following results:
orig price = 11.95 new price = 13.74 Rollback occurred
The trigger fired, printing the original price and the new price and—because the price increase was more than 10 percent—issuing a rollback.
Now let's check the price again to verify that the modification was rolled back. Use the following T-SQL code:
SELECT price FROM titles WHERE title_id = "BU1111" GO
The price has been reset to $11.95, so the modification was indeed rolled back.
Now let's increase the price by 9 percent and verify that the change in price takes effect. The T-SQL code for this modification is as follows:
UPDATE titles SET price = price * 1.09 WHERE title_id = "BU1111" GO SELECT price FROM titles WHERE title_id = "BU1111" GO
The price is changed to $13.03, and because the increase is less than 10 percent, the trigger does not initiate a rollback.
When you create an UPDATE trigger, you can specify that the trigger perform certain statements only if a particular column or certain columns are updated. For example, let's re-create the preceding trigger, this time using an IF UPDATE clause to specify that the trigger check the price column only when the price column itself is updated:
USE pubs GO IF EXISTS (SELECT name FROM sysobjects WHERE name = "Update_Price_Check" AND type = "TR") DROP TRIGGER Update_Price_Check GO CREATE TRIGGER Update_Price_Check ON titles FOR UPDATE AS IF UPDATE (price) BEGIN DECLARE @orig_price money, @new_price money SELECT @orig_price = price FROM deleted PRINT "orig price =" PRINT CONVERT(varchar(6),@orig_price) SELECT @new_price = price FROM inserted PRINT "new price =" PRINT CONVERT(varchar(6),@new_price) IF (@new_price > (@orig_price * 1.10)) BEGIN PRINT "Rollback occurred" ROLLBACK END ELSE PRINT "Price is OK" END GO
Now if an update is made to one or more columns in the titles table and does not include the price column, this trigger will skip the statements between the BEGIN and END keywords in the outer IF statement, in effect skipping over the entire trigger.
To test this trigger, run the following T-SQL statement, which updates the year-to-date sales (the value in the ytd_sales column) for the book whose title_id column value is BU1111.
UPDATE titles SET ytd_sales = 123 WHERE title_id = "BU1111" GO
Notice that the output does not include any of the messages specified in the trigger's PRINT statements. The trigger fired because we updated the titles table. Because the update was to the ytd_sales column, not to the price column, the outer IF condition returned FALSE. Therefore, the statements in the trigger were not executed. This technique prevents SQL Server from processing unnecessary statements.
Creating an INSTEAD OF Trigger
The INSTEAD OF trigger gives you control of what happens when an INSERT, an UPDATE, or a DELETE function occurs. The INSTEAD OF trigger is used primarily when updating a union view. Normally, union views are not updatable, because SQL Server would not know which underlying table or tables to modify. To get around this, you define an INSTEAD OF trigger on the view to modify the underlying tables. Let's look at an example.
The following T-SQL statements create a view called TitlesByAuthor, which references the authors, titles, and titleauthor tables. (See Chapter 18 for more information on creating views.)
USE pubs GO CREATE VIEW TitlesByAuthor AS SELECT authors.au_id, authors.au_lname, titles.title FROM authors INNER JOIN titleauthor ON authors.au_id = titleauthor.au_id INNER JOIN titles ON titleauthor.title_id = titles.title_id GO
Now that we have created a view, we'll use the following T-SQL code to display all the rows (also shown here) that meet the view criteria:
USE pubs GO SELECT * FROM TitlesByAuthor GO au_id au_lname title ––––––––––– –––––––––––––– –––––––––––––––––––––––––––––––––––––––– ––– 238-95-7766 Carson But Is It User Friendly? 724-80-9391 MacFeather Computer Phobic AND Non-Phobic Individuals: 756-30-7391 Karsen Computer Phobic AND Non-Phobic Individuals: 267-41-2394 O'Leary Cooking with Computers: 724-80-9391 MacFeather Cooking with Computers: 486-29-1786 Locksley Emotional Security: A New Algorithm 648-92-1872 Blotchet-Halls Fifty Years in Buckingham Palace Kitchens 899-46-2035 Ringer Is Anger the Enemy? 998-72-3567 Ringer Is Anger the Enemy? 998-72-3567 Ringer Life Without Fear 486-29-1786 Locksley Net Etiquette 807-91-6654 Panteley Onions, Leeks, and Garlic: 172-32-1176 White Prolonged Data Deprivation: Four Case Studi 427-17-2319 Dull Secrets of Silicon Valley 846-92-7186 Hunter Secrets of Silicon Valley 712-45-1867 del Castillo Silicon Valley Gastronomic Treats 274-80-9391 Straight Straight Talk About Computers 267-41-2394 O'Leary Sushi, Anyone? 472-27-2349 Gringlesby Sushi, Anyone? 672-71-3249 Yokomoto Sushi, Anyone? 213-46-8915 Green The Busy Executive's Database Guide 409-56-7008 Bennet The Busy Executive's Database Guide 722-51-5454 DeFrance The Gourmet Microwave 899-46-2035 Ringer The Gourmet Microwave 213-46-8915 Green You Can Combat Computer Stress! (25 row(s) affected)
If you attempt to delete the row from this view in which the au_lname value is Carson, you will get the following message:
Server: Msg 4405, Level 16, State 1, Line 1 View or function 'TitlesByAuthor' is not updatable because the FROM clause names multiple tables.
To get around this condition, let's create an INSTEAD OF trigger to handle the delete operation. The following T-SQL statements create an INSTEAD OF trigger called Delete_It:
NOTE
The following code does not actually delete a row from the authors table in the pubs database. It simply renames the row for the purposes of this example.
USE pubs GO IF EXISTS (SELECT name FROM sysobjects WHERE name = 'Delete_It' AND type = 'TR') DROP TRIGGER Delete_It GO CREATE TRIGGER Delete_It ON TitlesByAuthor INSTEAD OF DELETE AS PRINT 'Row from authors before deletion...' SELECT au_id, au_lname, city, state FROM authors WHERE au_lname = 'Carson' PRINT 'Deleting row from authors...' UPDATE authors SET au_lname = 'DELETED' WHERE au_lname = 'Carson' PRINT 'Verifying deletion...' SELECT au_id, au_lname, city, state FROM authors WHERE au_lname = 'Carson' GO
Now when we issue the T-SQL statements to delete Carson from the view, the INSTEAD OF trigger will fire, and we will receive the following output:
Row from authors before deletion... au_id au_name city state ––––––––––– ––––––––––––––– –––––––––––––––––––– ––––– 238-95-7766 Carson Berkeley CA (1 row(s) affected) Deleting row from authors... (1 row(s) affected) Verifying deletion... au_id au_name city state ––––––––––– ––––––––––––––– –––––––––––––––––––– ––––– (0 row(s) affected)
Using AFTER Triggers
As mentioned earlier in this chapter, an AFTER trigger is simply a trigger that fires after a specified data modification event is completed. If you have more than one AFTER trigger defined on a table for a particular event or set of events, you can specify which trigger will fire first and which trigger will fire last. Any other triggers defined on the table for that event or set of events will fire in a random order. The first and last triggers are specified via the sp_settriggerorder T-SQL statement. The syntax of the statement is as follows:
sp_settriggerorder [@triggername =] 'triggername', [@order=] {'first' | 'last' | 'none'} Let's look at an example. Suppose we have four triggers defined on a table: MyTrigger, MyOtherTrigger, AnotherTrigger, and YetAnotherTrigger. We want to ensure that after the triggering event, AnotherTrigger fires first and MyTrigger fires last. We issue the following T-SQL statements:
sp_settriggerorder @triggername = 'AnotherTrigger', @order = 'first' go sp_settriggerorder @triggername = 'MyTrigger', @order = 'last' go sp_settriggerorder @triggername = 'MyOtherTrigger', @order = 'none' go sp_settriggerorder @triggername = 'YetAnotherTrigger', @order = 'none' go
The 'none' designation for MyOtherTrigger and YetAnotherTrigger instructs SQL Server to fire these triggers randomly after AnotherTrigger fires and before MyTrigger fires. Because this random firing is the default behavior for triggers, you need not explicitly execute sp_settriggerorder for the triggers that will randomly fire.
Using Nested Triggers
Nested triggers are triggers that are fired by other triggers. They differ from recursive triggers, which fire themselves. A nested trigger is initiated when a data modification event within another trigger fires the nested trigger. Like SQL Server 7, SQL Server 2000 allows triggers to be nested up to 32 levels deep. One trigger fires a second trigger, which, in turn, fires a third trigger, and so on, up to the thirty-second trigger. Nested triggers are enabled by default in SQL Server 2000. You can specify whether SQL Server should allow nested triggers by setting the nested triggers server configuration parameter. To disable nested triggers, for example, run the following command:
sp_configure "nested triggers", 0 GO
Setting the value to 0 disables nested triggers; setting it to 1 enables them.
Let's look at an example of using nested triggers. In this example, we'll create nested triggers that will perform cascading deletes when a book title is deleted from the titles table. In the section "Creating a DELETE Trigger," we created a single trigger that performs this operation. First we'll drop the trigger from the earlier example so it will not fire. Then we'll create three triggers. The second and third triggers will be nested triggers. The first one fires the second, which fires the third. Here is the code:
USE pubs GO IF EXISTS (SELECT name FROM sysobjects WHERE name = "Delete_Title" AND type = "TR") DROP TRIGGER Delete_Title GO CREATE TRIGGER TR_on_titles ON titles FOR DELETE AS DELETE sales FROM sales, deleted WHERE sales.title_id = deleted.title_id PRINT "Deleted from sales" GO CREATE TRIGGER TR_on_sales ON sales DELETE roysched FROM roysched, deleted WHERE roysched.title_id = deleted.title_id PRINT "Deleted from roysched" GO CREATE TRIGGER TR_on_roysched ON roysched DELETE titleauthor FROM titleauthor, deleted WHERE titleauthor.title_id = deleted.title_id PRINT "Deleted from titleauthor" GO
To execute these triggers successfully, you must delete the FOREIGN KEY constraints on the tables specified in the triggers (as you did in the section "Creating a DELETE Trigger"). To test whether all of the triggers execute, run the following DELETE statement:
DELETE FROM titles WHERE title_id = "PS7777" GO
You will see the following result set:
(2 row(s) affected) (1 row(s) affected) Deleted from titleauthor (2 row(s) affected) Deleted from roysched (1 row(s) affected) Deleted from sales (1 row(s) affected)
When a failure occurs at any level in a set of nested triggers, the entire transaction is canceled, and all data modifications are rolled back to the beginning of the transaction.
Using Enterprise Manager
To create a trigger by using Enterprise Manager, you simply type your T-SQL statements in the Trigger Properties window. To use this method, follow these steps:
- In Enterprise Manager, right-click the name of the table on which you want to create the trigger. In the shortcut menu that appears, point to All Tasks and then choose Manage Triggers from the All Tasks submenu. The Trigger Properties window appears, as shown in Figure 22-1.
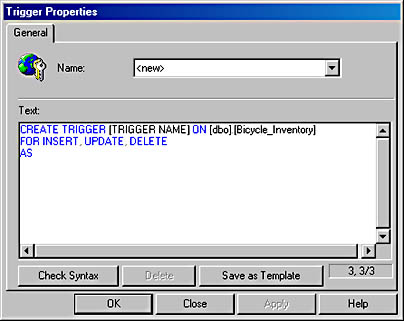
Figure 22-1. The Trigger Properties window.
- Type the T-SQL code for your trigger in the Text box. Figure 22-2 shows the Trigger Properties window, containing T-SQL code for a sample trigger called Print_Update.
- Click Check Syntax to verify the syntax. If the syntax of your T-SQL code is correct, you will see the dialog box shown in Figure 22-3. If not, make the required corrections. Click Apply to create the trigger. The name of the new trigger now appears in the Name drop-down list. Figure 22-4 shows the list, with the name of our sample trigger appearing in it.
- The Trigger Properties window remains open, enabling you to create additional triggers on the table. If you do not have more triggers to create, click Close.
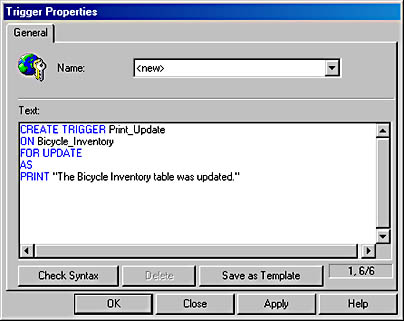
Figure 22-2. The Trigger Properties window with trigger code inserted.
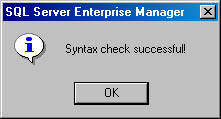
Figure 22-3. The dialog box indicating a successful syntax check.
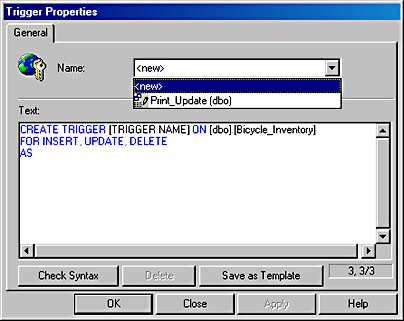
Figure 22-4. The name of the newly created trigger in the Name drop-down list.
EAN: N/A
Pages: 264