| You don't actually create PDFs from within Acrobat. Instead, Acrobat lets you view, edit, customize, and refine the PDF documents you create in other applications. Acrobat includes a printer driver that appears like any other real printer in any Print dialog. Choosing Adobe PDF as your printer lets you create a PDF that you can then print, or view in Acrobat and Adobe Reader. InDesign, Illustrator, Photoshop, and QuarkXPress all include built-in tools for creating PDF versions of your documents as well. Acrobat's PDF Printer When you install Acrobat, a new printer called Adobe PDF 7.0, which refers to the version of Acrobat installed on your Mac, is automatically added to your printer list. That printer is available in any application and lets you output documents as PDF. Unless you tell it otherwise, the Adobe PDF 7.0 printer uses your current settings in Distiller. Here's how to choose different PDF output settings: 1. | Choose File > Print or press Command-P to open the Print dialog.
| 2. | Choose Adobe PDF 7.0 from the Printer pop-up menu.
| 3. | Choose PDF Options from the pop-up menu that has Copies & Pages selected by default.
| 4. | Choose the PDF settings you want to use from the Adobe PDF Settings pop-up menu.
| 5. | Click the Print button to output your document.
|
Creating PDF documents with the Adobe PDF printer is much better than using Tiger's built-in Save as PDF option for professional jobs. The Adobe printer uses Distiller to create your PDF, which gives you the control you need as a designer over transparency, embedded fonts, and image compression. PDF documents created with Tiger's built-in tool may not always render transparency correctly, which can cause delays on press while you create new PDF documents to correct rendering errors. Creative Suite Applications InDesign, Photoshop, and Illustrator all include an Export to PDF option, which uses the Distiller engine to create a PDF version of your document. InDesign and Illustrator include an Export to PDF option that has the same features as Distiller for controlling the output settings in your document. The settings are also grouped similarly to the way they are in Distiller. InDesign and Illustrator Here's how to save an InDesign or Illustrator document as a PDF: 1. | Choose File > Export.
| 2. | Choose Adobe PDF from the Format pop-up menu.
|
The Export PDF dialog includes the same options as in Distiller, just grouped a little differently (Figure 4.9). General. Much like Distiller's General pane, the General pane here allows you to set the oldest version of Acrobat that your PDF is compatible with. In InDesign only, the Standard pop-up menu lets you select a PDF/X standard for your document, just as you can in Distiller's Standards pane. Figure 4.9. InDesign includes the same PDF formatting options as in Distiller. It even uses the Distiller engine when building a PDF from your documents. 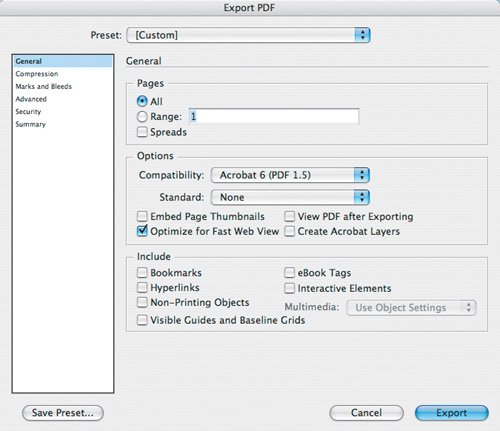 Compression. Here you can set the maximum image resolution, as in the Images pane in Distiller. Marks and Bleeds. This is where you add crop, bleed, and registration marks, color bars, and page information to your PDF. InDesign also lets you add a slug area (see the sidebar "Working with Slugs"), since it is a page-layout application, whereas Illustrator is not. Advanced. The Advanced pane combines some of the settings from Distiller's Color and Advanced panes. If InDesign or Illustrator is not using a color-managed workflow, the Include ICC Profiles option is disabled. If you did not choose a PDF/X profile from the Standard pop-up menu in the General pane, the PDF/X option here is disabled, too. If you are using a PDF/X standard, you can use the Output Intent Profile pop-up menu to choose your intended output-device type. InDesign and Illustrator always embed the fonts you use in your document. If you want to change the threshold where subsetting begins, use the "Subset fonts when percentage of characters used is less than" option. You should be fine leaving this option set to 100 percent, which will help keep your PDF file size down. If your PDF will be compatible with Acrobat 5 or later, the Transparency Flattener options are disabled. For earlier Acrobat versions, transparency effects must be flattened during rendering. Choose High Resolution from the Preset pop-up menu for the best quality. Tip If you need to select an Output Intent Profile but aren't sure which one is appropriate, you can usually get by with one of a few choices. In the United States, U.S. Web Coated (SWOP) v2 is the most common. In Europe, Europe ISO Coated FOGRA27 is likely to meet your needs. European printing standards, however, tend to be several years ahead of the United States', so be sure to double-check which profile is appropriate if your project is being printed outside of the United States.
Security. This is where you add different levels of security to your PDF through the use of passwords. You can set a password that limits or prohibits the ability to print or edit the PDF, and you can also require a password to open the document. We'll discuss password-protecting PDFs later in the "PDF Security" section. Summary. Once you finish configuring your settings exactly the way you want, you can use the Summary section to review your choices. Clicking the Save Summary button creates a report for you that is saved as a text file. If you are sending a PDF to a service bureau or print shop, including a Summary report can help in tracking down the source of problems if your document doesn't output correctly.
Working with Slugs A slug is a special area in your document that is outside of the finished-piece area. Typically, it's at the bottom of the page. Slugs include extra information about the document or project, such as job numbers, client information, copyright information, notes about fonts and colors used, or any other information you may need as the project progresses to a finished, printed product. Depending on your needs, you can choose to print your slug or not. If it is printed, it needs to be outside of the trim area so that it will be cut from the finished piece. |
Photoshop CS and CS2 The PDF export option in Photoshop is limited, compared with InDesign and Illustrator. Since Photoshop documents tend to be composed primarily of raster images, and any vector elements are converted to raster during output, Photoshop includes a subset of Distiller's options for converting graphics to PDF. Here's how to save a Photoshop CS document as a PDF: 1. | Choose File > Save As.
| 2. | Choose Photoshop PDF from the Format pop-up menu.
| 3. | Click Save. This will open the PDF Options dialog.
| | | 4. | Set your image-compression level in the Encoding section in the PDF Options dialog (Figure 4.10).
Figure 4.10. Photoshop doesn't include as many PDF setting options as InDesign does, but that's because it's an image editor and not a page-layout application. 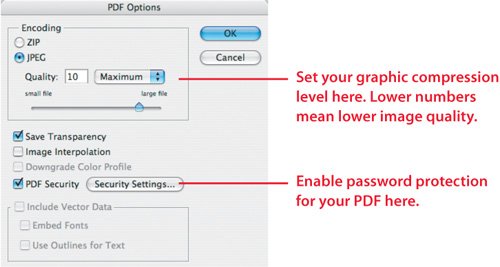
| 5. | Uncheck Save Transparency if your PDF is going to be opened in Acrobat or Adobe Reader 5 or earlier.
| 6. | Check the PDF Security box if you want to add passwords to prohibit opening, printing, or editing your document without authorization. Click the Security Settings button to set your document passwords, and then click OK.
|
Tip Adding a password to prevent printing or editing of a Photoshop-created PDF applies only if the document is opened in Acrobat. The PDF is still editable if it is opened in Photoshop.
Photoshop CS2 includes a Save as Adobe PDF dialog that is very similar to InDesign's. Just like Photoshop CS, you access the PDF dialog by choosing File > Save As. The dialog includes the same General, Compression, Output, Security, and Summary features as InDesign and Illustrator. QuarkXPress QuarkXPress 7 includes its own PDF export feature. Instead of using the Print dialog, it uses an Export option similar to InDesign's. 1. | Choose File > Export > Layout as PDF.
| 2. | Choose your PDF settings from the PDF Style pop-up menu. Click the Options button if you want to customize the PDF output settings. Use Default PDF Output Style for the standard QuarkXPress 7 output settings.
| 3. | Click Save.
|
If you want to create your own PDF output settings, choose Captured Settings from the PDF Style pop-up menu, and then click the Options button. The PDF Export Options dialog lets you control most aspects of your PDF output, but it doesn't let you add password protection to prohibit unauthorized opening or printing of your document (Figure 4.11). Figure 4.11. QuarkXPress 7 includes many of the same PDF export options as InDesign and Illustrator do. 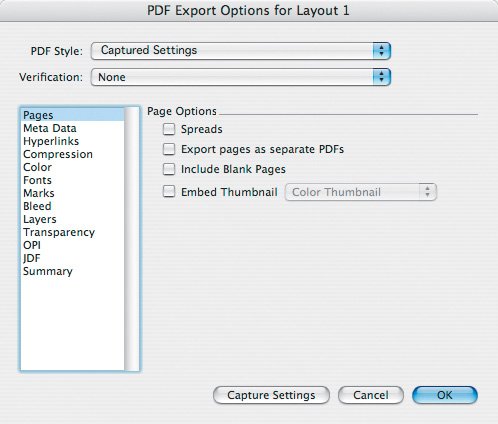
Since most of the options here are similar to those of InDesign, Illustrator, and Distiller, let's look at the options that are unique to QuarkXPress 7. Meta Data. If you make a PDF from a Creative Suite application, you have to open your document in Acrobat to add metadata content. QuarkXPress 7, however, lets you add some basic metadata, like a document title, subject information, author, and keywords. You can search for your metadata with Spotlight, too (Figure 4.12). If you aren't familiar with Spotlight, check out Chapter 1, "The Tiger Finder." Figure 4.12. You can add information to your PDF in QuarkXPress. That information is searchable with Spotlight. 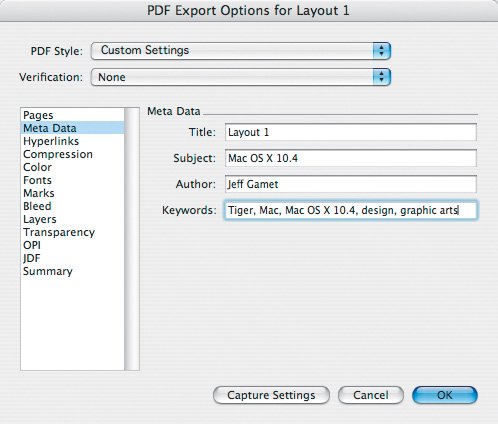 Hyperlinks. QuarkXPress 7 can embed in your PDF document the hyperlinks you create (Figure 4.13). By default, this option is turned on and set to create an invisible frame around each link. Figure 4.13. If your QuarkXPress document includes hyperlinks to Web pages, or to other places in your document, you can choose to include those in your finished PDF.  Layers. The Adobe applications include all visible document layers in your PDF. QuarkXPress takes a different approach, and lets you choose which layers appear in your PDF (Figure 4.14). Any layer with a checked box will print; layers with an unchecked box won't. Figure 4.14. QuarkXPress 7 lets you set which document layers are included in your finished PDF.  Transparency. By default, QuarkXPress always flattens transparency effects when outputting to PDF (Figure 4.15). A Transparency Flattening Resolution setting of 300 dpi most closely matches InDesign's Medium Resolution preset. A setting of 1200 dpi is similar to InDesign's High Resolution setting. Figure 4.15. Setting the Transparency Flattening Resolution lower than 300 dpi will probably give you unacceptable transparency quality in your finished PDF. If you are creating a PDF that is compatible with Acrobat 5 or later, you can check the Ignore Transparency Flattening box, but that will limit compatibility of your PDF to the newer versions of Adobe Acrobat and Reader. 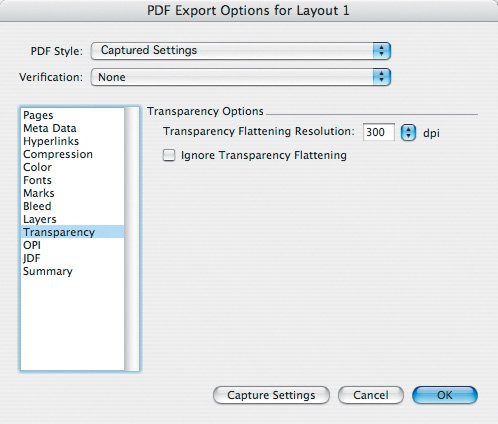
Third-Party PDF Tools PDF has revolutionized at least part of the design and printing industry by making it so much easier to create documents that output properly wherever they may end up. For some, however, PDF is the lifeblood of their workflow, and the PDF features that come with the Adobe Creative Suite or QuarkXPress aren't enough. Several companies make applications that automate your PDF workflow, help you create correct PDFs, and preflight PDFs to check for problems, but I'm partial to the products from Enfocus (www.enfocus.com). Instant PDF and PitStop Professional work along with the copies of Acrobat and Distiller already installed on your Mac to help ensure that every PDF you make or get from someone else is built correctly. If all the jobs you output are in PDF format, PitStop Pro can also completely automate that process for you, send your finished PDFs to the appropriate output device, and send you e-mails to let you know when it finishes a job or finds an incorrectly built PDF. Instant PDF Instant PDF ($199) helps streamline your PDF creation by building error-free PDF documents from InDesign and QuarkXPress, and managing and creating PDF settings files. After it is installed, you access it by choosing File > Save As Certified PDF. It works by applying PDF settings someone else has given you, or that you created yourself, to Distiller when your PDF is made. Preflight 101 Any good design or printing workflow includes a preflight phase. Preflighting is the process of evaluating the contents of a job. For example, if you hand off a project to a print shop for final output, the printer should check to see that all of the necessary files are included, such as the document itself, and the fonts and graphics you used. The printer should also check to see if any of your images are at the wrong resolution, or using the wrong color space. Preflighting a PDF works the same, except that you are checking to verify that the document components, including fonts and graphics, are properly embedded. Preflighting is a critical part of design and printing workflows. It will save you time and money, since you'll know before your project enters your workflow if there are potential problem or missing files, image color space or resolution problems, or font issues. |
Choosing to make a PDF with Instant PDF opens the Enfocus Instant PDF window, where you can choose your PDF settings, either from a group you have already made or from settings files that your service bureau or print shop has given you (Figure 4.16). If there are any parts of your PDF that don't comply with the settings specifications, you'll get a report that details what's wrong. For example, if you output an InDesign document to PDF that should only include CMYK images, but an RGB image is included, Instant PDF will let you know. Figure 4.16. Instant PDF, from Enfocus, gives you even more control over your PDF documents than Distiller does. You can also use PDF settings files from other InstantPDF or PitStop Pro users so that they know the files you give them are compliant with their workflow needs. 
Tip If you work with several designers that have Instant PDF installed, give them the PDF settings file for your workflow. They can create PDFs with those settings, so you always know that the files they send you don't have any hidden problems lurking inside. If you work in a print shop, supply copies of Instant PDF for your clients and post your PDF settings files on your Web site. They can download and install your settings, and send you PDFs that are built exactly the way you want them.
PitStop Professional PitStop Professional ($599) is a high-powered PDF editing tool that works as an Acrobat plug-in. It lets you preflight PDFs based on PDF/X standards or PDF settings you create yourself. PitStop Pro can even auto-correct some of the problems it finds. You can use PitStop Pro to convert RGB colors to spot Pantone colors, edit text, and move and edit graphics, which can save you hours of time you would otherwise spend rebuilding PDF documents that your clients create from Microsoft Word files. It also lets you create PDF settings files that you can distribute to other designers and clients. |