K3b, for a Friendlier Burn
| I still find it interesting to consider the terms that have entered the language when referring to creating CDs. We rip, and then we burn. Considering the violent-sounding nature of the process, anything that simplifies the process and makes things a little friendlier is certainly welcome. One of the friendliest tools for creating and copying audio and data CDs is called K3b. K3b now comes as part of KDE, but you can still keep up with development or pick up the latest version at www.k3b.org. K3b is generally found under the Multimedia menu the program name (should you wish to run it from the shell or via the <Alt+F2> launcher) is k3b. When you fire up K3b for the first time, the program will detect the various devices you have for reading and writing. There you will see a pop-up window that asks you to verify those devices (Figure 18-14). Figure 18-14. K3b asks you to verify the writing speed of your CD and DVD writers.
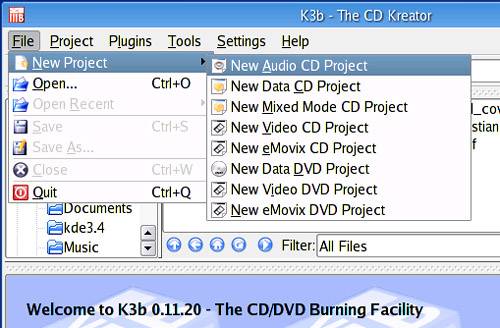
On my test system, I have a CD writer as well as a DVD writer. Unless you know that it is something different, it's usually okay to just accept the burn speed suggested. Click OK, and you'll find yourself at the main K3B window (Figure 18-15). Figure 18-15. K3b's main window, ready for action.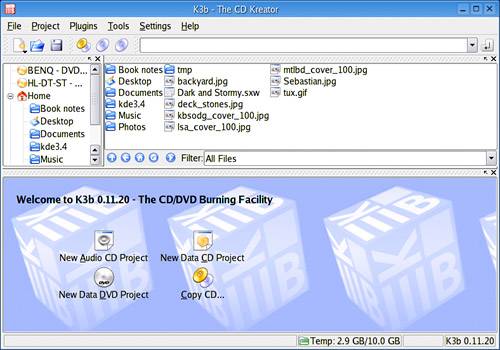 Getting Familiar with K3bK3b's interface is friendly and very easy to use. It is broken up into three main windows, with two top frames and one larger one at the bottom, all of which can be resized to your tastes. The top left-hand frame is your file navigator, showing your directories in the Konqueror-like tree format you are now familiar with. Just click the plus signs to open a directory or the minus sign to collapse it. The top right-hand frame will display the contents of whatever folder you have selected on the left-hand side. Creating a CD of any kind in K3b is done with projects, and that is where the bottom window comes into play. That window will display details about the CD or DVD you are going to put together. Before you actually do, however, notice the quick-access projects there (Audio CD, New Data DVD, etc.). These just happen to be the most common choices you might make. Click File on the menu bar and select New Project. You'll be presented with several other choices (Figure 18-16). Figure 18-16. This close-up of the File, New Project dialog displays a list of K3b projects.
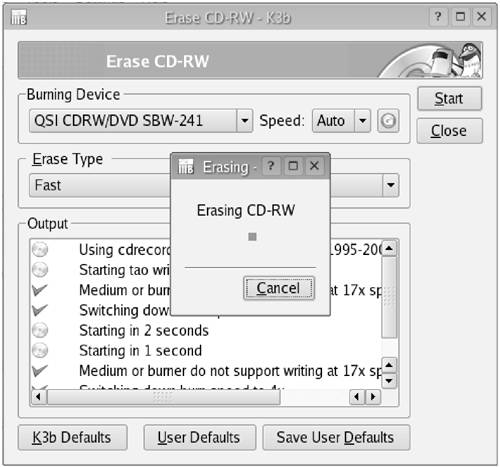
If you are looking to create an audio CD, click File on K3b's menu bar and select New Project; then click on New Audio Project. If you were creating a data CD (which we cover shortly), you would click on New Data Project. Backing Up Your Data with K3bK3b makes a quick and easy tool for backing up your important data. The best approach involves CD-RW, or rewriteable CDs, because you can use them over and over again. Before you reuse your CD-RW, you'll want to blank it first. Pop the disk into your CD rewriter, click Tools on the menu bar, select CD, and then from that submenu choose Erase CD-RW. A window will appear (Figure 18-17) showing you some options for erasing the CD-RW just click the drop-down box for other choices. From there, you can select which CD writer you wish to use (if you have more than one), the speed at which you want to perform the operation, and whether you want a fast or a complete erase. When you are happy with your choice, click the button labeled Start at the top right-hand corner of the window. Just below all this is an Output window, where the progress of blanking will be displayed. After your successful-completion message, you will still want to click Close to banish the window. Figure 18-17. Preparing to erase a CD-RW.
Now you are ready to back up your data. Start a New Data Project. A tab with a sequentially generated name will appear (starting with DataCD1) in the bottom Current Projects window. It will be divided into two areas. On the left-hand side, you'll see a small icon representing a CD, with the current project name next to it. On the right will be a blank list with headings for file Name, Type, Size, Local Path, and Link. To fill this project, simply drag directories or files onto the CD icon in the left-hand side of the Current Projects window. As each directory is added, K3b will calculate the amount of space all of this takes. Consequently, it may take a few seconds for a large directory to appear as these calculations are being made. A colored bar will stretch along the bottom, indicating the amount of space you still have left to create your data CD. Figure 18-18. To create a data CD, just drag directories and files into the data window.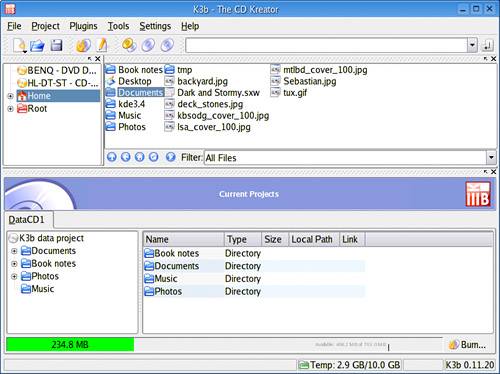
After you have added everything you want, click the Burn icon directly below the menu bar. You can also right-click the current project tab and select Burn there. A new Write window will appear, with five tabs, labeled Writing, Settings, Volume Desc, Filesystem, and Advanced. I won't cover everything on every tab here, but I will tell you about a few of the more important settings, starting with the Writing tab. If your device is capable of high-speed burning, you may want to change the setting for Speed. The default choice is Auto, which will try to guess the optimal speed for your device. You may, however, feel confident that you can squeeze out a little more performance or accuracy by playing with this setting. Notice also the Burnfree checkbox. Most modern devices have Burn-Proof or Burnfree technology built right into the writers. If yours is capable, make sure you check this option on.
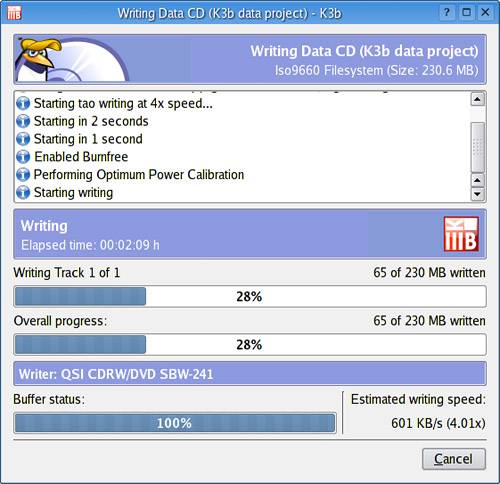
The Volume Desc tab allows you to set some label information for your CD, such as the name, who created it, and what system it was intended for. You don't actually need to enter anything here. It is all optional. Finally, take a look under the Advanced tab, where you'll find a number of miscellaneous options related to how data is written on your CD. For most users, these can be left alone. Did Someone Say "Backups"?By now you must be thinking, "Hey, if I can copy data directories to my CD, surely I can use this thing to do backups," and you would be bang on. Other than the limitations of the CD's roughly 700MB of storage, this is a great option. Use CD-RWs, and you can create a rotating set of discs for backup purposes. Taking all this into consideration, we're onto something here, but there are some things to consider. Look under the Filesystem tab, and you'll find a couple of important settings related to data backups. The first has to do with whether you will ever be looking at this CD using a Windows system. If so, make sure you check on the Generate Joliet extensions box. Under Permissions, check on Preserve file permissions if this CD is a backup of your data. Should you ever need to recover from this CD, you'll want to have the proper ownership and permissions of files and directories maintained. When you're done and ready to go, click on the Burn button, located in the top right-hand corner of this dialog box. A progress window will appear, with status information on the current CD creation (Figure 18-19). Figure 18-19. Watching the status of a burn in progress.
That's it. With your data safely backed up, you can sleep soundly at night. Creating a Music CD with K3bData is fine, of course, but I started this chapter talking about music. The good news is that if you've already mastered the art of creating a data CD with K3b, you are well on your way to doing the same with music. From the file menu, select New Project; then click on New Audio CD Project. Putting your music CD together is just a matter of navigating to the directory in which your music is stored and dragging songs into the Current Projects window at the bottom (Figure 18-20). The window has a tab labeled AudioCD1. You can create multiple projects if you wish, and each will appear with its own tab. Figure 18-20. Building an audio CD of your favorite songs.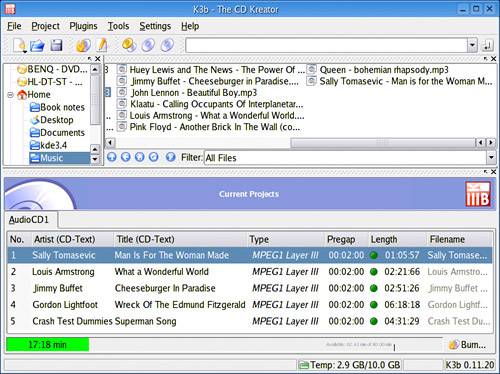 Along the bottom of the audio project window is a green bar indicating how much time the songs you've chosen take up so that you know when to stop. When you have everything you want, click that Burn button in the bottom right-hand corner of the K3b window. Don't worry about the order in which the songs appear on the list. When you have your selection complete, simply click on the songs in the lower pane, and move them up or down at will. If the song in position 6, for example, would make a better opener, drag it up to position 1. It is that easy. When you are done, click Burn. As the window appears, you might notice that it looks a little different than the data-burn window. For starters, there are two fewer tabs. We'll start with that one labeled CD-Text. Like the Volume Desc tab in the data project, this is for information only. This is where you enter the CD label information, performer name, or other information related to this disc. Should you decide simply to leave this blank, your CD will still work. The Advanced tab is much simpler than on the data CD dialog. The only option is a strange little trick to hide the first track of a song in the first pregap. If you do this, you won't find the song on a straight play. You'll have to seek backward from the first song. Finally, we'll go back to the Writing tab. There's really nothing new here that you haven't already seen. Select your write speed and click Write.
|

EAN: 2147483647
Pages: 247