Evolution
| In the preceding chapter, I mentioned that Evolution was a great e-mail client for those coming from the Windows world, particularly if they were used to working with Outlook. This is equally true when working with Evolution's calendaring applications. Take a look along the top of the application, just below the menu bar (Figure 12-13). The icons to the left let you quickly create appointments, send and receive e-mail, print, and so on. The icons to the right represent five calendar views: a day, a workweek (five days), a full week, a month, and a straight list of events. Clicking any of those buttons will change the calendar view in the main window below. Figure 12-13. Evolution's calendar view. The main window is divided into three sections. To the left of the main window (centrally located) is your main calendar view. To the right of that, you have a small calendar showing the current month. Clicking a date in that smaller calendar lets you jump right to that date. Still in the right-hand section, but below, you'll find a quick summary of your to-do items. Finally, a set of icons runs down the left-hand sidebar, providing you with quick access to Mail, Contacts, Calendar, and Tasks.
Creating AppointmentsWhere KOrganizer calls these events, Evolution uses the term appointment or meeting.
The idea is the same. To create a new appointment in Evolution with a single click, move your mouse pointer to the New button and click there (or press <Ctrl+N>). Notice the down arrow beside the New button (Figure 12-14). Clicking on the arrow brings up a number of additional choices, from composing a mail message to creating a contact in your address book. If you like, you can always take the multiclick route by clicking File on the menu bar, selecting New, and then selecting Appointment. If you will be inviting others to this event, choose Meeting. Figure 12-14. The Evolution "New" dialog.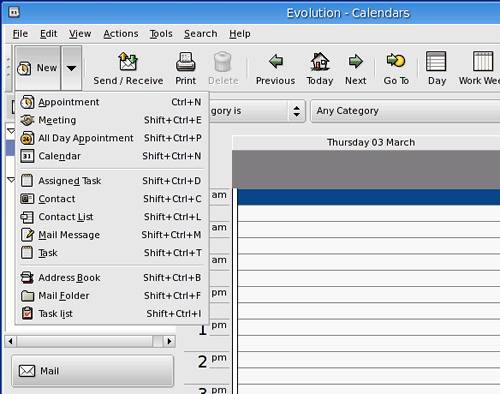 Another way to do this is to double-click on the time you want in the main calendar view. As soon as you do this, the new Appointment dialog will appear. Start by entering your Summary information (e.g., Poker night) and a Location (e.g., Jake and Michelle's house). A Start time will have been entered as well as an End time, but you may have to fine-tune those. Clicking on the down arrow beside the date pops up a small calendar, from which you can quickly pick the date. The drop-down list associated with the time is divided into half-hour intervals.
An appointment can also be set as an all-day event by clicking the All day event checkbox. Doing this will blank out the start and end times but not the dates. If this is an important appointment, you will likely want to be reminded of it. Click on the Alarm checkbox. There are three default reminders to the right of that button. Unless you change the settings, the message will appear 15 minutes before the appointment. The other settings are 1 hour before and 1 day before the appointment. If this isn't specific enough, click the Customize button. Your default alarm will appear (the 15-minute one) with an option to Add new alarms or Remove the current one. Remove the current alarm (or click Add if you want multiple alarms), and the Add Alarm dialog will appear (Figure 12-15). Figure 12-15. Evolution can remind your of your appointments in many different ways.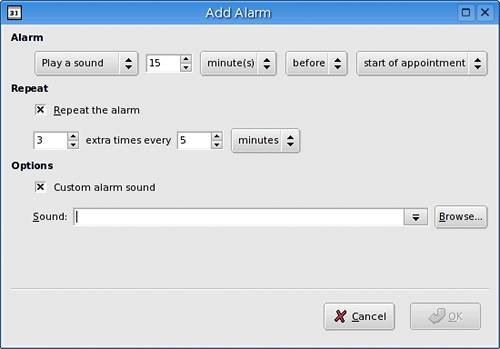 In order to create a different type of alarm, click on the Pop up an alert button (under the Alarm label) and change it to either Play a sound or Run a program. You can set a custom pop-up message and even specify a repeat for the alarm. Another way to look at it is how often do you want to be nagged? When you are done with the new alarm, click OK. To add more alarms, all you have to do is click the Add button once. Now you get the idea. Let's Do That Again: Evolution RecurrenceBefore we move on to making this more than a one-person appointment, let's look at recurrence. If the gang meets for that poker game every week or every month at the same place and time, it just makes sense to enter the appointment once and have the system do the rest for you. Click on the Recurrence tab (Figure 12-16). Figure 12-16. Setting recurrence information for an Evolution appointment.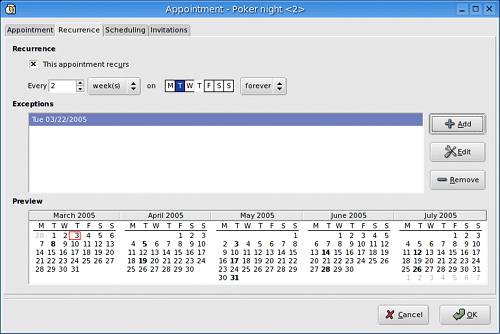 Activate recurrence by clicking the This appointment recurs checkbox. Choose how often you want this appointment to occur and with what frequency (e.g., every 2 weeks on Tuesday). Directly below is the Exceptions dialog. Clicking on the down arrow to the right of the Add button will pop up a small calendar. Select those days that don't apply to the standard recurrence (e.g., your holidays) and click Add. You can specify as many exceptions as you like. When you are happy with everything, click the OK button. The new appointment will appear in your main calendar view. The Makings of a MeetingFor your meeting to be truly a meeting and not just an appointment, you'll need some people to invite. As I mentioned earlier, meetings have two additional tabs along the top, labeled Scheduling and Invitations. Click on the Invitations tab. The first thing you should see (if you created this appointment) is that you are listed as the Organizer of the meeting. This is something you can override. But if you created the meeting, it probably makes sense to leave it as is. Below that is a large window labeled Attendees. Click the Add button to the right, and a field will open in which you can add the person's e-mail address. (You can also click the Contacts button and choose attendees from your address book.) Under the Type heading, you can define whether that attendee represents an individual or some other resource. Next, under the Role heading, select whether the individual will act as chair, a participant (required or not), or an optional-participant (i.e., an observer) or whether you are specifying a resource. Under the next heading, RSVP, decide whether or not the attendee should confirm his or her attendance. Finally, under Status, you may define whether the attendee has already accepted, declined, or whether their attendance is tentative. By default, entries are listed as Needs Action. Finally, we have the Scheduling tab (Figure 12-17). This is another way to select individuals, but one that allows you to check free/busy information. Near the bottom of this window, you'll see the word Autopick by a drop-down box. To the right and left are buttons with double arrows on them. Click these, and Evolution will automatically select the next block of time (either before or after your initial attempt) in which all invitees are free, based on their published free/busy information. When you click OK, your attendees will be sent an e-mail message in which they can choose to accept or decline the invitation to attend. Figure 12-17. Scheduling a meeting with free/busy information.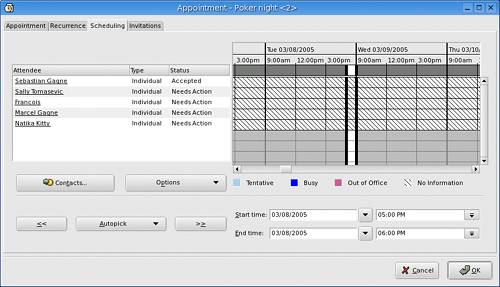 Tasks and Other To-DosIn Evolution, your to-do items are called tasks. Looking at Evolution's main calendar display, you'll see a summary task list in the lower right-hand pane. Adding a new task is as easy as clicking the field labeled Click to add a new task. Type a brief description of your task, and press <Enter> when you are done. For a task-only list, click the Tasks button in the left-hand sidebar. That will provide you with a much larger view and another quick-entry field. Double-click on any field, and a dialog will appear offering you a much more detailed view of the task in question (Figure 12-18). The new window features two tabs, labeled Task and Status. These allow you to enter a description of the task, assign a completion date and time, and indicate priority and status information, such as whether the task has been started and its percentage of completion. Figure 12-18. A more complete task dialog. One last, and fairly important, feature is the ability to delegate this task to someone else. Right-click on the item you want in the task list. Select Assign Task from the drop-down list. A new tab will appear, labeled Assignment, from which you can select an individual to carry out the task. When you have entered the information, a window will pop up asking whether the assigned task should be sent. The correct answer is, of course, Yes. |
EAN: 2147483647
Pages: 247