Flylib.com

Books Software


Recording Scheduled Transactions in Your Account Register


Recording Scheduled Transactions in Your Account Register

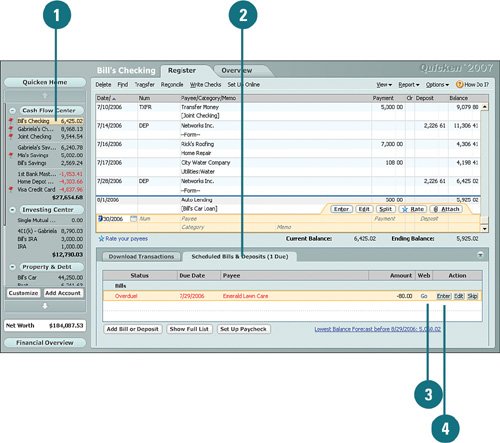
When you set up your accounts and tell Quicken about any regularly scheduled transactions for your accounts, Quicken creates a scheduled transactions list for you. The scheduled transactions for your all your accounts appear on the Scheduled Bills & Deposits tab in each of your account registers. They also appear on the Scheduled Bills & Deposits section in the Cash Flow Center, the Quicken Home page, and on the master list in the Bills & Deposits window. You can record transactions from any of these locations. The following task shows you how to record scheduled transactions from an account register.

Record Scheduled Transactions in Your Account Register

On the account bar, select the account to which you want to record scheduled transactions.

If it's not already visible, click the Scheduled Bills & Deposits tab. The number in parentheses represents the number of transactions waiting to be added to your register.

If you pay this bill online through a website, ensure that you are connected to the Internet, and click the Go link to open the website. After you're finished, you can return to Quicken and enter the transaction in your register.

To add a scheduled transaction to your register, click Enter .

For Your Information

You can edit transaction information for all future instances of this transaction by selecting it from the Scheduled Bills & Deposits tab and clicking Edit . Then from the Edit Future Transactions window, make your changes and click OK .


Review the information to ensure that it is correct and make changes, if needed. Any changes you make here do not apply to all future transactionsonly to the current transaction.

To add the transaction to your register, click Enter Transaction .

If you are not ready to enter the transaction in your register, click Cancel to take no action on the transaction and return to the scheduled transaction list. The transaction remains in the scheduled transaction list until you are ready to record it or skip it.

If the transaction does not apply for this transaction period, click Skip to remove the transaction from your scheduled transactions for the current period. It will reappear the next time it is scheduled to show up.

To view the average amount spent for a transaction, select the transaction and click the Report icon. You can view a complete report by clicking the Show Report button.

To close the pop-up window, click Close .

You can also use the Report drop-down menu to view other information about the selected transaction and the categories associated with it.

Enter all scheduled transactions until you are finished. Transactions you record are entered into your register, and your balance is adjusted accordingly .

Did You Know?

Unscheduled transactions appear under the Schedule These? section. If there are transactions that have not been scheduled, Quicken creates a temporary section on the Scheduled Bills & Deposits tab called Schedule These? (not shown here). You click Yes to schedule a transaction or No to leave it unscheduled. This does not remove it from your scheduled transactions. If there are no unscheduled transactions, you do not see this section.


Downloading and Adding Transactions from Your Account Register

If you set up any of your accounts for online access, each time you use One Step Update, your most recent account transactions download to the appropriate account in Quicken. You can then review and add the transactions to your register, edit transactions before you add them to your register, or delete them if needed. If you don't use the online updates, you can add transactions manually.

Download Transactions from Your Account Register

On the account bar, click the account to which you want to add downloaded transactions.

To download account transactions, connect to the Internet and on the Downloaded Transactions tab, click Update Transactions .

In the Online Update for this Account window, select the account you want to download (if there are multiple accounts), type your password, and click Update Now .

See Also

See "Editing Accounts" on page 103 for information on setting up online services for accounts and "Using Online Updates" on page 79 for information on setting up a PIN.


Did You Know?

Your account must be set up for online access before you can download transactions . In order to download account transactions, the account must already be set up for online access, your financial institution must provide download capability in to Quicken, and you must have a login ID and password already set up.


If the Online Update Summary window opens, review the information that was downloaded and click Close .

To add all transactions to your register, click Accept All .

IMPORTANT Be aware that if you have scheduled transactions set up and have already entered them in your account register, and you then download the same transactions, duplicate transactions can be created. You should match up the transactions so that duplicate transactions are not entered in your account register. To do this, before you accept the transaction, click the Edit drop-down next to the transaction and select Match Manually. From the Manually Match Transactions window, select the scheduled transaction you want to replace with the downloaded transaction. Then click Accept.

To add only individual transactions to your register, click each transaction you want to add and click Accept . A message appears, asking if you want to assign a category to each transaction.

Click Yes to assign a category or No to enter the transaction without assigning a category.

To assign a category, select the category you want to use or click Split to assign more than one category to a transaction.

Click Enter . The status of the transaction changes to Accepted on the Downloaded Transactions tab. After you add all transactions to your register, the transactions no longer appear on the Downloaded Transactions tab.

To remove a transaction, select the transaction, click Edit , and then select Delete .

To view spending totals and averages for the category, click the Report icon.

TIMESAVER You can also view payee spending totals by clicking in the Payee column and clicking the Report icon.

Did You Know?

Assigning categories can help you track your spending. By assigning categories to all your transactions, you can see exactly where your money is going when you run transaction reports , as shown in step 11. Quicken tracks categories across all your accounts so that when you run a report, it can show you exactly how much you've spent in a specific category.