How To Prototype
|
| < Day Day Up > |
|
There are two types of prototypes: physical prototypes and software prototypes. The difference is that physical prototypes tend to be created using pen and paper or other real-world materials, while software prototypes are entirely digital and rely on computer code to function.
Physical prototypes
Let’s begin with physical prototypes since that’s the easiest type of prototype for most game designers to construct on their own. These are typically created using slips of paper, cardboard, and household objects with hand-drawn markings. You are free to use anything you like, from lead figures to plastic army men to pieces borrowed from other games. Whatever you can cobble together is fine.
In early drafts, we recommend that you pay no attention to the quality of the artwork. Stick figure drawings are the norm. The goal is to rough out system components so that you can see how the game operates on a mechanical level. Spending time on the artwork only slows down the process. Also, if you invest too much time crafting the look and feel of the prototype, you may become attached to your work and be reluctant to make changes. Since the prototyping process is all about iteration and change, this becomes counterproductive.
Think of the prototype as analogous to a blueprint for a building. It might be only an approximation of the final product, but it serves its purpose, and often the limitations of pen and paper enable you to see the underlying forms and structures more clearly.
Battleship prototype
For our prototyping explanation, we're going to use a classic game with a simple system. If you’re not familiar with Battleship, it’s a popular twoplayer boardgame in which the object is to be the first player to sink your opponent’s fleet.
Let’s construct a physical prototype of this game. When starting with a prototype, it’s best to identify the key elements of a game and then handcraft each element. In this case, take four sheets of paper and draw a 10×10 grid on each. Label the rows on each grid with the letters “A” through “J.” Label the columns on each grid “1” through “10.” Put the following titles on the four grids: “Player 1 Ocean Grid,” “Player 1 Target Grid,” “Player 2 Ocean Grid,” and “Player 2 Target Grid.” The final set will look like Figure 7.2.
Next, find two players and give each an ocean grid, a target grid, and a pen. Players should shield their grids from their opponent’s view. Each player distributes the following five ships by drawing on his Ocean Grid. The numbers in parentheses are the ships’ sizes on the grid:
-
Carrier (1×5 cells)
-
Battleship (1×4 cells)
-
Destroyer (1×3 cells)
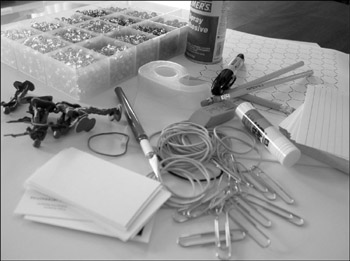
Figure 7.1: Prototyping materials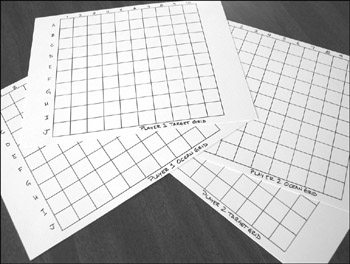
Figure 7.2: Battleship grids -
Submarine (1×3 cells)
-
Patrol Boat (1×2 cells)
All segments of the ships should be drawn on the playing grid. Ships may not be placed diagonally. Figure 7.3 shows an example of ships placed on the grid.
Now that you have the prototype assembled,it’s time to play. On a player’s turn, that player calls out grid coordinates—e.g., “B5.” If the opponent has a ship on that cell, then he answers, “hit.” If not, he answers, “miss.” When all segments of a ship have been hit, the opponent says, “You sank my battleship!” Simple enough?
Players track hits and misses on their target grids. If “B5” is a hit, the player marks an “H” on his target grid. Players take turns calling coordinates like this until one player sinks all five of the opposing ships. Figure 7.4 shows an example of what grids will look like during play.
Play this game yourself. Think about it in terms of how it functions as a prototype. Does it accurately represent the game mechanics? Although the artwork is crude and the rules are rough, do they provide enough of an experience for someone to grasp the game and give feedback? If this is the case, then the prototype is a success.
As you can see, making a playable game prototype doesn’t require programming skills or art skills. The experience generated by the paper version of Battleship is almost identical to the experience generated by the fully produced Milton Bradley version.
The advantage of prototyping is that as you assemble the game, you gain a tactile sense for how the mechanics fit together. Abstract rules suddenly become concrete. You can look at the grid and ask yourself, “What if I made that bigger? How would that affect the gameplay?” And enlarging the grid is simple—just a matter of getting out a piece of graph paper and drawing a bigger box. Then you can replay the game and see if the experience is better or worse.
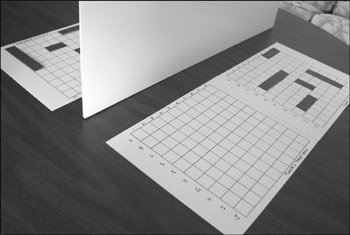
Figure 7.3: Battleship grids with ships
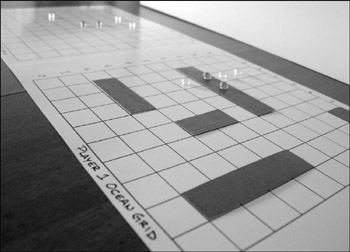
Figure 7.4: Battleship grids during play
Exercise 7.1: Modifying Your Prototype
Take your Battleship prototype and modify three aspects of the game. You can change the grids, the ships, the object of the game, the procedures for playing, etc. Get creative with the changes you make. After each change, play the game with a friend and describe how that particular change affects the gameplay.
As you manipulate elements of the game structure, it will invariably spark more ideas, and it’s not uncommon for entirely new systems to materialize during this process. You can then spin some of these systems off into their own games. After you become experienced at prototyping, you’ll find that this is probably the most effective way to create gameplay because it takes you right down into the mechanics and permits you to experiment in a way no other process can.
Prototyping a first-person shooter
It’s one thing to prototype a simple boardgame, but is it possible to create a physical prototype of an action-packed videogame? The answer is yes. Doing so is more difficult than prototyping a turn- based game, but it’s just as valuable to the design process.
A first-person shooter (FPS) is a popular video- game genre. Examples include Quake, Castle Wolfenstein, Battlefield 1942, Half-Life, Unreal Tournament, and Medal of Honor. The core game mechanics involve units running around shooting other units. That’s simple to understand, but how do you model one of these games on paper and what can that teach us? Let’s start by defining what we’ll need to construct our physical prototype.
More examples
Physical prototypes are critical for designing both boardgames and sophisticated electronic games. Many famous electronic games are based on paper games. The system for digital role-playing games such as Diablo II, Baldur’s Gate, EverQuest, Asheron’s Call, and Dark Age of Camelot are derived from the paper-based system of Dungeons & Dragons. Likewise, the system for the famous computer game Civilization is based on a Civilization boardgame published by Avalon Hill.
The designers and programmers used the paper-based originals to figure out what would work electronically. Remember, there’s nothing magical about using a computer. When it comes down to it, it’s how people relate to the set of rules and to each other that matter—not what medium the game is delivered on.
Many videogame designers started out by learning the craft of designing boardgames, and all boardgames begin as paper prototypes. Building and revising paper prototypes instills a deep understanding of gaming principles. And it does so in a setting that isn’t bogged down by the complexities of software development.
Arena map
Take a large sheet of hexagonal graph paper. Hexagons are nice for prototypes because they allow units to move diagonally. You can purchase this graph paper at most boardgame stores or print it out using one of several freeware and shareware programs available online, such as HexPaper 2. The grid will serve as the arena for your game.
Cut out a small paper chit and color it red to mark spawning points. A “spawning point” is the cell on the grid where units materialize after they are killed.
Units
Units are “your guys” in this game. You can represent them with coins or plastic army men or other household objects. Whatever you use should fit within one cell on the grid. In addition, a unit should clearly show which direction it is aiming. For example, if you use coins as units, draw an arrow on them to indicate their direction.
This prototype is designed so multiple units can play at the same time. To determine starting cells for the different unit on the grid, roll a die. The player with the lowest number places his unit on the grid first. Go in clockwise order from there and have each player choose a starting cell. An example of what your prototype might look like is presented in Figure 7.5.
Exercise 7.2: Movement and Shooting
If you want a challenge, stop reading now and come up with your own movement and shooting rules. Explain your reasoning behind this set of rules.
Movement and shooting rules
Here is one possible solution for movement and shooting. There are endless other creative possibilities, and we encourage you to experiment with them.
Each player gets the following nine cards:
-
“Move 1 space” ×1
-
“Move 2 spaces” ×1
-
“Move 3 spaces” ×1
-
“Move 4 spaces” ×1
-
“Turn Any Direction” ×2
-
“Shoot” ×3
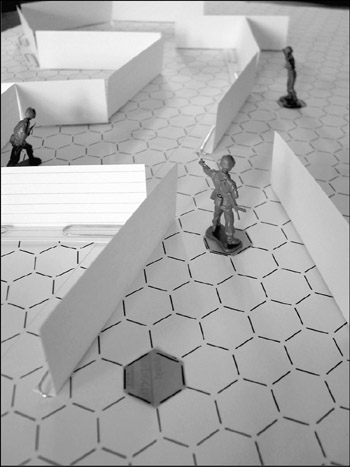
Figure 7.5: FPS Prototype example
Put lines on the grid to represent walls. Units cannot move or shoot through walls. It’s helpful to make walls out of objects that can be repositioned on the grid. Matchsticks are perfect for this. Having moveable walls makes it easier to tweak the system.
You probably already have questions like: “How many hexes should be on the grid?” “How big should each hex be?” “How many spawning points do I need?” and “Do I need lots of walls or only a few?” The answer to all of these questions is: take your best guess. There’s no way to know what will work until you play the game. No matter what you decide, you’ll probably wind up changing it later on. So pick whatever parameters you deem reasonable and proceed with the process.
-
1.Build Stack: Each player chooses three cards and places them face down on the table in a stack.
-
2.Reveal: Each player turns over his top card.
-
3.Resolve Shoot Cards: Players with a Shoot Card fire in the direction their unit is pointed. They follow an imaginary line across the grid. If this line intersects with a cell containing another unit, the shot hits. If this line comes to a wall or otherwise does not intersect with a unit, it misses. Shots happen simultaneously so that two or more players may hit at the same time.
-
4.Resolve Turn Cards: Players with Turn Cards turn their unit to whatever direction they please. If two or more players have Turn Cards, roll a die to determine who turns first.
-
5.Resolve Move Cards: Players with Move Cards move their units the number of spaces specified on the card. If two or more players have Move Cards, roll a die to determine who moves first. Players cannot occupy the same cell.
-
Repeat steps 2–5 for the second card in the stack.
-
Repeat steps 2–5 for the third card in the stack.
If a unit is shot, then it’s removed from the grid, and the player chooses one of the spawning points on the grid and reappears there at the beginning of the next round.
Exercise 7.3: Build it Yourself
Build the physical prototype described just previously and test it out. Describe any problems that you encounter. Also, list out any questions you have while building it.
This process of prototyping an action-based game may seem complex, but if you think about what we’ve done, it’s pretty amazing. In less than five pages, we’ve completely described how to build a first-person shooter using only pen and paper. When you play with this model, you’ll see that it’s both flexible and simple to use.
Suggested additions
-
1.Add a scoring system, making players track the number of kills they get. The first player to get ten kills wins the game.
-
Include a hit percentage. Say the chance that a shot hits is 100% when two units are standing on adjacent hexes on the grid. This percentage decreases by 10% for each hex of distance added. Calculate hits and misses using a tensided die.
-
3.Provide hit points. Have each unit starts with five hit points. One shot suffered removes one hit point.
-
4.Drop in first aid. If a unit stands on a first aid hex on the board for a full round, then his hit points return to their original amount.
-
5.Add in ammo. Units start with 10 rounds each. Every time they shoot, one bullet is removed. If a unit stands on an ammo hex for a full round, he will reload his clip.
-
6.Introduce other weapons. New weapons can be placed on the grid. If a unit stands on the weapon, he can use it in the next round. Enhancements to weapons include more damage per shot, higher accuracy, more bullets, etc.
Exercise 7.4: Features
Add some or all of the features mentioned previously plus a few that you dream up yourself and incorporate them into the physical prototype. Write down how these features affect the gameplay.
Perspective on physical prototyping
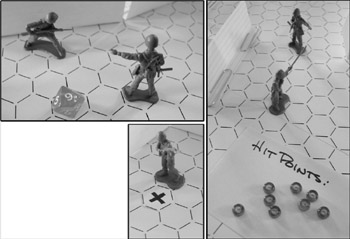
Figure 7.6: FPS prototype example with additions—clockwise from top left: hit percentage, hit points, and first aid
New rules and features can continue to be added, altered, and removed. You can use the system to create “capture the flag” games, cooperative play missions, and death matches. You can continue adding, testing, and tweaking until you come up with the right combination. Each time you add a rule or feature, it may spark new ideas and lead you down a path you didn’t expect to go. This is the heart of the creative process, and you should encourage yourself to try things that may seem ridiculous or absurd—and just see what happens when you play the game. Completing these exercises will give you insight into how all first-person shooters and 3D adventure games are designed.
People not used to physical prototyping may argue that this method doesn’t accurately represent the player experience on a computer. They may think a pen and paper prototype might work for a turn-based game, but not for an action-based shooter because gameplay is integrally tied to the 3D environment and the ability of the players to act in real-time. We are not arguing that physical prototyping replaces those things. What we are saying is the overall gaming system can benefit tremendously in its early stages by building a physical prototype.
Physically prototyping allows you to build a structure for the game, think through how the various elements interact, and formulate a systemic approach to how the game will function. The sensory experience created by a digital game—e.g., the feeling of moving through a 3D space—is only one component of an engaging game experience. And although it’s a critical component, it can be isolated and left until later in the process. At a minimum, physical prototyping forces you to think through the design elements and define them. You can always change them down the road, but this gives you a framework to build upon, and that in itself can save you from stumbling around blindly when it comes to preparing and launching a production team.
Imagine getting in a room with programmers who know nothing about the project and trying to describe to them the game you have in your head. It’s not easy. If you want to create gameplay that people have never seen before, it may be impossible. A physical prototype that they can sit down and play ensures that they will be able to grasp your vision of the game. They also have something solid to work from. A written treatment or design document is good, but when it comes to communicating a complex system, they don’t compare to a prototype that someone can actually play.
Exercise 7.5: Working Backwards
Now let’s apply what you’ve learned to a different type of game.
-
Take two different real-time strategy (RTS) games, such as WarCraft and Age of Empires, and work backwards. Strip away the external feature set and show what both games have in common. These are the core game mechanics.
-
Translate the core game mechanics for one of the RTS games to paper in a playable format.
Remember, all we care about are the rules that correlate between the two games. These rules represent the core gaming system and will form the basis for your RTS physical prototype.
Software prototypes
Software prototypes are analogous to physical prototypes, except that they are made using programming tools. Like physical prototypes, they include only the elements needed to make the system functional; they are void of polished art and sound; and they serve as the conceptual blueprint for creating the final electronic game.
If you have programming skills, you should prototype using the software tools with which you’re most familiar. Again, this is not a book about programming. The de facto standard programming language for today’s PC and console games is C++. Electronic Arts, for example, has standardized on C++ and uses it for every new game. Most other game companies do the same. One of the benefits of C++ is that it’s an object-oriented language, which means sections of code can be reused. This leads to efficiencies during production and is good for creating large-scale applications where dozens of programmers are working on the same project.
Other popular languages for prototyping are Shockwave (especially for web-based games), Delphi, Blitz Basic, and Visual Basic (because it’s so simple to learn), as well as certain types of 3D and 2D graphic engines, like Macromedia Director, which can get you up and running quickly. But if you don’t have programming skills, don’t be discouraged. Many of the world’s greatest game designers are not programmers. You can focus your talents on game design and find programmers to work with you when producing games. See more about working with teams and software development in Part III starting on page 317.
Last but not least, there are software tools that can help you lay out the design in the prototyping phase of a project. These include Visio, for making flowcharts, Excel, for creating spreadsheets, and Access and Filemaker, for structuring the data. It pays to learn some of these tools. They can save you an enormous amount of time when preparing your game concept and presenting it to others.
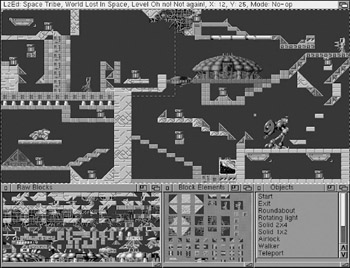
Figure 7.7: Lemmings third party level editor (game type: puzzle)
Level editors
Another useful and fun way to learn about prototyping games with software is to experiment with level editors. Level editors are programs that are used to create custom levels of PC and console games. They are typically “drag and drop” tools, so you don’t have to be a programmer to use them. Creating a custom level will expose you to the formal system guts of a game and help you learn how to prototype your own games. Some level editors come with the games and some are created by third parties. Many can be downloaded from the Internet for free once you’ve purchased the game.
by Nikita Mikros, Co-Founder and Lead Game Designer, Black Hammer Game
In a successful game, the rules of the game interact with each other and give rise to interesting but controlled emergent subsystems and compelling play patterns. Having a solid understanding of how one system interacts with another is essential in writing a comprehensive design document, answering questions from the team about the project, resolving unforeseen problems and ultimately creating a compelling balanced game. As games become increasingly complex, it becomes more and more difficult for the game designer to keep a complete image of all the elements or systems of gameplay in his or her mind.
Scientists use simulations and visualizations to gain understanding of complex data. Similarly game designers can employ their own set of tools to gain insight into their own creations. These tools include daily logs, design documents, paper prototypes, and software prototypes. Software prototypes should be one of many tools at the game designer’s disposal and although they can be extremely useful, without clear goals they can easily escalate into monsters more complex to build than the problem the designer is trying to solve. The goal in building a software prototype should always be to create a tool to help in your game design efforts, not to show off fancy graphics or elegant software architecture. prototype.
When Do You Need Software Prototypes?
Many games lend themselves very easily to paper prototypes, and even if the whole game cannot be modeled this way, isolated parts can often be playtested and designed using this process. However, there are times where one cannot really get a feel for a game without a software prototype. A simple example would be the game of Tetris. Tetris was inspired by pentominoes, a puzzle/toy based on building shapes out of pieces that are constructed from five basic blocks. In Tetris, the pieces are simplified from five to four blocks (tetrominoes) and are dropped at a constant rate, allowing the player to spin and move the pieces trying to construct solid horizontal rows on the bottom of the board. When a horizontal row is created, that row of building blocks is eliminated from the game. The pieces stack up, and eventually the game is lost when the player can no longer fit pieces onto the board. Although they share many similarities, constructing shapes with tetrominoes is very different from playing Tetris. How would one model the game of Tetris in a physical/paper prototype? Although the game has its origins in a physical puzzle, it is very tightly bound to a type of interaction that can only be modeled on the computer. In this case a physical/paper prototype would be more difficult to construct than a software
Supremacy: Four Paths To Power
The creation of any software prototyping tools should be carefully considered, due to the costly and time-consuming nature of writing software. The questions that the designer should ask before diving into such a project are as follows:
-
Is the tool/prototype really needed?
-
What are the requirements of the tool/prototype?
-
What is the quickest way to build the tool?
-
Will the tool be flexible enough?
In the following section I will address how I attempted to resolve these questions for a particular problem in my current project.
Supremacy: Four Paths To Power is an open-ended strategy war game that is waged on two fronts: the meta game, which is a battle in space, and the ground battles that determine the individual capture of planets. Each type of planet has different natural resources that the player can exploit to build unique military units and ultimately try to defeat his or her enemies. Overzealous players can destroy their own planets due to overproduction.
Is the Tool/Prototype Really Needed?
My first task was to build a paper/physical prototype and test my ideas by getting feedback from the rest of our team who I volunteered to be playtesters. Two separate paper prototypes were created: one simulating battles on the ground, and one simulating the larger battles in space. The ground battle prototype worked fine; the math was straightforward and keeping track of all the stats was relatively simple. Excited by the first prototype, we set out to play the space battle prototype and disaster struck. After much groaning and moaning, we somehow slogged through seven or eight turns in what seemed like as many hours before calling it quits. The accounting of resources that was required was daunting. We were so caught up doing math that we could not see the forest for the trees. When one of the playtesters declared, “This game is hurting my head,” I decided it was time to create a software prototype.
What are the Requirements of the Tool/Prototype?
My first impulse was to build a full visual prototype, but upon further consideration I decided to ignore the “programmer within” and opted for a simpler solution. What I decided upon was a nonvisual representation of the game in software and the old paper prototype for visual representation. It was easy for us mere mortals to move pieces, count squares, calculate line of sight, and do all the things that take many person-hours to express in code. Alternatively, it was very easy to program the software to do all the accounting calculations as well as some other tedious tasks like keeping track of turns. The “prototype” looked nothing like a game—it looked like an ugly excel spreadsheet with lots and lots of buttons. It took me about a day and a half to write.
What is the Quickest Way to Build the Tool/Prototype?
My first attempt was to build the tool in a spreadsheet program, but I quickly realized that it was not feasible due to the nature of some of the calculations. I decided to build it using Java and the Metrowerks RAD (Rapid Application Development) toolset. This was a good option because I could quickly and easily lay out my tables, buttons, and other widgets and doodads. I was already familiar with the language and the development environment, so it was a natural choice. For me, writing this type of software is somewhat liberating because the end product is more or less a throwaway. I am far less concerned with software design, architecture, optimization, coding standards, and all the other things that go into building solid software. Remember, the goal is to create a tool to help your game design efforts, not to create elegant airtight software. Ultimately, I believe that you should write your prototypes in whatever language or authoring system you feel comfortable in and which allows you to experiment and change things quickly and easily. If you are not a programmer or are unfamiliar with any type of authoring software then you must rely on your programming team. This can be difficult because ultimately programmers want to write good code and their first impulse is always to build well-engineered reusable code that they can then use in the final product. This is not a bad idea once you have a clear idea of all the elements of your game, but this approach to rapid game design prototyping is like building a tractor to make a sandcastle. It is overkill, and it prematurely locks you into something that you may not be trying to build.
Will the Tool Be Flexible Enough?
Ultimately, you want to be able to change rules and values easily and have the ability to experiment as quickly as you would be able to in a paper prototype. Although this is somewhat of a holy grail, there are things you can do to make your software prototyping tool more flexible. Here are some simple suggestions.
-
Everything is a variable.
-
Try to avoid using any literal constants in your code, in other words a code snippet that looks like this:
totalOutput = 15*2
should look like this:
totalOutput = rateOfProduction*numFactories
-
Expose as many variables in the interface as possible.
-
Litter your prototyping tool with editable text fields; any value that has a remote possibility of changing should be editable through these fields. Your tool will be as ugly to look at as your high school yearbook picture, but you’ll be happy when you don’t need to recompile or go rifling through your code looking for a variable in the middle of a play testing session.
-
Don’t even think of reusing this code.
When I was an undergrad studying fine art, I had a drawing professor by the name of Marvin Bileck, and everybody called him Buddy. One day Buddy made us all go buy some sheets of very expensive drawing paper. We all came to class the next week with our beautiful drawing paper, ready to draw. At this point Buddy instructed us to throw the paper on the ground and stomp on it, if we weren’t doing a good enough job he came over and joined in on the destruction of our precious paper. At the end of this exercise he declared that we were ready to start drawing. The point of the exercise was clear to me: if you want to be creative don’t hold on to anything too tightly, don’t make anything so precious that you can’t see beyond it. This is the way you should think about your prototyping code. In the end you may wind up reusing parts of the code, but this should not be a goal as you create it. You should be fully prepared to throw it away.
Conclusion
Software prototyping is a tool that can be used to understand and ultimately control the elements of your game. You gain nothing by writing software that prototypes a part of your game that you already thoroughly understand or that you can play test via cheaper methods like paper prototypes. Every game is different, with its own special characteristics and requirements. If we had been working on a first person shooter, or a fighting game, a totally different type of prototype would have been needed. I believe in this particular case the software prototype was successful. It allowed me to visualize emergent behaviors in the game that I would not have been able to see with just a paper prototype. This prototype worked because it addressed the specific problems I was trying to solve and because I could build it quickly and easily.
Author Bio
Nikita Mikros is co-founder and lead game designer for Black Hammer Game. He served as technical director and lead programmer for the award-winning GameBoy Advance title I-Spy Challenger
Black Hammer, he joined with John Mikros in 1997 to found Flying Mikros Interactive, a creator of electronic entertainment for the Internet, and of graphics and entertainment software for the Macintosh and PC. Their PC game, The Egg Files, was selected as one of ten finalists in the 2002 Independent Games Festival. Other completed titles include Alien Attack: The Battle over Sector 7G, Monkey Shines 2: Gorilla Warfare, and Chick-Tac-Toe. In addition, Mr. Mikros has taught various programming and game design classes in the MFA Computer Art Department at the School of Visual Arts for the past seven years.
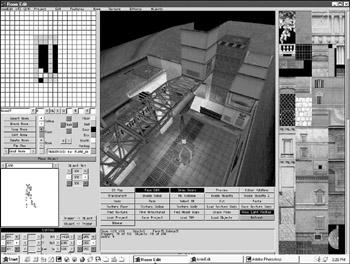
7.8 Tomb Raider: Chronicles level editor (game type: action/adventure)
If you look carefully at the screen shot of the editor for Unreal 2 in Figure 7.9, you’ll notice that they include the same formal elements found in our first-person shooter prototype—a map grid, rooms, units, objects, etc. In fact, spending time using a level editor is the single best way to get a feel for a specific genre of game, and if you invest the time, you’ll find that you aren’t alone. Creating“mods,” or modifications, is a big part of gaming today. If you go online, you’ll discover tens of thousands of mods created by players. Some of the best mod designers are snatched up by large game publishers/developers and can go on to become top designers.
Perhaps the most famous modder is Minh “Gooseman” Le. He took the popular FPS Half-Life and modded it to create a version with more team- oriented gameplay. The result was Counter-Strike. In this mod, one team plays the role of terrorist and the other plays the role of counter-terrorist. The two sides have different weapons and abilities. They created a variety of maps with creative goals such as hostage rescue, assassination, bomb defusing, and escape. Gooseman and the Counter- Strike team released the mod online and it became an instant hit. The game has won dozens of awards for gameplay and has helped sell tens of thousands of copies of Half-Life. In fact, many folks buy Half-Life just so they can play Counter-Strike. This is an example of a talented modder becoming a star in the game industry.
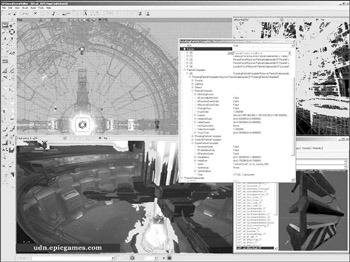
Figure 7.9: Unreal 2 level editor (game type: first-person shooter)
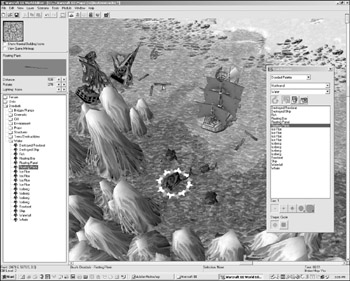
Figure 7.10: WarCraft III world editor (game type: real-time strategy)
WarCraft III has one of the most sophisticated level editors available. The game developer, Blizzard Entertainment, calls it the “world editor.” It allows you to create your own WarCraft III maps and manipulate nearly every facet of the game. It’s the same editor that the level designers at Blizzard used to make the tutorial on the game CD. If you haven’t tried it, you should. Becoming familiar with this level editor is one of the best ways to understand basic RTS game design.
In Spring 2003, Blizzard conducted a mapmaking contest using the editor. Over one thousand players created their own maps and uploaded them to the Blizzard site. Eleven winners were chosen. Their maps were included on the WarCraft III: Frozen Throne CD, and their names appeared in the official game credits.
The screen in Figure 7.11 shows how you can set the board size for a WarCraft III map. Like in most games, a bigger, more complex grid often lengthens the game time, while a smaller, simpler grid makes for a shorter and often more intense experience.
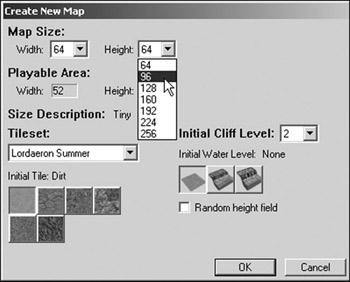
Figure 7.11: WarCraft III world editor: choose map size
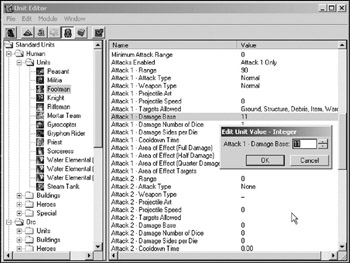
Figure 7.12: WarCraft III world editor: unit properties
The unit editor in Figure 7.12 allows you to define properties for units in a game session. The default numbers are numbers set by the game designers at Blizzard. As you start to play around with the numbers, you may wonder how the designers came to choose certain values for each unit. The answer is through prototyping and playtesting. More powerful units have higher costs in terms of resources and build time. For instance, the knight unit comes with 800 hit points and a ground attack strength of 25. It is almost two times more powerful than the footman unit which comes with 420 hit points and a ground attack strength of 12.5. The knight has a commensurate cost of 245 gold plus 60 wood compared to the footman’s cost of 135 gold and 0 wood. Also the knight has a long build time, 45, compared to the footman’s short build time of 20. So there’s always a trade off balanced into the game.
Every unit property in WarCraft III had to be meticulously playtested and tweaked based on benefits versus cost until the game system balanced. If any number were out of proportion, experienced players might mass-produce that unit, making all other units irrelevant.
The Aurora Toolset for Neverwinter Nights (see sidebar on page 172 and the accompanying figure) was created as a platform to allow gamers to build their own worlds, quests, and storylines. It puts complete control of the world into the user’s hands and can be used as a creative toolset for making new kinds of gameplay in a 3D space.
Exercise 7.6: Mapping a Level
Take a game like WarCraft III, Neverwinter Nights, or another game that ships with a level editor. Study one of the pre-made levels in the game, and sketch out a map of all of its elements, so that you have a clear understanding of how it was designed.
Exercise 7.7: Designing Your Own Level
Use the level-editing tool of the game you chose in the last exercise to design a playable level of your own. You can find a number of example levels online for most games with level editors.
|
| < Day Day Up > |
|
EAN: 2147483647
Pages: 162