Saving a Calendar as a Web Page
To help you coordinate your plans with others, you can share your schedule over an intranet or the Internet. Your co-workers and clients can view your schedule even if they aren t using Microsoft Outlook. You can also share your schedule by saving your Calendar as a Web page or by publishing your free and busy times for others to see.
For example, you might post a calendar with important project dates on your company intranet, or you might publish to an Internet location, for your clients to view, the times that you are busy and the times when you are available. When you save your Calendar as a Web page, you can easily post it to any Web site to share it with colleagues, friends , or family members .
| Tip | When you save your Calendar as a Web page, you can save it to your local computer or a network location. You might have to take additional steps to make that Web page available to others. Your network or ISP administrator can provide the information you need. |
In this exercise, you will save your Calendar as a Web page that can be posted on an Internet or intranet site.
OPEN your own Calendar.
-
On the File menu, click Save as Web Page .
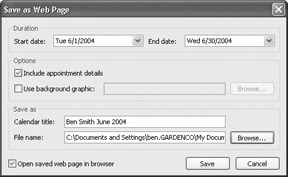
The Save as Web Page dialog box appears.
-
In the Start date box, type 6/1/04 , press the [TAB] key, and in the End date box, type 6/30/04 .
-
Click in the Calendar title box, delete any existing text, type your name followed by June 2004 , and then click the Browse button.
The Calendar File Name dialog box appears.
-
On the Places bar, click
 My Documents .
 -
In the File name box, type June2004 , and then click the Select button.
The Calendar File Name dialog box closes , and the file name and the path to it are inserted into the File name box.
-
Be sure the Open saved web page in browser check box is selected, and then click the Save button.
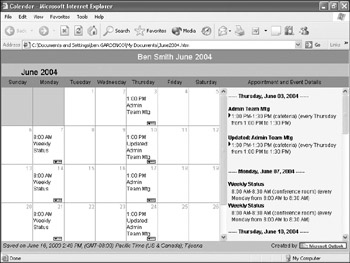
The Save as Web Page dialog box closes, and the schedule is displayed in your Web browser. (The browser is loading the file from your computer, not the Internet ”you haven t published the schedule to the Internet yet.)
-
Review the Calendar, and then click the browser window s Close button.
The Web browser window closes.
| |
Microsoft offers a Web-based service called the Microsoft Office Internet Free/Busy Service that you can use to publish information about your free and busy times to a designated, secure Internet location. If you and your colleagues don t have access to each other s calendars but do have access to the Internet, each of you can join this service and publish your free/busy information for others to view. Easy access to this information can save you a lot of time when you need to coordinate the schedules of a group of busy people.
To make your Calendar information available to other Office users:
-
On the Tools menu, click Options .
-
In the Calendar area, click the Calendar Options button, and then in the Advanced options area, click the Free/Busy Options button.
-
In the Free/Busy Options dialog box, select the Publish and search using Microsoft Office Internet Free/Busy Service check box.
-
If you want to request that other people make their schedules available through the Microsoft Office Internet Free/Busy Service, select the Request free/busy information in meeting invitations check box, and click OK .
-
If prompted to install the feature, click Yes .
-
When installation is complete, click OK to close the open dialog boxes.
You can also choose to publish your free/busy information to an intranet location you specify. Your administrator can provide you with the path to the appropriate locationon your organization s intranet.
To publish your free/busy information to an intranet site:
-
In Outlook, on the Tools menu, click Options .
-
In the Calendar area, click the Calendar Options button.
-
In the Advanced options area, click the Free/Busy Options button.
-
In the Internet Free/Busy area, select the Publish at my location check box, click in the Publish at my location box, and type the server location provided by your administrator, followed by the file name you want.
-
Click OK to close each of the open dialog boxes.
Your free/busy information is published to the specified location.
-
On the Tools menu, point to Send/Receive , and then click Free/Busy Information to publish your free/busy information to your server.
-
To view your published free/busy information, open your Web browser, and in the Address box, type the URL of the file on the server.
Your free/busy information appears as a text file in your browser window.
-
Review the information, and click the browser s Close button.
The Web browser window closes.
The contents of the Publish at my location box will typically be something like \\server\share\username\June2002.vfb . Include the full path and file name in the Publish at my location box.
The retrieval URL might not be the same as the path you entered in the Publish at my location box. Your administrator can provide you with the URL.
| |
EAN: 2147483647
Pages: 350