Archiving Messages
As messages accumulate in your Inbox and other message folders, you might need to consider other ways to store them in order to cut down on the amount of storage space you re using. For example, you might want to archive all messages sent or received before a certain date. Archiving messages in a separate Outlook message file helps you manage clutter and the size of your primary message file, while still allowing easy access to archived messages from within Outlook.
You can archive messages manually or automatically. When archived messages are moved to a separate message file, the messages are removed from their original folder. By default, Outlook automatically archives messages in all folders at regular intervals to a location determined by your operating system. You can change the default global settings for the AutoArchive function and specify varying archive settings for specific folders. Archive settings selected for a specific folder override the global settings for that folder. If you don t specify AutoArchive settings for a folder, Outlook uses the global settings.
In this exercise, you will investigate your automatic archive options, and then archive messages manually.
USE the SBSOrganizing data file in the practice file folder for this topic. This practice file is located in the ![]() My Documents\Microsoft Press\Office 2003 SBS\Organizing folder and can also be accessed by clicking Start/All Programs/Microsoft Press/Microsoft Office System 2003 Step by Step .
My Documents\Microsoft Press\Office 2003 SBS\Organizing folder and can also be accessed by clicking Start/All Programs/Microsoft Press/Microsoft Office System 2003 Step by Step .
BE SURE TO open the SBSOrganizing data file before beginning this exercise.
OPEN the practice file Inbox.
-
On the Tools menu, click Options .
The Options dialog box appears.
-
Click the Other tab, and then click the AutoArchive button.
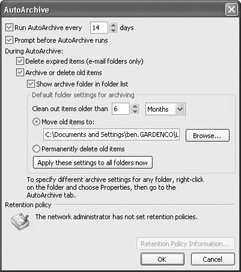
The AutoArchive dialog box appears.
-
Review your AutoArchive default settings ”particularly note the interval at which the archive will happen, the age at which items will be archived, and the location in the Move old items to box.
-
Click Cancel in each of the open dialog boxes.
The dialog boxes close without initiating any changes.
Tip You can use the Mailbox Cleanup feature to see the size of your mailbox, find and delete old items or items that are larger than a certain size, start AutoArchive, or view and empty your Deleted Items folder. To use this feature, on the Tools menu, click Mailbox Cleanup.
-
In the Navigation Pane , click the Folder List icon.
The Folder List appears.
-
In the SBS Organizing data file, click the Inbox (not the Inbox in your mailbox).
-
On the File menu, point to Folder , and then click Properties.
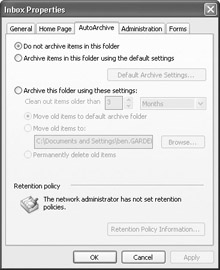
The Inbox Properties dialog box appears.
-
Click the AutoArchive tab.
The AutoArchive options are displayed.
-
Select the Archive this folder using these settings option.
-
In the Clean out items older than box, select 1 and Days .
Important You would usually stipulate a longer archive period, but for the purposes of this exercise you will archive all the messages in the practice Inbox.
-
Be sure the option to Move old items to default archive folder is selected, and click OK .
The Inbox Properties dialog box closes . Items in the Inbox will be archived according to the new settings. Items in all other folders will be archived according to the default settings.
-
On the File menu, click Archive .
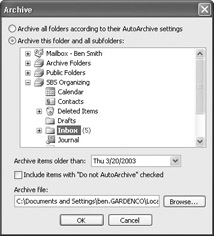
The Archive dialog box appears.
-
With the Archive this folder and all subfolders option selected, click the SBS Organizing folder.
-
In the Archive items older than drop-down list, click a date that you know is later than the date of some of the messages in the Inbox, and click OK .
Outlook archives the messages in the practice Inbox according to your settings.
-
In the Folder List , double-click Archive Folders to expand it, and click the Inbox folder that appears within that folder.
The contents of the archived Inbox folder are displayed.
BE SURE TO close the SBS Organizing data file after completing this chapter.
| |
By default, Outlook will check any e-mail address you type against the entries in the Outlook Address Book. If the address book does not contain an entry for a name that you type in the To, Cc, or Bcc boxes of a new message, when you send the message, Outlook will prompt you to select an address book entry or provide a full e-mail address.
To have Outlook check entries from your Personal Address Book:
-
On the Tools menu, click Address Book .
-
On the Address Book window s Tools menu, click Options .
-
In the Addressing dialog box, click the Add button.
-
In the Add Address List dialog box, click Outlook Address Book , and then click the Add button.
-
Click the Close button.
-
In the Addressing dialog box, click OK .
-
In the Address Book window, click the Close button.
| |
EAN: 2147483647
Pages: 350