Customizing a Slide Show
If you plan to present variations of the same slide show to different audiences, you don t have to create a separate presentation for each audience. Instead, you can select slides from the presentation that are appropriate for a particular audience and group them as a custom show. You can then run the custom show using just those slides. For example, a slide show to train The Garden Company employees in how to conduct classes for customers might include slides that are not appropriate for a training session for people hired on contract. Because the training materials are similar for the two groups, rather than creating two presentations, The Garden Company can develop the employee presentation first and then create a custom show for contractors using a subset of the slides in the employee presentation.
Sometimes you might want to be able to make an on-the-spot decision during a presentation about whether to display a particular slide. You can give yourself this flexibility by hiding the slide so that you can skip over it if its information doesn t seem useful to a particular audience. If you decide to include the slide s information in the presentation, you can display it by using the Go to Slide command and clicking that slide in a list, or you can insert an action button on a visible slide that you can click to jump to that slide.
In this exercise, you will create and edit a custom show. You will also hide a slide and use an action button to display it when necessary. Finally, you will run the slide show to see how custom shows, hidden slides, and action buttons work.
USE the CustomShow presentation in the practice file folder for this topic. This practice file is located in the ![]() My Documents\Microsoft Press\Office 2003 SBS\SettingShow\CreatingCustom folder and can also be accessed by clicking Start/All Programs/Microsoft Press/Microsoft Office System 2003 Step by Step .
My Documents\Microsoft Press\Office 2003 SBS\SettingShow\CreatingCustom folder and can also be accessed by clicking Start/All Programs/Microsoft Press/Microsoft Office System 2003 Step by Step .
OPEN the CustomShow presentation.
-
On the Slide Show menu, click Custom Shows .
The Custom Shows dialog box appears.
-
Click New .
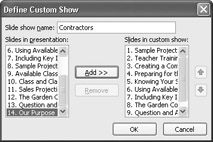
The Define Custom Show dialog box appears. The default custom show name is selected in the Slide show name box.
-
In the Slide show name box, type Contractors .
-
In the Slides in presentation box, click slide 8, and then click Add .
Slide 8 appears as Slide 1 in the Slides in custom show box on the right.
-
In turn , select Slides 2 through 7, and 12 through 14 in the Slides in presentation list, and add them to the custom slide show.
The slides appear in sequential order in the Slides in custom show box on the right.
-
Click OK .
-
In the Custom Shows dialog box, click Show to start the custom slide show.
-
Click through all the slides, including the blank one at the end of the show.
-
In Normal view, click Custom Shows on the Slide Show menu.
-
In the Custom shows list, verify that Contractors is selected, and then click Edit .
The Define Custom Show dialog box appears.
-
In the Slides in custom show box, click Slide 8 to select the item.
-
Click Remove .
PowerPoint removes the slide from the custom show, but not from the main presentation.
Tip To change the order of the list, move a slide by selecting it and clicking the up arrow or the down arrow to the right of the Slides in custom show box.
-
Click OK to close the Define Custom Show dialog box, and click Close to close the Custom Shows dialog box.
-
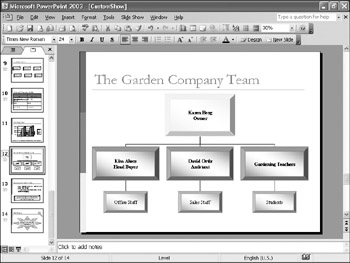
Scroll to the bottom of the Outline/Slides pane. Then on the Slides tab, right-click Slide 12, and click Hide Slide on the shortcut menu.
PowerPoint puts a shadow box around and a diagonal line through the number12 to indicate that the slide is hidden.
Tip In Slide Sorter view, you can select a slide and then click the Hide Slide button on the Slide Sorter toolbar.
-
Click Slide 11, click the Slide Show button, and then press [SPACE] to move to the next slide.
Because Slide 12 is hidden, PowerPoint skips from Slide 11 to Slide 13.
-
Press the [ ] key to return to the previous slide, Slide 11.
-
Right-click anywhere on the screen, point to Go To Slide , and then click (12) The Garden Company Team .
The hidden slide appears in Slide Show view.
-
Press [ESC] to end the slide show.
-
Move to Slide 11, and on the Slide Show menu, point to Action Buttons , and then click the Action Button: Return button in the lower-left corner of the menu.
-
Click the lower-right corner of the slide.
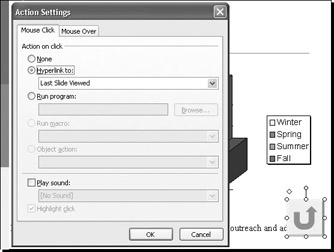
PowerPoint inserts a large action button where you clicked and displays the Action Settings dialog box.
-
In the Action on click area, click the down arrow to the right of the box below Hyperlink to , and click Slide in the drop-down list.
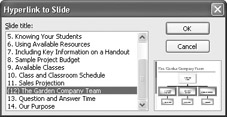
The Hyperlink to Slide dialog box appears.
-
Scroll to the bottom of the Slide title list, and click (12) The Garden Company Team .
-
Click OK to close the Hyperlink to Slide dialog box, and click OK again to close the Action Settings dialog box.
-
Use the action button s sizing handles to make it smaller, and then position it in the lower-right corner of the slide.

-
Click the Slide Show button, and then click the slide s action button.
PowerPoint displays the hidden slide.
-
Press [ESC] to end the slide show.
-
On the Standard toolbar, click the Save button to save the presentation.
CLOSE the CustomShow presentation.
EAN: 2147483647
Pages: 350