Using Lookup Lists to Restrict Data
It is interesting how many different ways people can come up with to enter the same items of information in a database. Asked to enter the name of their home state, for example, residents of the state of Washington will type Washington , Wash , or WA , plus various typos and misspellings. If you ask a dozen sales clerks to enter the name ofa specific product, customer, and shipper in an invoice, the probability that all of them will type the same thing is not very high. In cases like this, in which the number of correct choices is limited (to actual product name, actual customer, and actual shipper), providing the option to choose the correct answer from a list will improve your database s consistency.
Minor inconsistencies in the way data is entered might not be really important to someone who later reads the information and makes decisions. Most people know that Arizona and AZ refer to the same state. But a computer is very literal, and if you tell it to create a list so that you can send catalogs to everyone living in AZ , the computer won t include anyone whose state is listed in the database as Arizona .
You can limit the options for entering information in a database in several ways:
-
For only two options, you can use a Boolean field represented by a check box. A check in the box indicates one choice, and no check indicates the other choice.
-
For several mutually exclusive options on a form, you can use option buttons to gather the required information.
-
For more than a few options, a combo box is a good way to go. When you click the down arrow at the end of a combo box, a list of choices is displayed. Depending on the properties associated with the combo box, if you don t see the option you want, you might be able to type something else, adding your entry to the list of possible options displayed in the future.
-
For a short list of choices that won t change often, you can have the combo box look up the options in a list that you provide. Although you can create a lookup list by hand, it is a lot easier to use the Lookup Wizard .
In this exercise, you will use the Lookup Wizard to create a list of months from which the user can choose.
USE the FieldTest database in the practice file folder for this topic. This practice file is located in the ![]() My Documents\Microsoft Press\Office 2003 SBS\Accurate\Lookup folder and can also be accessed byclicking Start/All Programs/Microsoft Press/Microsoft Office System 2003 Step by Step .
My Documents\Microsoft Press\Office 2003 SBS\Accurate\Lookup folder and can also be accessed byclicking Start/All Programs/Microsoft Press/Microsoft Office System 2003 Step by Step .
OPEN the FieldTest database.
-
Open the Field Property Test table in Design view.
-
Add a new field below LastName . Name it Month , and set the data type to Lookup Wizard .
The first page of the Lookup Wizard appears.
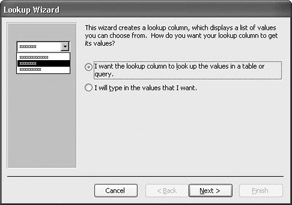
You can use this wizard to create a combo box that provides the entry for a text field. The combo box list can come from a table or query, or you can type the list in the wizard.
Tip If a field has a lot of potential entries, or if they will change often, you can link them to a table. (You might have to create a table expressly for this purpose.) If the field has only a few items and they won t change, typing the list in the wizard is easier.
-
Select the I will type in the values that I want option , and then click Next .
-
Leave the number of columns set to 1 , and click in the Col1 box.
-
Enter the 12 months of the year ( January , February , and so on), pressing [TAB] after each one to move to a new row. Then click Next .
-
Accept the Month default label, and click Finish .
-
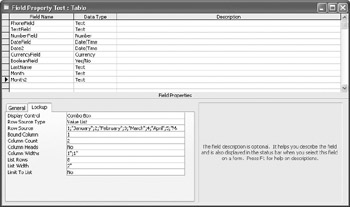
In the Field Properties area, click the Lookup tab to view the Lookup information for the Month field.
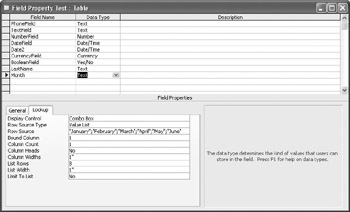
The wizard entered this information, but you could easily figure out what you would have to enter to create a lookup list by hand.
-
Click the View button to change to Datasheet view, clicking Yes to save your changes.
-
Adjust the column widths so that you can see all the fields, by dragging the vertical bars between columns in the header.
Tip You can drag the vertical bars between the columns to make them smaller than the text in them. You can also double-click the vertical bars to automatically size the columns to fit the text in them.
-
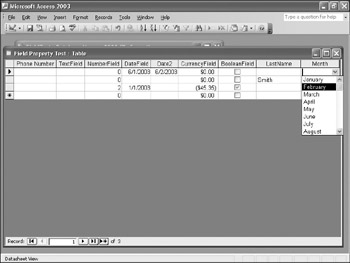
Click in the Month field of a record, and then click the down arrow to display the list.
-
Click February to enter it in the field.
-
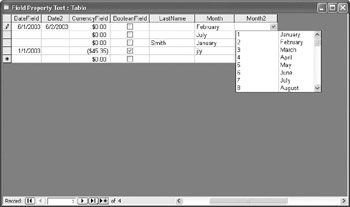
Click in the next Month field, type Jan , and press [ENTER].
As soon as you type the J , the combo box displays January . If you had typed Ju , the combo box would have displayed June .
-
In the next Month field, type jly , and press [ENTER].
Even though the entry isn t in the list, it is accepted just as you typed it. Although there might be times when you want to allow the entry of information other than the items in the list, this isn t one of those times, so you need to change the field properties to limit what can be entered.
-
Return to Design view.
The last property on the Lookup tab is Limit To List . It is currently set to No , which allows people to enter information that isn t in the list.
-
Change Limit To List to Yes .
-
Save the table, return to Datasheet view, type jly in a new Month field, and press [ENTER].
Access informs you that the text you entered is not in the list, and refuses the entry.
-
Click OK , and then click July in the list.
A list of the names of months is convenient for people, but if your computer has to deal with this information in some mathematical way, a list of the numbers associated with each month is easier for it to use. There is a solution that will work for both humans and machines.
-
Return to Design view, create a new field named Month2 , and again set the data type to Lookup Wizard .
-
Select the I will type in the values that I want option, and click Next .
-
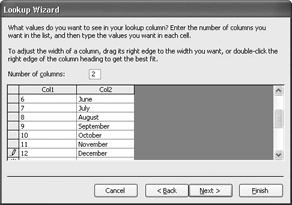
Type 2 to add a second column, and then click in the Col1 box.
Access adds a second column, labeled Col2 .
-
Enter the following numbers and months in the two columns, pressing [TAB] to move from column to column:
Number
Month
Number
Month
1
January
7
July
2
February
8
August
3
March
9
September
4
April
10
October
5
May
11
November
6
June
12
December
-
Click Next to move to the next page.
-
Accept the default selection of Col1 as the column whose data you want to enter when a selection is made from the list, and click Finish .
You return to the table, and the Field Properties area displays the Lookup information.
The wizard has inserted your column information into the Row Source box andset the other properties according to your specifications.
-
Change Limit To List to Yes .
-
Save your changes, switch to Datasheet view, and then click the down arrow in a Month2 field to display the list.
-
Click January .
Access displays the number 1 in the field, which is useful for the computer. However, people might be confused by the two columns and by seeing something other than what they clicked or typed.
-
Switch back to Design view, and in the Column Widths box ”which appears as 1";1" ” change the width for the first column to (you don t have to type thesymbol for inches) to prevent it from being displayed.
-
Save your changes, return to Datasheet view, and as a test, in the remaining records set Month2 to February in two records and to March in one record.
Only the name of the month is now displayed in the list, and when you click a month, that name is displayed in the field. However, Access actually stores the associated number from the list s first column.
-
Right-click in the Month2 column, click Filter For on the shortcut menu, type 2 in the box, and press [ENTER].
Only the two records with February in the Month2 field are now displayed.
-
Click the Remove Filter button, and then repeat the previous step, this time typing 3 in the box to display the one record with March in the Month2 field.
CLOSE the FieldTest database, saving your changes.
EAN: 2147483647
Pages: 350
- ERP Systems Impact on Organizations
- The Effects of an Enterprise Resource Planning System (ERP) Implementation on Job Characteristics – A Study using the Hackman and Oldham Job Characteristics Model
- Context Management of ERP Processes in Virtual Communities
- Data Mining for Business Process Reengineering
- Development of Interactive Web Sites to Enhance Police/Community Relations