Creating a Query in Design View
When you want to work with more than one table, you need to move beyond filters and into the realm of queries. The most common type of query selects records that meet specific conditions, but there are several other types, as follows :
-
A select query retrieves data from one or more tables and displays the results in a datasheet. You can also use a select query to group records and calculate sums, counts, averages, and other types of totals. You can work with the results of a select query in Datasheet view to update records in one or more related tables at the same time.
-
A duplicate query is a form of select query that locates records that have the same information in one or more fields that you specify. The Find Duplicates Query Wizard guides you through the process of specifying the table and fields to use in the query.
-
An unmatched query is a form of select query that locates records in one table that don t have related records in another table. For example, you could use this to locate people in the customer table who don t have an order in the order table. The Find Unmatched Query Wizard guides you through the process of specifying the tables and fields to use in the query.
-
-
A parameter query prompts you for information to be used in the query ”for example, a range of dates. This type of query is particularly useful if the query is the basis for a report that is run periodically.
-
A crosstab query calculates and restructures data for easier analysis. It can calculate a sum, average, count, or other type of total for data that is grouped by two types of information ”one down the left side of the datasheet and one across the top. The cell at the junction of each row and column displays the results of the query s calculation.
-
An action query updates or makes changes to multiple records in one operation. It is essentially a select query that performs an action on the results of the selection process. Four types of actions are available: delete queries , which delete records from one or more tables; update queries , which make changes to records in one or more tables; append queries , which add records from one or more tables to the end of one or more other tables; and make-table queries , which create a new table from all or part of the data in one or more tables.
Tip Access also includes SQL queries, but you won t be working with this type of query in this book.
| |
The major differences between using filtering or sorting and using a query are:
-
The Filter and Sort commands are usually faster to implement than queries.
-
The Filter and Sort commands are not saved, or are saved only temporarily. A query can be saved permanently and run again at any time.
-
The Filter and Sort commands are applied only to the table or form that is currently open. A query can be based on multiple tables and other queries, which don t have to be open .
| |
You can create a query by hand or by using a wizard. Regardless of how you create the query, what you create is a statement that describes the conditions that must be met for records to be matched in one or more tables. When you run the query, the matching records appear in a datasheet in Datasheet view.
In this exercise, you will create an order entry form that salespeople can fill in as they take orders over the phone. The form will be based on a select query that combines information from the Order Details table and the Products table. The query will create a datasheet listing all products ordered with the unit price, quantity ordered, discount, and extended price. Because the extended price isn t stored in the database, you will calculate this amount directly in the query.
USE the GardenCo database in the practice file folder for this topic. This practice file is located in the ![]() My Documents\Microsoft Press\Office 2003 SBS\Queries\QueryDes folder and can also be accessed by clicking Start/All Programs/Microsoft Press/Microsoft Office System 2003 Step by Step .
My Documents\Microsoft Press\Office 2003 SBS\Queries\QueryDes folder and can also be accessed by clicking Start/All Programs/Microsoft Press/Microsoft Office System 2003 Step by Step .
OPEN the GardenCo database and acknowledge the safety warning, if necessary.
-
On the Objects bar, click Queries .
-
Double-click Create query in Design view .
Access opens the query window in Design view and then opens the Show Table dialog box.
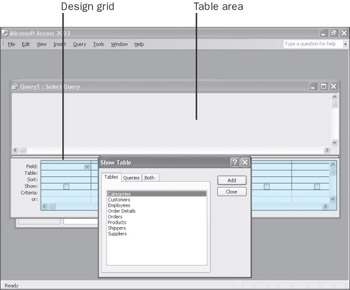
You can use the Show Table dialog box to specify which tables and saved queries to include in the current query.
-
With the Tables tab active, double-click Order Details and Products to add both tables to the query window. Then close the dialog box.
Each table you added is represented in the top portion of the window by a small field list window with the name of the table ”in this case, Order Details and Products ”in its title bar.
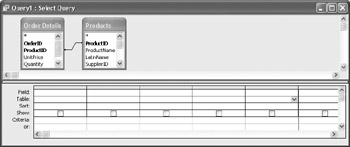
At the top of each list is an asterisk, which represents all the fields in the list. Primary key fields in each list are bold. The line from ProductID in the Order Details table to ProductID in the Products table indicates that these two fields are related.
Tip To add more tables to a query, reopen the Show Tables dialog box by right- clicking the top portion of the query window and clicking Show Table on the shortcut menu; or by clicking the Show Table button on the toolbar.
The lower area of the query window is taken up by a design grid where you will build the query s criteria.
-
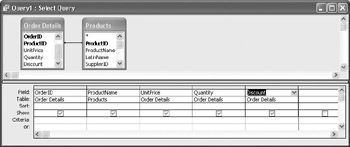
To include fields in the query, you drag them from the lists at the top of the window to consecutive columns in the design grid. Drag the following fields from the two lists:
From table
Field
Order Details
OrderID
Products
ProductName
Order Details
UnitPrice
Order Details
Quantity
Order Details
Discount
Tip You can quickly copy a field to the next open column in the design grid by double-clicking the field. To copy all fields to the grid, double-click the title bar above the field list to select the entire list, and then drag the selection over the grid. When you release the mouse button, Access adds the fields to the columns in order. You can drag the asterisk to a column in the grid to include all the fields in the query, but you also have to drag individual fields to the grid if you want to sort on those fields or add conditions to them.
-
Click the Run button to run the query and display the results in Datasheet view.
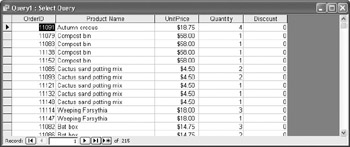
The results show that the query is working so far. There are two things left to do: sort the results on the OrderID field and add a field for calculating the extended price, which is the unit price times the quantity sold minus any discount.
-
Click the View button to return to Design view.
The third row in the design grid is labeled Sort. If you click in the Sort cell in any column, you can specify whether to sort in ascending order, descending order, or not at all.
-
Click in the Sort cell in the OrderID column, click the down arrow, and click Ascending .
Neither of the tables includes an extended price field. There is no point in entering this information in a table, because you will use the Expression Builder to insert an expression in the design grid that computes this price from existing information.
-
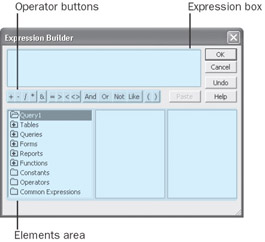
Right-click the Field row of the first blank column in the design grid (the sixth column), and on the shortcut menu, click Build to open the Expression Builder dialog box.
Here is the expression you will build:
<CCur([Order Details].[UnitPrice]*[Quantity]*(1-[Discount]))>
The only part of this expression that you probably can t figure out is the CCur function, which converts the results of the math inside its parentheses to currency format.
-
Double-click the Functions folder in the first column of the elements area, and then click Built-In Functions .
The categories of built-in functions are displayed in the second column.
-
Click Conversion in the second column to limit the functions in the third column to those in that category. Then double-click Ccur in the third column.
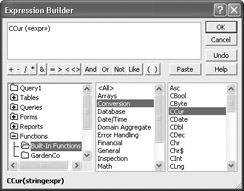
You ve inserted the currency conversion function in the expression box. The << expr >> inside the parentheses represents the other expressions that will eventually result in the number Access should convert to currency format.
-
Click << expr >> to select it so that the next thing you enter will replace it.
-
The next element you want in the expression is the UnitPrice field from the Order Details table. Double-click the Tables object, click Order Details , and then double-click UnitPrice .
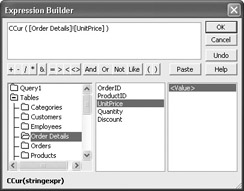
Your last action left the insertion point after UnitPrice, which is exactly where you want it.
-
Now you want to multiply the amount in the UnitPrice field by the amount in the Quantity field. Start by clicking the * (asterisk) button in the row of operator buttons below the expression box.
Access inserts the multiplication sign and another << Expr >> placeholder.
-
Click << Expr >> to select it, and then insert the Quantity field by double-clicking it in the second column.
What you have entered so far multiplies the price by the number ordered, which results in the total cost for this item. However, The Garden Company offers discounts on certain items at different times of the year. The amount of the discount is entered by the sales clerk and stored in the Order Details table. In the table, the discount is expressed as the percentage to deduct ”usually 10 to 20 percent. But it is easier to compute the percentage the customer will pay ”usually 80 to 90 percent of the regular price ”than it is to compute the discount and then subtract it from the total cost.
-
Type *(1- , then double-click Discount , and type ) , and then widen the window to see the whole expression.
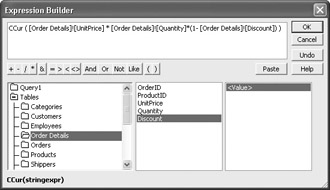
Remember that the discount is formatted in the datasheet as a percentage, but it is stored as a decimal number between 0 and 1. When you look at it you might see 10%, but what is actually stored in the database is 0.1. So if the discount is 10 percent, the result of *(1-Discount) is *.9. In other words, the formula multiplies the unit price by the quantity and then multiplies that result by 0.9.
-
Click OK .
Access closes the Expression Builder and copies the expression to the design grid.
-
Press [ENTER] to move the insertion point out of the field, which completes the entryof the expression.
Tip You can quickly make a column in the design grid as wide as its contents by double-clicking the line in the gray selection bar that separates the column from the column to its right.
-
Access has given the expression the name Expr1 . This name isn t particularly meaningful, so rename it by double-clicking Expr1 and then typing ExtendedPrice .
-
Click the View button to see the results in Datasheet view.
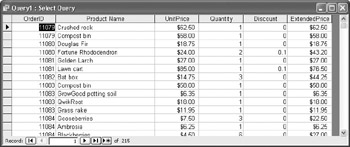
The orders are now sorted on the OrderID field, and the extended price is calculated in the last field.
-
Scroll down to see a few records with discounts.
If you check the math, you will see that the query calculates the extended price correctly.
-
Close the query window, and when prompted to save the query, click Yes. Type Order Details Extended to name the query, and click OK to close it.
CLOSE the GardenCo database.
| |
When an expression is a valid filter or query option, you can usually either type the expression or use the Expression Builder to create it. You open the Expression Builder by either clicking Build on a shortcut menu or clicking the button (sometimes referred to as the Build button) at the right end of a box that can accept an expression.
The Expression Builder isn t a wizard; it doesn t lead you through the process of building an expression. But it does provide a hierarchical list of most of the elements that you can include in an expression. After looking at the list, you can either type your expression in the expression box, or you can select functions, operators, and other elements to copy them to the expression box, and then click OK to transfer them to the filter or query.
| |
EAN: 2147483647
Pages: 350