Manipulating PivotTables Programmatically
|
| < Day Day Up > |
|
Pivoting a PivotTable by hand is a straightforward operation…you just drag the field header to the desired location in the PivotTable layout. One common complaint from PivotTable users, however, is that they often forget the exact configuration they need to emphasize a certain point. When you have a relatively simple PivotTable, such as the six-field table used as the example in this chapter, you probably won't have too many difficulties remembering what goes where. However, if your PivotTable has more than six fields, or if you're working with unfamiliar data, you might need to use some macro helpers to get you through your presentation. This section contains four macros that you can use to build your own solutions.
Pivoting a PivotTable Programmatically
The first procedure shows you how to change the position of a field within a PivotTable. In this case, you start with the PivotTable found on the PivotTable sheet of the EditPivot.xls workbook, arranged in the layout shown in Figure 16-8.
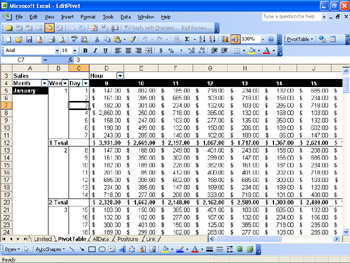
Figure 16-8: This is the starting layout for your PivotTable manipulations.
There are three fields (Month, Week, and Day) in the Row area, and there is one field (Hour) in the Column area. You could pivot the PivotTable to create a single column of results by pivoting the Hour field to the fourth position in the Row area. The following procedure does just that, generating the results shown in Figure 16-9:
Sub PivotHourTo4()
On Error Goto NotEnough
    With ActiveSheet.PivotTables("PivotTable8").PivotFields("Hour")
        .Orientation = xlRowField
        .Position = 4
    End With
NotEnough: MsgBox ("There are fewer than three fields in the Row area.")
End Sub
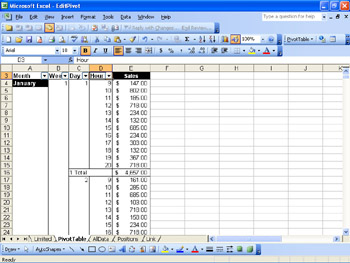
Figure 16-9: Putting the Hour field in the fourth position in the Row area generates this result.
An Interesting Occurrence
For this macro to work correctly, there must be three fields in the Row area. The order of the fields matters in that it affects data presentation, but the order doesn't matter when it comes to the procedure functioning properly. The presence or absence of the On Error statement, however, makes an interesting difference in how Excel handles the result of the instruction to place the Hour field at the fourth position in the Row area. If you leave out the On Error statement and there are fewer than three fields in the Row area, Excel won't be able to find the fourth position in the Row area, and you'll get this error: 'Run-time error ‘1004': Unable to set the Position property of the PivotField class.' However, if you include the On Error statement, which directs the program to jump to the line with the NotEnough: label if an error occurs, Excel will interpret the instruction to move the Hour field to the fourth position in the Row area as an instruction to move the Hour field to the last position in the Row area. Maybe this is a reward for good programming behavior.
Resetting a PivotTable to Its Original Position
After you've manipulated a PivotTable for a while during a presentation, it's very easy to forget the original arrangement of fields in the PivotTable. If you want to reset a PivotTable to its original condition, all you need to do is re-order the fields. Doing it by hand might be problematic when you're trying to concentrate on your message, so it makes sense to write a macro that re-creates the original layout. The next procedure sets the PivotTable in EditPivot.xls to the layout shown in Figure 16-8.
Sub ResetPivotTable()

With ActiveSheet.PivotTables("PivotTable8").PivotFields("Month")
    .Orientation = xlRowField
    .Position = 1
End With

With ActiveSheet.PivotTables("PivotTable8").PivotFields("Week")
    .Orientation = xlRowField
    .Position = 2
End With

With ActiveSheet.PivotTables("PivotTable8").PivotFields("Day")
    .Orientation = xlRowField
    .Position = 3
End With

With ActiveSheet.PivotTables("PivotTable8").PivotFields("Hour")
    .Orientation = xlColumnField
    .Position = 1
End With

End Sub
| Note | Notice that the code moves the fields into position in order, so that the field in the Row area's position 1 goes in before the field in position 2. |
Recording and Restoring Arbitrary PivotTable Positions
Specifying the exact location of each field in a PivotTable is great if you know the desired layout of your PivotTable, but how do you remember when you're playing around with a PivotTable and you happen upon an arrangement you love? The old way to remember the layout was to write down the order, keep the paper handy, and reconstruct the PivotTable by hand. The new way is to use the RecordPosition macro to write the field order to a group of cells in the active worksheet. Again, the macro is specific to the PivotTable on the EditPivot.xls workbook's PivotTable worksheet.
| Note | You need to make sure the active cell is in a location where there will be room to paste the position data this macro creates. To that end, it's a good idea to create a new worksheet, perhaps named RecordedPositions, to save these layouts.
Sub RecordPosition() |
Figure 16-10 shows the results of running the RecordPosition macro against the default arrangement of the PivotTable in EditPivot.xls.
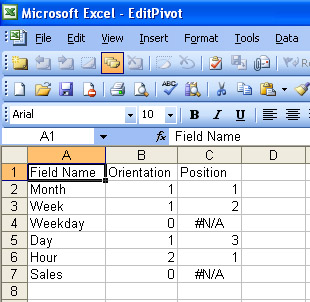
Figure 16-10: Excel records your PivotTable position for future use.
It's important to realize that the values assigned to the Position property are represented internally as numbers, not the Excel constants in the XlPivotFieldOrientation group. Table 16-7 lists the XlPivotFieldOrientation constants and their corresponding numerical values.
| Constant | Numerical Value |
|---|---|
| xlColumnField | 2 |
| xlDataField | 0 |
| xlHidden | 0 |
| xlPageField | 3 |
| xlRowField | 1 |
| Caution | When you write the values representing a PivotTable's layout to a worksheet, you'll need to be sure there's a blank row below the last entry to ensure the restore macro will run correctly. |
Now comes the moment of truth. You've recorded the PivotTable layout using the RecordPosition procedure, but it's time to see if you can use that data to re-create the layout you recorded. To test the restoration procedure, change the layout of the PivotTable on the PivotTable worksheet of EditPivot.xls and run the ResetFromRecorded macro.
| Important | For this macro to run correctly, the active cell needs to be on the worksheet that contains the recorded position data. This macro also assumes you're using the PivotTable in the EditPivot.xls workbook. If you want to use it on another PivotTable, you'll need to change the With statement so it reflects the worksheet name (PivotTable in the example) and identifier of the PivotTable (PivotTable8 in the example).
Sub ResetFromRecorded() |
This procedure starts with the cell that contains the Field Name label, verifies that the next cell in the field name column isn't blank, and then moves through the Do…While loop, assigning fields to the listed orientation and position, until it finds a blank cell in the list of field names.
| Tip | Make Each One Special |
In this chapter, you've explored PivotTables and PivotCharts, learning how to create them programmatically and through the Excel user interface. After the discussion of how to create PivotTables, you learned some valuable techniques for manipulating them programmatically. The procedures at the end of the chapter are valuable tools for anyone who wants to use data to tell a story, instead of fumbling for words while trying to find a particular PivotTable layout.
|
| < Day Day Up > |
|
EAN: 2147483647
Pages: 161