16.3 Linux
| There was a time when changes to the Linux kernel came out on a daily basis, and the hardest part about building a Linux kernel was knowing how to stop. These days, the production kernel tree is much more stable, but there are still significant kernel updates released on a regular basis. One way to take advantage of these updates is to download and install the kernel update packages made available in conjunction with the Linux distribution you are using. The advantage of this method is that the changes are merged into the actual distribution's kernel source code in other words, the source code as modified by the distribution's creators a process that can be daunting and difficult for anyone else. However, you may still decide to build your own custom kernel, probably beginning from a standard source-code package. If you decide to go this route, be sure that you understand any changes that may be required to support distribution-specific features that you may be using. The following commands illustrate the basic procedure for building a Linux kernel (the conservative way, not the kernel hacker's way). By way of illustration, they apply patches to bring the source code package to the current revision level before building the kernel. The first steps are to save the old kernel and unpack the kernel source code, if necessary: # cp /boot/vmlinuz /boot/vmlinuz.save Save current kernel. # cd /usr/src Change to source code area. # bzip2 -dc linux-2.4.x.tar.bz2 | tar xvf - Unpack starting kernel. You may choose to install a source-code RPM from your distribution instead of the standard tar archive (the latter is available from http://www.kernel.org). Once you have the Linux kernel source code installed, you start the process here: # for p in patch-list ; do Apply any patches to kernel. > bzip2 -dc /tmp/patch$p.bz2 | patch -p0 > done # cd /usr/src/linux Change to build directory. # cp arch/i386/config.in{,.save} Save configuration file. # cp .config .config.save If it exists. # make mrproper Clean build area. # make xconfig Select kernel options. The final command starts an X-based kernel configuration editor (illustrated in Figure 16-3). This utility allows you to specify a huge number of kernel parameters and select the features that you want to include. Figure 16-3. The Linux make xconfig utility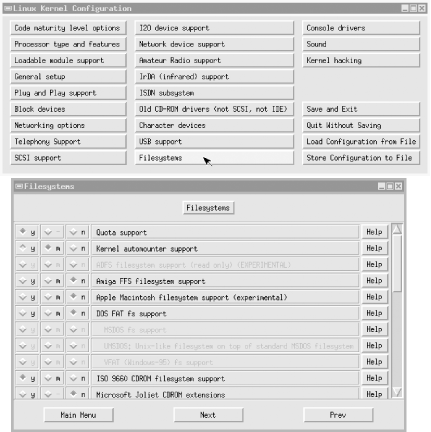 The utility divides the available settings into a series of categories accessible from its main window (uppermost in the figure). In the bottom window, we see the settings related to filesystem support, and we have just enabled support for disk quotas by clicking the y button in the first item. In this case, we can choose only whether to enable or disable support for the item, and the capability will be included in or excluded from the kernel according to our choice. For other items, however, there is a third option, corresponding to the middle check mark (labeled m:), which is used to enable support for the feature via a loadable module. In our example, kernel support for the automounter is provided in this way. If you are not running X, you may use a text-based menu configuration utility by running make menuconfig instead. In the last resort, you may run the make config command, which allows you to specify kernel parameters and other settings by answering a series of (seemingly) hundreds of prompts. NOTE On SuSE Linux systems, the configuration of the currently running kernel can be found in /proc/config.gz. This functionality is not available in the standard Linux kernel but was added by SuSE for convenience. After completing the kernel configuration, we next verify that certain include-file directory links are present and point to the correct places: the asm and linux include subdirectories of /usr/include point to the source tree, and the source tree's include/asm subdirectory points to the correct architecture-specific subdirectory: # ls -ld /usr/include/{linux,asm} lrwxrwxrwx 1 root system 26 Apr 25 16:03 /usr/include/asm -> /usr/src/linux/include/asm lrwxrwxrwx 1 root system 26 Dec 23 21:01 /usr/include/linux -> /usr/src/linux/include/linux # ls -ld include include/: total 10 lrwxrwxrwx 1 root system 8 Mar 8 17:40 asm -> asm-i386 drwxr-xr-x 2 root system 1024 Apr 25 16:01 asm-alpha drwxr-xr-x 2 root system 1024 Dec 29 02:04 asm-generic drwxr-xr-x 2 root system 1024 Apr 25 16:01 asm-i386 drwxr-xr-x 2 root system 1024 Dec 6 04:47 asm-m68k drwxr-xr-x 2 root system 1024 Apr 25 16:01 asm-mips drwxr-xr-x 2 root system 1024 Apr 25 16:01 asm-ppc drwxr-xr-x 2 root system 1024 Apr 25 16:01 asm-sparc ... Next, we perform some additional preparatory steps: # make dep # make clean # emacs Makefile The purpose of editing the Makefile is simply to specify a name for this configuration by modifying the EXTRAVERSION line near the top: EXTRAVERSION="-new_2-4-666" This variable specifies a suffix that is added to the new kernel executable image file and related file (e.g., vmlinuz-new_2-4-666 in the example above). Now, we are ready to begin the actual build process: # make bzImage # make install The final command installs the kernel and associated files into the proper locations. If you are usingkernel modules (discussed in a bit), you must run these commands as well: # make modules # make modules_install If you are using a SCSI adapter, you will also need to update the initial RAM disk image used to load the appropriate module: # mkinitrd /boot/initrd-suffix suffix suffix is the suffix you defined to identify the new kernel; in this case, it also identifies the subdirectory of /lib/modules to use in building the new initrd file. The final step of the build process is to reconfigure and update the Linux boot loader, lilo, which is the subject of the next section. Alternatively, you can use the newer grub loader (which is discussed after lilo) for which reconfiguration is optional. 16.3.1 Using liloAs we noted in Chapter 4, the boot process on a microcomputer has three stages: the system's master boot record (MBR) contains the primary boot program that starts the boot process and loads a secondary boot program from the boot blocks of the active partition; this second boot program is what loads the actual kernel. For Intel-based systems, Linux provides lilo , the Linux Loader, and most distributions install lilo into the MBR when Linux is installed. You can also install it manually with a command like this one: # lilo -C /etc/lilo.conf The -C option specifies the location of lilo's configuration file; the location in the preceding command is in fact the default location, so this -C clause is redundant. The lilo.conf file specifies lilo's behavior for certain aspects of the boot process and also defines the kernels and operating systems that it can boot. The following sample lilo.config file lists the most important entries and the ones that you are most likely to want or need to modify: # global parameters section: apply to all choices prompt Allow user to enter a boot command. timeout=100 Wait 10 seconds, then boot default entry. install=/boot/boot.b Second stage boot loader. boot=/dev/hda Where to install lilo (no partition=>MBR). message = /boot/boot.message Text file displayed before boot prompt. default = linux Default image label. # first boot selection image = /boot/vmlinuz Path to kernel. label = linux Boot prompt response to boot this entry. root = /dev/hda2 Partition holding the root directory. read-only Initial mount is read-only. # kernel argument for ancient Sony CD-ROM append = "cdu31a=0x340,0," Specifies parameters to pass to kernel (changes device's compiled-in I/O address). # another Linux boot selection image = /boot/vmlinuz-safe An alternate Linux kernel. label = safe Corresponding prompt response. alias = aok Another label for this entry. root = /dev/hda2 read-only # a Windows 2000 selection other = /dev/hda3 Some other operating system. label = win2k table = /dev/hda Use this partition table. Generally, lilo gets installed into the MBR area of the system disk using a boot configuration file entry like the one above, which references only the disk as a whole (here, /dev/hda), not any specific partition. However, you can also install the utility into the boot sector of a single disk partition by running a lilo command using the same configuration file and its -b option (which replaces the boot entry in the configuration file). For example, this command loads lilo into the boot sector of the first partition on the first hard disk: # lilo -b /dev/hda1 -C /etc/lilo.conf I tend to install lilo in both the MBR and the Linux partition for maximum flexibility. This way, if I decide to remove lilo from the MBR, I'll be all set to switch over to the Linux partition version. Booting a Linux partition on the second hard drive is handled in the same basic way. For this to work, lilo must be installed in the MBR of the system's boot disk, as well as in the boot sector of the Linux partition itself on the second disk.
16.3.1.1 Using a graphical message screenRecent versions of lilo provide support for a graphical boot menu screen. The most recent versions of SuSE Linux use this feature, which is defined via configuration file entries like these: message=/boot/message Image file location. menu-title="Linux System" menu-scheme=Wg:kw:Wg:wg Menu lettering color scheme. The binary image file is created with the mkbootmsg utility (it is part of the gfxboot-devel package). The colon-separated subfields of the menu-scheme entry specify colors for the menu's text, highlight bar, border and title text; see the lilo.conf manual page for details on specify colors. 16.3.1.2 lilo and WindowsThe final section (stanza) of the sample lilo.conf file illustrates the format for booting a Windows partition on the first hard disk. The entry for a Windows operating system on the second hard drive (i.e., D:) is more complicated and looks something like this: other = /dev/hdb1 A different operating system. map-drive=0x80 "Swap" C: and D:. to=0x81 map-drive=0x81 to=0x80 table = /dev/hdb Use this partition table. label = w2ksrv Corresponding prompt response. The map-drive commands tricks the BIOS thinking the second disk is the system (C:) drive. You can also boot Linux from the Windows 2000/XP boot menu. You need to be sure that lilo is installed into the partition boot sector. Then you need to extract that boot sector by booting off alternate media and running a dd command like this one: # dd if=/dev/hda2 of=linux.ldr bs=512 count=1 Then copy the output file to the Windows system disk's root directory and add an entry like the following to the Boot.Ini file: multi(0)disk(0)rdisk(0)partition(1)\linux.ldr="Linux" The specified path is to the Windows partition. This causes the Windows boot loader to start the Linux boot loader from its root directory, and the latter is configured to boot Linux from the proper partition. 16.3.1.3 More complex booting scenariosIt is also possible to boot a Linux partition on each of two disks. The procedure for doing so is the following:
To summarize, we have configuration 1 installed into the MBR on the first hard disk (and possibly into the boot sector of the Linux partition as well), and we have configuration 2 installed in the boot sector of the Linux partition on the second hard disk. The boot sequence might then go something like this: Welcome to gallant. Boot choices: linux (default; on C:), win2k, eviltwin (Linux on D:), boot: eviltwin Welcome to goofus. Boot choices: test (default; on D:), goodtwin (Linux on C:) boot: Return Loading test... Given these selections, Linux will boot from the D: drive. The lilo from the MBR on drive C: has run first, and it has then started the boot program on the Linux partition on the D: drive which is again lilo. That (second) lilo then loads the kernel from the D: drive. (Note that if you wanted to, you could just keep popping back and forth between the lilo programs on C: and D: ad infinitum.) If you think this is pretty silly, omit the prompt keyword from the lilo configuration file for the D: drive (as well as its image section for the Linux partition on the C: drive), resulting in a simple lilo.conf file on the D: drive: install=/boot/boot.b boot=/dev/hdb2 root=/dev/hdb2 map=/boot/map image=/boot/vmlinuz label=linux Once this is installed, selecting eviltwin at the initial boot prompt immediately boots the Linux partition on the second hard disk. 16.3.1.4 lilo's -r optionSometimes it is useful to be able to run lilo for a disk partition mounted somewhere other than /. For example, if you have another Linux root filesystem mounted at /mnt, you might want to run lilo to install the kernel (currently) at /mnt/boot/vmlinuz, using the configuration file /mnt/etc/lilo.conf. lilo's -r option is designed for such a purpose. It sets the root directory location for the lilo operation to the directory specified as its argument and looks for all files relative to that point. Thus, for the scenario we've been discussing, the correct command is: # lilo -r /mnt 16.3.1.5 The boot.message fileThe boot.message file is displayed before the boot prompt is issued. Here is an example boot.message file: Welcome to JAG Property of the Linc Guerrilla Hackers Association Computational science is not for the faint hearted! Our current boot offerings include: * linux (smaller test kernel--2.4.666 currently) * safe (SuSE distribution 2.4.something) * hacked (do you feel lucky?) * windog - guess what ... (on D:) An effective file will list all the defined choices (but it needn't be this eccentric). 16.3.2 The Grub Boot Loadergrub is theGrand Unified Bootloader (sic) from the GNU project (see http://www.gnu.org/software/grub/), originally written by Erich Boleyn and currently maintained by Gordon Matzigkeit and Okuji Yoshinori. It is designed to be operating system-independent and more flexible than previous programs of this type. Among its advantages is that it functions as a boot-time shell from which you can type any boot commands that may be appropriate, allowing you to specify a different configuration or kernel without prior preparation. When it starts, grub displays an initial splash screen and a menu of boot choices. You can customize both of these items via its configuration file, grub.conf , usually stored in /boot/grub under Linux. Here is an annotated example configuration file, illustrating methods for booting a variety of operating systems. We begin with the general section, which applies to all entries: # general section splashimage (hd0,0)/grub/splash.xpm.gz default 0 Default boot entry (numbering starts at 0). timeout 30 Menu timeout period in seconds. password -md5 xxxxxxx Use the grub-md5-crypt command to encode. grub uses a simple method for referring to disks and partitions: (hdn,m) refers to partition m on disk n, where both sets of numbers start at 0. Thus, the image file displayed behind the menu is located in the grub subdirectory on the first partition on the first disk. Here are entries used to boot Linux: title Linux Boot menu label. root (hd0,0) Base partition for future references. kernel /vmlinuz ro root=/dev/hda2 initrd /initrd.img title Test-Linux Second selection. root (hd1,1) Different base partition. kernel /boot/vmlinuz-test ro root=/dev/hdb2 initrd /boot/initrd.img-test The first entry is used to boot a Linux installation whose root directory is the second partition on the first disk (indicated via the root kernel parameter) but whose kernel image and associated files are stored in a separate /boot partition (the first partition on the first disk). The second entry boots a Linux installation on the second hard disk whose root and boot partitions are both on the second partition on that disk. The following entries could be used to boot a Windows operating system on the third partition of the first and second hard disk, respectively: title Win2K root (hd0,2) Specify partition. makeactive Activate it. chainloader +1 Hand off to local boot loader. title WinXP map (hd0) (hd1) "Swap" the two drives. map (hd1) (hd0) root (hd0,2) makeactive chainloader +1 Here is an entry which may be used to boot FreeBSD: title FreeBSD # use the 1st BSD subpartition in disk 1 partition 3 root (hd0,2,a) kernel /boot/loader This entry follows the documentation's recommendation to boot FreeBSD using the FreeBSD final-stage boot loader rather than directly invoking the FreeBSD kernel. grub also has the nice feature of remembering what you booted each time and making it the default for the next time. To enable this capability, set the default entry to saved and add a savedefault directive to the end of each stanza: default saved title Linux ... savedefault Installing grub itself is straightforward. Once you have built it, you can use the grub-install program to install it, as in these examples: # grub-install '(hd0)' # grub-install -root-directory /boot '(hd0)' The first example installs grub into the MBR on the first hard disk. The second command does the same thing, but it lets grub know that the kernel images are in a separate partition mounted at /boot. 16.3.3 Booting a Linux System with syslinuxOnce in a while, you'll run across a system where lilo just will not work. These systems have unusual hardware configurations that are basically not supported by this boot loader. At the moment, I have one such system. It is an older, Intel-based PC with two IDE controllers on the motherboard, one of which does not work. To compensate, the vendor installed another standalone IDE controller into a PCI slot. (No, I didn't know this when I accepted delivery). The CD-ROM and Zip drive are connected to the motherboard controller, and the system disk uses the separate secondary controller. This is the only configuration that works at all (I've tried all the others), but it confuses every operating system I've wanted to run on this computer. In the case of Linux, lilo just balks at the configuration and hangs on boots. A good solution for unusual cases like these is to use syslinux, a simple boot loader that runs off a floppy disk (FAT format). To create such a boot floppy, use commands like these: # mount -t msdos /dev/fd0 /floppy Mount floppy. # cp /boot/vmlinuz /floppy Copy kernel. # rdev /floppy/vmlinuz /dev/hda2 Set kernel root directory. # umount /floppy # syslinux /dev/fd0 Add loader program to floppy. Finally, you must create a configuration file for the boot floppy named syslinux.cfg. Here is a simple one: label linux kernel vmlinuz This file specifies the path to the kernel on the floppy and a label for the entry. If required, you can specify kernel parameters (the append keyword), an initial RAM disk (initrd), and other items. Consult the package's documentation for information about all the available configuration-file features. Once you have finished, booting from this floppy disk automatically boots the kernel on it, using /dev/hda2 as the root partition. 16.3.4 Restoring the DOS Master Boot ProgramShould you ever need to, here is the procedure for restoring the standard ("DOS") master boot program:
You can also perform the same task under Windows 2000 (and follow-ons):
16.3.5 Booting Alpha Linux SystemsAlpha Linux systems have different BIOSes than Intel-based systems, and the boot process differs. There are three boot loaders in use at the moment: the MILO boot loaders (used with ARC firmware), the APB boot loader (used with UP1000 systems), and the ABOOT boot loader (used with SRM console systems). Compaq Alpha systems generally use the latter. As we saw in Chapter 4, commands like these can be used to initiate a boot: aboot> p 2 Select the second partition to boot from. aboot> 0 Boot predefined configuration 0. The following command can be used to boot Linux from the second hard disk partition: aboot> 2/vmlinux.gz root=/dev/hda2 You can configure the ABOOT loader using the /etc/aboot.conf configuration file. The swriteboot command is used to install a configuration. Here is a sample entry from this file: 0:2/vmlinux.gz ro root=/dev/hda2 The boot command is preceded by a configuration number and a colon. Thus, this entry defines configuration 0. To boot from CD-ROM, first use the show dev command to determine the device name for the CD-ROM drive, then enter a command like this one: > boot dqb1 -fl 0 The first argument is the device name for the CD-ROM drive. 16.3.6 Linux Loadable ModulesThe Linux kernel has supported loadable modules since Version 1.2. In this scheme, you build a minimal kernel and dynamically load modules providing additional functionality as required. Such an approach has the advantage that many types of system changes no longer require a kernel rebuild; it also has the potential to significantly decrease the size of the kernel executable. The modutils package provides utilities for building, installing and loading kernel modules. Running make modules after building a kernel creates the loadable modules files, and make modules_install installs them into a subdirectory of /lib/modules whose name corresponds to the kernel release level and/or any assigned build suffix. The lsmod command lists currently loaded modules: Module Size Used by sg 21216 0 (autoclean) (unused) smbfs 32144 2 (autoclean) nls_iso8859-1 2848 1 (autoclean) ipv6 117744 -1 (autoclean) mousedev 3968 0 (unused) hid 11744 0 (unused) input 3104 0 [mousedev hid] printer 4832 0 (unused) usb-uhci 21712 0 (unused) usbcore 46480 1 [hid printer usb-uhci] 3c59x 22912 1 (autoclean) The output shows the module name, size, number of current users, and other modules that use it. For example, we see that the smbfs module (Samba-based support for mounting remote filesystems) has a current use count of 2. You can get information about a specific module with the modinfo command: # modinfo -d 3c59x Description 3Com 3c59x/3c90x/3c575 series Vortex/Boomerang/Cyclone driver # modinfo -a 3c59x Author Donald Becker <becker@scyld.com> # modinfo -n 3c59x Corresponding file /lib/modules/2.4.2-2/kernel/drivers/net/3c59x.o The configuration file /etc/modules.conf lists various configuration parameters for installed modules. Here are some sample entries to illustrate the type of information stored in this file: # map generic Ethernet interface to the specific device type alias eth0 3c59x alias eth1 off Disabled. # set options for the parallel port (passed when loaded) options parport_pc io=0x378 irq=none,none # sound subsystem configuration alias sound-slot-0 es1371 # command to run after insertion/activation post-install sound-slot-0 /bin/aumix-minimal -f /etc/.aumixrc -L >/dev/null 2>&1 || : # command to run before removal/deactivation pre-remove sound-slot-0 /bin/aumix-minimal -f /etc/.aumixrc -S >/dev/null 2>&1 || : These days, the modules facility is well integrated into general Linux development, and most packages perform any module configuration and bookkeeping activities themselves, so editing this file is seldom necessary. Similarly, manual loading or unloading of modules is a rare event because these actions generally occur on demand. However, the following utilities can be used to manually manipulate modules:
|

EAN: 2147483647
Pages: 162