Creating a Channel Mask: The Basics


Let's start with a simple channel masking example. Then we can get into the details of each step of this procedure.

1.

Open the Westminster Abbey image. Before you do anything, ask yourself how you intend to use the image. How you plan to use the image once you've masked it will determine how accurate you need to make the mask.

Figure 6.1. The original image (example A), and the image masked on a white background (example B).


2.

Evaluate the channels to see which one offers the most contrast. Press Command/Ctrl-1, 2, 3, to look at the Red, Green, and Blue channels in turn. Select the channel that has the most edge contrast between subject and backgroundin this case Blueand drag its thumbnail to the New icon at the bottom of the Channels palette to duplicate it. This duplicate channel is the basis for your mask.

Figure 6.2. The Channels palette showing the duplicate Blue channel, the starting point of the mask.


3.

Block out your mask: begin by viewing your duplicate channel and hiding all other channels. Choose your Brush tool and paint in any large areas in black or white, depending on whether these areas will become masked or selected areas. Alternatively, use the Lasso or Marquee tools to select and fill areas with black or white. Keep this step quick, creating a very basic separation between the black and white areas of your image. Stay away from any edges and use a hard-edged brush to avoid introducing any unwanted feathering into your mask.

Figure 6.3. Blocking out areas as opaque black and white on either side of the image edge.


4.

Viewing your channel at 100%, force contrast by choosing Image > Adjustments > Levels and moving the Black point and White point sliders towards each other, into the center. Move the Midpoint slider to the right. Dark grays should become black, while the highlight areas become white. Watch how your adjustments are affecting the edgesif you overdo it by moving the Levels sliders too close together, the edges will lose detail and become aliased. Once you've applied your Level (or Curves) adjustment, you may need to paint in any small areas that didn't shift to black or white.


Figure 6.4. Applying a Levels adjustment to force the gray areas as far as possible towards opaque black and white.


5.

Return to your RGB composite channel and load the mask as a selection by Command/Ctrl-clicking your duplicate channel (Alpha 1). You're now ready to use the selection any way you want. In this example we're going to turn it into a layer mask. Click the Add layer mask icon at the bottom of the Layers palette. Note that if you're working with a flattened image (i.e., one that has a background layer) you will first need to double-click the layer thumbnail to name the layer.

6.

Refine the mask by painting on the layer mask to fix any inaccuracies. Of course, it's not until you put the image on top of another layer that the worst of the inaccuracies become obvious. In the examples that follow we see how to fix the edges of a mask when you are compositing the image with other layers.

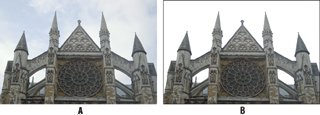
Figure 6.5. Using a channel mask makes it easy to maintain fine detail around the edges of the building.


Adobe PhotoShop Unmasked. The Art and Science of Selections, Layers, and Paths
Adobe Photoshop Unmasked: The Art and Science of Selections, Layers, and Paths
ISBN: 0321441206
EAN: 2147483647
Year: 2004
Pages: 93
Authors: Nigel French

flylib.com © 2008-2017.
If you may any questions please contact us: flylib@qtcs.net