Balancing Exposure
| If you're like me you've probably got a shoebox (or its metaphorical equivalent) full of photographs where the foreground is underexposed due to your camera taking its light reading from the sky. This is the kind of problem an adjustment layer eats for breakfast. Let's take a look. By putting down multiple anchor points on the curve you can edit the different tonal zones of your image with great independence. For example, using Curves you can edit the highlights without necessarily affecting the midtones or the shadows, or you can edit just the shadows without affecting the midtones or the highlights. The limitation of a Curves-only approach, however, is that anything more than a subtle change to either the shadows or highlights will also affect the tonal values at the other end of the tonal range, albeit to a lesser extent. With lots of practice you can carefully tweak the shape of your curve, adding up to 16 points (and Photoshop veterans perform amazing feats of independent tonal adjustment by carefully tweaking an image's curve!), but this is always time-consuming and not always successful. Curves that have been pulled up or down a lot at one end and locked down at the other tend to flatten the image in unpleasing ways. The good news is that you don't have to perform Curve gymnastics; instead, you can use the adjustment layer's mask to achieve the best result with the least effort. For images with a clear division between highlight and midtones/shadowspretty much any image with a sky or where the subject is strongly lit from one sidethis is easy: just paint with a gradient on the layer mask. For images where the light and dark areas are mixed up, or where the subject extends above the horizon line into the sky, a gradient made from multiple swipes may work, or you may need to use your selection tools to make the mask. With the layer mask that comes free of charge with all adjustment layers, you can paint in black to block the effect of the adjustment layer wherever you don't want it to be applied to the image. Using adjustment layer masks to affect specific areas of an image combines the numerical approach of Curves with the select-by-area approach of layer masks. In this example the sky is dramatic but the foreground dark. I underexposed this image intentionally. Had I exposed the image for the foreground, the sky would be too light, possibly blowing out the highlights, which would narrow my options for how I could edit the image. Underexposing the foreground is less problematic because it's easier to tease information from an underexposed than from an overexposed image. Assuming, that is, you're shooting the image with a half-decent camera. By the time I've performed a quick fix in Photoshop, I'll have the best of both worlds: a dramatic sky and a correctly exposed foreground.
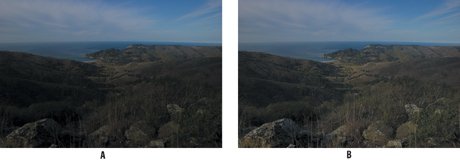
Figure 5.6. Adding a Foreground to Transparent gradient to restore the original sky. The layer mask (example A) and the Layers palette (example B).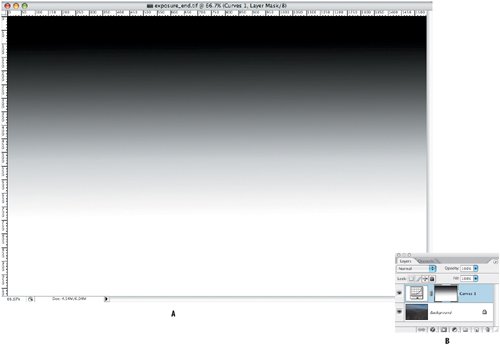 Here's another example with a correctly exposed sky but underexposed foreground: Figure 5.7. The original image (example A). The finished image (example B), which was easily fixed with a brightening curve and a Foreground (black) to Transparent gradient on a layer mask (examples C and D).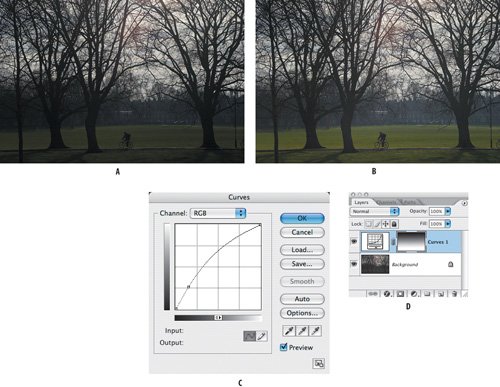 For more demanding images you can use a combination of layer masks and gradient layer masks to adjust the exposure in specific regions of the image. In the next example I brightened the foreground using a mask made from the sky. To brighten the doorway, I added another Curves adjustment layer. I filled the mask with black, and then, to reveal the brighten color in the doorway, I made several swipes with a White to Transparent gradient on the layer mask. Because the gradient transitions smoothly between white and black, no edges or halos appear around the mask. Figure 5.8. The original image (example A) and the finished image with brightened foreground and doorway (example B). One adjustment layer was used to brighten the foreground and another to brighten the doorway (examples C, D and E). |

EAN: 2147483647
Pages: 93
- Article 220 Branch-Circuit, Feeder, and Service Calculations
- Article 342 Intermediate Metal Conduit Type IMC
- Article 384 Strut-Type Channel Raceway
- Article 406: Receptacles, Cord Connectors, and Attachment Plugs (Caps)
- Example No. D2(b) Optional Calculation for One-Family Dwelling, Air Conditioning Larger than Heating [See 220.82(A) and 220.82(C)]