Using the Paths Palette
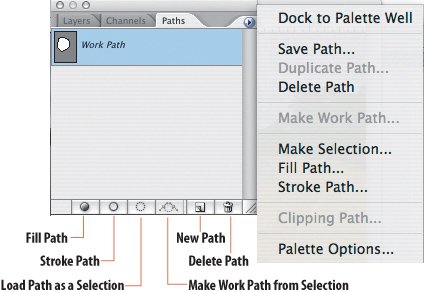
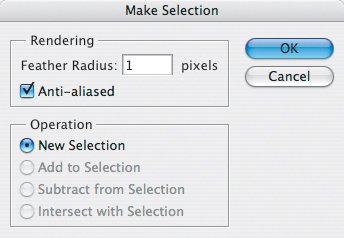
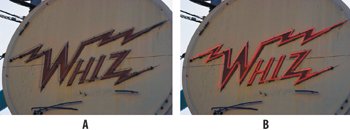
| The Paths palette is the control center for working with paths. The illustration shows its key features. Figure 1.40. The Paths palette. Even if you plan to convert your path to a selection, it's worth saving a path as insuranceand paths add little to your file size. Make SelectionThe most useful item on the Paths palette menu is Make Selection. Once you've defined an accurate path you can convert it to a selection. And why the extra step? Because paths are not actually selections but vector outlines and consequently don't allow feathering and anti-aliasing of their edges. To make a selection using the last settings specified in the Make Selection dialog box, Command/Ctrl-click the Make Selection icon at the bottom of the Paths palette. Hold down a modifier key if you want the new selection to be added to (Shift), subtracted from (Option/Alt) or to intersect (Shift-Option/Alt) an existing active selection. Figure 1.41. Using Make Selection you can specify a feather radius and determine how the selection interacts with an existing active selection. As well as being able to turn a path into a selection, you can also go in the other direction. Any selection can be turned into a Work Path using the Make Work Path icon at the bottom of the Paths palette. A lower tolerance number gives a more accurate but more complicated path. If a selection has rather jagged edges, using a higher tolerance can smooth the path. However, you'll always get a better result drawing the path yourself rather than converting a selection to a path. Stroking a PathChoose Stroke Path from the Paths palette menu to use the Painting or Retouching tool to stroke an active path. Click the Stroke Path icon at the bottom of the Paths palette and the active tool in the Toolbox (if it's capable of stroking a path) is used with its current settings. If the active tool can't be used, the tool last selected to stroke a path is used. But why do this? While it isn't something I do often, it does have some effective uses. For example, you can stroke a path with the Clone tool or Healing Brush to repair or retouch a continuous line of blemish like a power line. Let's look at an example. Figure 1.42. The original image (example A) and the finished image (example B) with the neon "turned on" by stroking a pen path.
Stroking a path can also help you get the best from the Extract tool. This technique is discussed in Chapter 6, "Channel Masks." Clicking the Fill Path with the foreground color icon at the bottom of the Paths palette does exactly thatequivalent to making a selection and filling it with the foreground color. If you want filled vector shapes, use a shape layer instead, which assigns your shape to its own layer for more editing flexibility. Making a Clipping PathClipping paths can be used to define transparent areas in images that you are exporting to page layout applications. When you import the image into your page layout, the area outside the clipping path is invisible. However, now that the current versions of InDesign and QuarkXPress recognize "real" transparencyas defined by an alpha channel or a layer maskold school clipping paths are arguably obsolete. Because alpha channel and layer masks are 8-bit, or, to put it another way, because they support 256 shades of gray, you can feather their edges as well as vary their opacity. Clipping paths, on the other hand, are hard-edged and historically have been responsible for too many "blunt scissor" masks. So, do you ever need a clipping path? Well, perhaps. Clipping paths have an advantage in two respects:
Once a path is saved it can be defined as a clipping path by choosing Clipping Path from the Paths palette menu. Its' name will be outlined. When the file is saved and imported into a page layout program the area outside the clipping path is masked. However, rather than use the Clipping Path option from the Paths palette menu, opt instead for a Vector mask, whose effects you can evaluate and edit within Photoshop. See "Vector Masking Sharp Edges" in Chapter 4. |


EAN: 2147483647
Pages: 93