19.2 Programming COM Security
19.2 Programming COM+ SecurityIn this section, we explain how to configure COM+ security with .NET attributes; we do this by creating and deploying an example serviced component. We demonstrate how to use COM+ RBS and PAS to control access to a simple component that tracks software defects for an imaginary software product called SecurityPro. In Section 19.3 , we demonstrate an alternative approach to configuring COM+ security. We begin by defining the IDefectTracker interface, which contains the three methods we use to simulate defect tracking. We briefly describe the purpose of each interface method in the list below. We are developing this component to demonstrate COM+ security, so we do not define types to represent defects, or specify method arguments:
The following statements define our simple IDefectTracker interface: # C# using System; public interface IDefectTracker { void ViewAllDefects( ); void CreateNewDefect( ); void CloseDefect( ); } # Visual Basic .NET Imports System Public Interface IDefectTracker Sub ViewAllDefects( ) Sub CreateNewDefect( ) Sub CloseDefect( ) End Interface In the following sections, we create a serviced component that implements the IDefectTracker interface, and apply .NET attributes to configure COM+ RBS and PAS. 19.2.1 Creating the Serviced ComponentA serviced component must inherit from the System.EnterpriseServices.ServicedComponent class and must be a member of a strong-named assembly. The following statements list the SecurityProTracker class, which extends ServicedComponent and implements the IDefectTracker interface. # C# using System; using System.EnterpriseServices; // Specify the file containing the key for assembly signing [assembly: System.Reflection.AssemblyKeyFile("mykey.key")] public class SecurityProTracker: ServicedComponent, IDefectTracker { public void ViewAllDefects( ) {} public void CreateNewDefect( ) {} public void CloseDefect( ) {} } # Visual Basic .NET Imports System Imports System.EnterpriseServices ' Specify the file containing the key for assembly signing <Assembly: System.Reflection.AssemblyKeyFile("mykey.key")> Public Class SecurityProTracker Inherits ServicedComponent Implements IDefectTracker Public Sub ViewAllDefects( ) Implements IDefectTracker.ViewAllDefects End Sub Public Sub CreateNewDefect( ) Implements IDefectTracker.CreateNewDefect End Sub Public Sub CloseDefect( ) Implements IDefectTracker.CloseDefect End Sub End Class
The emphasized statements specify the file containing the cryptographic key we use to create the strong name for our assembly; we create this file in Section 19.2.4. See Chapter 2 for details of assembly strong names. We have now satisfied the two requirements for COM+ serviced components, and we can compile and install our serviced component without any further changes. 19.2.2 Specifying the COM+ Application TypeThe System.EnterpriseServices.ApplicationActivation class is the first COM+ attribute we apply, allowing us to specify whether we want a COM+ server or library application. This attribute accepts a single parameter, which must be a value from the System.EnterpriseServices.ActivationOption enumeration, the values of which are detailed in Table 19-1. Application proxies are created with the Component Services tool; consult the Windows documentation for details.
The emphasized statements in the code fragment below demonstrate the use of the ApplicationActivation attribute to specify a COM+ server application for our example component: # C# using System; using System.EnterpriseServices; // Specify the file containing the key for assembly signing [assembly: System.Reflection.AssemblyKeyFile("mykey.key")] // Specify that we want a COM+ Server application [assembly: ApplicationActivation(ActivationOption.Server)] public class SecurityProTracker: ServicedComponent, IDefectTracker { # Visual Basic .NET Imports System Imports System.EnterpriseServices ' Specify the file containing the key for assembly signing <Assembly: System.Reflection.AssemblyKeyFile("mykey.key")> ' Specify that we want a COM+ Server application <Assembly: ApplicationActivation(ActivationOption.Server)> Public Class SecurityProTracker Inherits ServicedComponent Implements IDefectTracker 19.2.3 Applying the Security AttributesIn this section, we demonstrate how to use COM+ RBS and PAS, both of which are configured using .NET attributes from the System.EnterpriseServices namespace. COM+ security can be configured programmatically, as demonstrated in this part of the chapter, or administratively, as discussed in Section 19.3 . When applying .NET attributes to configure RBS and PAS, you must bear in mind that the system administrator can change the security configuration for your components or even disable security completely. 19.2.3.1 The ApplicationAccessControl attributeThe first security attribute to apply is ApplicationAccessControl, which acts as a master switch for COM+ application security and allows you to specify your PAS authentication and impersonation levels. This attribute is always applied to an assembly, because it affects the entire COM+ application. The ApplicationAccessControl attribute defines four properties:
The emphasized statements below show the use of the ApplicationAccessControl attribute for our example component. We have enabled COM+ security, specified that we wish to use PAS and RBS, and accepted the default levels for authentication and impersonation: # C# using System; using System.EnterpriseServices; // Specify the file containing the key for assembly signing [assembly: System.Reflection.AssemblyKeyFile("mykey.key")] // Specify that we want a COM+ Server application [assembly: ApplicationActivation(ActivationOption.Server)] // Specify our application level security settings [assembly: ApplicationAccessControl( // Enable COM+ Security Value=true, // Enable PAS and RBS AccessChecksLevel=AccessChecksLevelOption.ApplicationComponent, // Use the computer default values for authentication and impersonation Authentication=AuthenticationOption.Default, ImpersonationLevel=ImpersonationLevelOption.Identify)] public class SecurityProTracker: ServicedComponent, IDefectTracker { # Visual Basic .NET Imports System Imports System.EnterpriseServices ' Specify the file containing the key for assembly signing <Assembly: System.Reflection.AssemblyKeyFile("mykey.key")> ' Specify that we want a COM+ Server application <Assembly: ApplicationActivation(ActivationOption.Server)> ' Specify our application level security settings <Assembly: ApplicationAccessControl( _ Value:=True, _ AccessChecksLevel:=AccessChecksLevelOption.ApplicationComponent, _ Authentication:=AuthenticationOption.Default, _ ImpersonationLevel:=ImpersonationLevelOption.Identify)> Public Class SecurityProTracker Inherits ServicedComponent Implements IDefectTracker 19.2.3.2 The ComponentAccessControl AttributeThe ComponentAccessControl attribute enables or disables COM+ security for an individual serviced component. This attribute accepts a single argument, which is set to true (to enable COM+ security for a component) or false (to disable COM+ access control for a component). The emphasized statements below demonstrate how we apply this attribute to enable COM+ security for our SecurityProTracker component: # C# // Enable COM+ Security for this component [ComponentAccessControl(true)] public class SecurityProTracker: ServicedComponent, IDefectTracker { # Visual Basic .NET 'Enable COM+ Security for this component <ComponentAccessControl(True)> _ Public Class SecurityProTracker Inherits ServicedComponent Implements IDefectTracker You must apply this attribute to every component that requires security services within a COM+ application. The ComponentAccessControl attribute has no effect if the ApplicationAccessControl attribute has disabled COM+ security at the application level. 19.2.3.3 The SecurityRole attributeThe SecurityRole attribute has a different affect depending on whether it is applied to an assembly, an interface, a class, or a method. In this section, we define some roles for our example component and use the SecurityRole attribute to apply COM+ RBS. We define the following roles for our component. Figure 19-4 shows how we map these roles to the methods implemented by the SecurityProTracker component:
Figure 19-4. Mapping roles to the SecurityProTracker component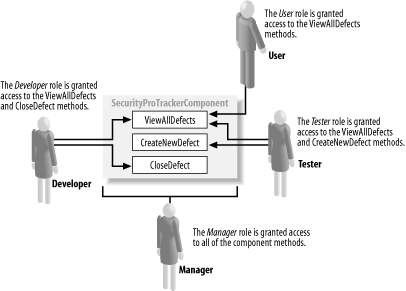 When the SecurityRole attribute role is applied to an assembly, it has the effect of defining the role within the COM+ application; we shall see the effect of this in Section 19.3. When used to define roles in this way, the attribute defines the properties described by Table 19-2.
The SetEveryoneAccess property is worthy of special note; the SecurityRole can be applied to an assembly to define roles for a COM+ application, but the system administrator is responsible for assigning the COM+ roles to Windows user accounts. If the SetEveryoneAccess property is set to true, the Windows Everyone group will be assigned the role and all users will be able to access the methods protected by this role.
The following statement demonstrates how to define the User role by applying the SecuityRole attribute to an assembly, specifying a description and ensuring that the Everyone group is not assigned the role: # C# // Define the Users role [assembly: SecurityRole("User", Description="Users of the Security Pro product", SetEveryoneAccess=false)] # Visual Basic .NET ' Define the Users role <Assembly: SecurityRole("User", _ Description:="Users of the Security Pro product", _ SetEveryoneAccess:=False)> Applying the SecurityRole attribute to an assembly only defines the role and allows you to provide a description; it does not grant the role access to the methods defined by an interface or component. The emphasized statements below demonstrate how we define the roles for our example component: # C# // Define the Users role [assembly: SecurityRole("User", Description="Users of the Security Pro product", SetEveryoneAccess=false)] // Define the Tester role [assembly: SecurityRole("Tester", Description="Security Pro product testers", SetEveryoneAccess=false)] // Define the Developer role [assembly: SecurityRole("Developer", Description="Security Pro product developers", SetEveryoneAccess=false)] // Define the Manager role [assembly: SecurityRole("Manager", Description="Security Pro product managers", SetEveryoneAccess=false)] // Enable COM+ Security for this component [ComponentAccessControl(true)] public class SecurityProTracker: ServicedComponent, IDefectTracker { # Visual Basic .NET ' Define the Users role <Assembly: SecurityRole("User", _ Description:="Users of the Security Pro product", _ SetEveryoneAccess:=False)> ' Define the Tester role <Assembly: SecurityRole("Tester", _ Description:="Security Pro product testers", _ SetEveryoneAccess:=False)> ' Define the Developer role <Assembly: SecurityRole("Developer", _ Description:="Security Pro product developers", _ SetEveryoneAccess:=False)> ' Define the Manager role <Assembly: SecurityRole("Manager", _ Description:="Security Pro product managers", _ SetEveryoneAccess:=False)> 'Enable COM+ Security for this component <ComponentAccessControl(True)> _ Public Class SecurityProTracker Inherits ServicedComponent Implements IDefectTracker When applied to a component, the SecureMethod attribute grants a role access to all of the methods defined by a component. We want to grant the Manager role access to all of the methods defined by our example component, and we will apply the SecurityRole attribute to the SecurityProTracker class, as shown by the emphasized statements below: # C# // Enable COM+ Security for this component [ComponentAccessControl(true)] // Grant the Manager role access to the component [SecurityRole("Manager")] public class SecurityProTracker: ServicedComponent, IDefectTracker { # Visual Basic .NET <ComponentAccessControl(True), _ SecurityRole("Manager")> _ Public Class SecurityProTracker Inherits ServicedComponent Implements IDefectTracker We can grant roles permission to access individual methods by applying the SecurityRole attribute to individual methods in either the interface or the component class. If we apply the attribute to an interface method, the role will be able to access the method in any component that implements the interface. If we apply the SecurityRole attribute to a method in the component, the role is granted access to that component only, and not other components that implement the same interface. We will apply our access controls to the interface, as shown by the emphasized statements below: # C# public interface IDefectTracker { [SecurityRole("User")] [SecurityRole("Tester")] [SecurityRole("Developer")] void ViewAllDefects( ); [SecurityRole("Tester")] void CreateNewDefect( ); [SecurityRole("Developer")] void CloseDefect( ); } # Visual Basic .NET Public Interface IDefectTracker <SecurityRole("User"), _ SecurityRole("Tester"), _ SecurityRole("Developer")> _ Sub ViewAllDefects( ) <SecurityRole("Tester")> _ Sub CreateNewDefect( ) <SecurityRole("Developer")> _ Sub CloseDefect( ) End Interface When we apply multiple attributes, a user identity granted any of the specified roles will be granted access. We cannot require an identity to be assigned multiple roles in order to access a method or component. 19.2.3.4 The SecureMethod attributeThe final attribute to apply is SecureMethod, which enables per-method access control for a component. Without this attribute, COM+ RBS will be applied on a component level only, and the role protection we have assigned to the IDefectTracker interface will be ignored. The emphasized statement below demonstrates how we apply this attribute to our example class; this attribute defines no properties: # C# // Enable COM+ Security for this component [ComponentAccessControl(true)] [SecureMethod] // Grant the Manager role access to the component [SecurityRole("Manager")] public class SecurityProTracker: ServicedComponent, IDefectTracker { # Visual Basic .NET <ComponentAccessControl(True), _ SecureMethod( ), _ SecurityRole("Manager")> _ Public Class SecurityProTracker Inherits ServicedComponent Implements IDefectTracker 19.2.4 Compiling and Installing the COM+ ApplicationIn the previous section, we applied .NET attributes to configure COM+ RBS and PAS for a serviced component. In this section, we compile our example component and show you how to install a COM+ application. Our first task is to create a code file containing the statements we introduced in the previous section; we have listed the complete C# and Visual Basic .NET definitions of the example component below, and we have saved these statements into a file called Tracker.cs (C#) (see Example 19-1) or Tracker.vb (Visual Basic .NET) (see Example 19-2): Example 19-1. Tracker.cs (C#)using System; using System.EnterpriseServices; // Specify the file containing the key for assembly signing [assembly: System.Reflection.AssemblyKeyFile("mykey.key")] // Specify that we want a COM+ Server application [assembly: ApplicationActivation(ActivationOption.Server)] // Specify our application level security settings [assembly: ApplicationAccessControl( // Enable COM+ Security Value=true, // Enable PAS and RBS AccessChecksLevel=AccessChecksLevelOption.ApplicationComponent, // Use the computer default values for authentication and impersonation Authentication=AuthenticationOption.Default, ImpersonationLevel=ImpersonationLevelOption.Identify)] // Define the Users role [assembly: SecurityRole("User", Description="Users of the Security Pro product", SetEveryoneAccess=false)] // Define the Tester role [assembly: SecurityRole("Tester", Description="Security Pro product testers", SetEveryoneAccess=false)] // Define the Developer role [assembly: SecurityRole("Developer", Description="Security Pro product developers", SetEveryoneAccess=false)] // Define the Manager role [assembly: SecurityRole("Manager", Description="Security Pro product managers", SetEveryoneAccess=false)] // Enable COM+ Security for this component [ComponentAccessControl(true)] [SecureMethod] // Grant the Manager role access to the component [SecurityRole("Manager")] public class SecurityProTracker: ServicedComponent, IDefectTracker { public void ViewAllDefects( ) {} public void CreateNewDefect( ) {} public void CloseDefect( ) {} } public interface IDefectTracker { [SecurityRole("User")] [SecurityRole("Tester")] [SecurityRole("Developer")] void ViewAllDefects( ); [SecurityRole("Tester")] void CreateNewDefect( ); [SecurityRole("Developer")] void CloseDefect( ); } Example 19-2. Tracker.vb (VB.NET)Imports System Imports System.EnterpriseServices ' Specify the file containing the key for assembly signing <Assembly: System.Reflection.AssemblyKeyFile("mykey.key")> ' Specify that we want a COM+ Server application <Assembly: ApplicationActivation(ActivationOption.Server)> ' Specify our application level security settings <Assembly: ApplicationAccessControl( _ Value:=True, _ AccessChecksLevel:=AccessChecksLevelOption.ApplicationComponent, _ Authentication:=AuthenticationOption.Default, _ ImpersonationLevel:=ImpersonationLevelOption.Identify)> ' Define the Users role <Assembly: SecurityRole("User", _ Description:="Users of the Security Pro product", _ SetEveryoneAccess:=False)> ' Define the Tester role <Assembly: SecurityRole("Tester", _ Description:="Security Pro product testers", _ SetEveryoneAccess:=False)> ' Define the Developer role <Assembly: SecurityRole("Developer", _ Description:="Security Pro product developers", _ SetEveryoneAccess:=False)> ' Define the Manager role <Assembly: SecurityRole("Manager", _ Description:="Security Pro product managers", _ SetEveryoneAccess:=False)> <ComponentAccessControl(True), _ SecureMethod( ), _ SecurityRole("Manager")> _ Public Class SecurityProTracker Inherits ServicedComponent Implements IDefectTracker Public Sub ViewAllDefects( ) Implements IDefectTracker.ViewAllDefects End Sub Public Sub CreateNewDefect( ) Implements IDefectTracker.CreateNewDefect End Sub Public Sub CloseDefect( ) Implements IDefectTracker.CloseDefect End Sub End Class Public Interface IDefectTracker <SecurityRole("User"), _ SecurityRole("Tester"), _ SecurityRole("Developer")> _ Sub ViewAllDefects( ) <SecurityRole("Tester")> _ Sub CreateNewDefect( ) <SecurityRole("Developer")> _ Sub CloseDefect( ) End Interface We need to create the cryptographic key file that we specified with the AssemblyKeyFile attribute. We will create a test key pair for our example using the Strong Name Tool (sn.exe); consult Chapter 2 for details of signing assemblies. We assume that your DOS path includes the tools provided with the .NET Framework SDK; consult the .NET documentation for instructions. The following statement creates the key file we specified: sn -k mykey.key The following statements show how to compile the code file to create SecurityProTracker.dll, which is a library assembly with a strong name: # C# csc /target:library /out:SecurityProTracker.dll DefectTracker.cs # Visual Basic .NET vbc /target:library /out:SecurityProTracker.dll /reference:System.EnterpriseServices. dll DefectTracker.vb Now that we have created an assembly containing our component, we can use the .NET Services Installation tool (regsvcs.exe) to install the component on the local computer: regsvcs SecurityProTracker.dll The output from the .NET Services Installation tool is shown below: Microsoft (R) .NET Framework Services Installation Utility Version 1.0.3705.288 Copyright (C) Microsoft Corporation 1998-2001. All rights reserved. Installed Assembly: Assembly: C:\SecurityProTracker.dll Application: SecurityProTracker TypeLib: c:SecurityProTracker.tlb |

EAN: 2147483647
Pages: 346