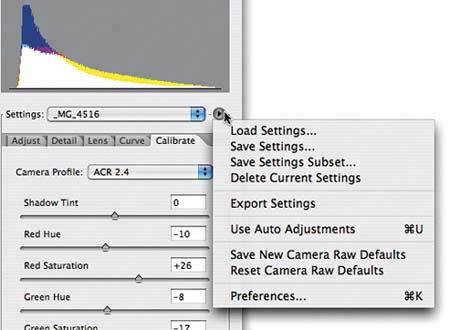
The Camera Raw Menu
| Cleverly hidden under the small unlabeled right-facing triangle is the Camera Raw menu, which allows you to load, save, and delete settings or subsets of settings, turn Camera Raw's Auto corrections on or off, set default settings for an individual camera model, restore Camera Raw's default settings for a camera model, and set Preferences. See Figure 4-16. Figure 4-16. The Camera Raw menu
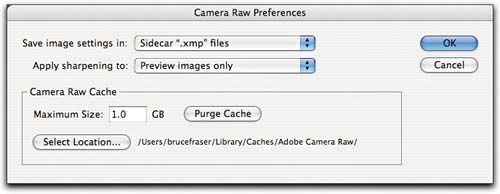
We'll start with Preferences, because until you understand the various behaviors controlled by Preferences, the other commands may not make a whole lot of sense. Camera Raw's Preferences are fairly simple, but they have far-reaching implications for your workflow. See Figure 4-17. Figure 4-17. Camera Raw Preferences
PreferencesCamera Raw's Preferences let you decide whether your raw edits are saved in the Camera Raw database or in "sidecar" .xmp files, and whether to apply sharpening to the converted image or to the preview only. It also allows you to choose the location and size of the Camera Raw cache, and lets you purge the Camera Raw cache. Save image settings inThe "Save image settings in" option lets you save settings in the Camera Raw database, or in individual sidecar .xmp files. Camera Raw treats the raw images as read-only (which is a Good Thing since your raw images never get overwritten), so your Camera Raw edits for the image get saved either in a sidecar .xmp filea small file designed to travel with the imageor in the Camera Raw database. Each approach has strengths and weaknesses. Saving your edits in the Camera Raw database means that you don't have to keep track of sidecar files or worry about making sure that they get renamed along with the imagethe Camera Raw database indexes the images by file content rather than name, so if you rename the raw file, the Camera Raw database will still find the correct settings. The major disadvantage of this approach is that if you move the images onto a different computer, or burn them to a CD or DVD, the edits won't travel with the images. Saving your edits in sidecar files allows the edits to travel with the images. You have more files to deal with, but Adobe gives you a lot of help in doing so. By default, Bridge hides .xmp sidecar files, and automatically keeps them with their respective images when you use Bridge to move or rename them. The only danger is that if you move or rename the images outside Bridge, you need to keep track of the sidecars yourself. A solution to this potentially confusing issue is to convert your raw images to DNG format. Camera Raw treats raw files as read-only because all the vendors' proprietary formatsCanon's .CRW and .CR2, Nikon's .NEF, Olympus' .ORF, and so onare undocumented. Rather than taking the risk of overwriting potentially useful information by writing metadata such as Camera Raw settings into the file, Camera Raw uses sidecar files or its own database. But DNG is a completely documented, open format, so when you use DNG, Camera Raw settings and other metadata get written drectly into the DNG file itself. See "Working With DNG" in Chapter 7, It's All About the Workflow. Apply sharpening toThe "Apply sharpening to" option lets you choose whether to apply sharpening to the previews and to the converted image, or to the previews only. I prefer to apply selective sharpening to the converted images, so I set this option to "Preview images only"that way I can enjoy reasonably sharp previews, but apply more nuanced sharpening to the converted images. Note that this preference only affects the Sharpness setting, not either of the noise reduction settings, which are found on the same Detail tab as the Sharpness control (see "The Detail Tab," later in this chapter). Camera Raw cacheThe Camera Raw cache holds pre-parsed raw data for the most recently used raw files, which is used to speed up the following operations:
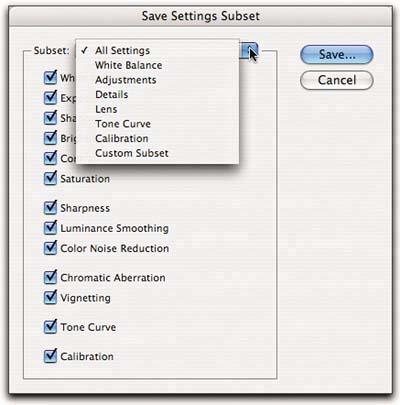
The cache file sizes average about 5MB, so at the default size limit of 1GB, the Camera Raw cache will hold the pre-parsed data for about the 200 most recently accessed images. If you commonly edit folders with more than 200 raw files, you probably want to increase the Camera Raw cache's size limit. Nothing is stored exclusively in the Camera Raw cache, so purging it never loses data. Loading and Saving SettingsThe Load Settings, Save Settings, and Save Settings Subset commands let you load and save settings or settings subsets you make with any of the image-specific (Adjust, Detail, Lens, Curve, and Calibrate) controls. The Save Settings Subset command lets you save subsets of image settingsfor example, you can create settings that only adjust the exposure value up or down in 1/4-stop increments such as +0.25, +0.50, -0.25, -0.5, and so on. See Figure 4-18. Figure 4-18. Loading and saving settings subsets
To make saved settings or subsets appear on the Settings menu automatically, save them in User/Library/Application Support/Adobe/Camera Raw/Settings (Mac), or Documents and Settings\User\Application Data\Adobe\Camera Raw\Settings (Windows). These saved settings also appear in the Apply Camera Raw Settings submenu on Bridge's Edit menu. If you save settings anywhere else, you can load them using Camera Raw's Load Settings command. Export SettingsThe Export Settings command offers a way to write a sidecar .xmp file when you have the Camera Raw Preferences set to save edits in the Camera Raw cacheit offers a way to produce sidecar files when you want to copy the images to removable media for use on another computer while preserving the edits. If the preference is set to use sidecar files, Export Settings will export a sidecar file only if no sidecar file already exists. If there's an existing sidecar file, or if the raw file is in DNG format, Export Settings does nothing. Use Auto AdjustmentsOne of the interesting new features in Camera Raw is the ability to have it perform autocorrections on images. This feature isn't as simple as it might appear at first glance! When it's turned on, which it is by default, Camera Raw tries to come up with optimum settings for each image, essentially autocorrecting tone and exposure. In my experience, it does something close to what I want slightly more than half the time, so it's quite useful. But keeping Use Auto Adjustments as part of the default settings makes it difficult to learn the behavior of a camera, because each image has been adjusted individually, so you don't get to see a consistent baseline interpretation. That's not a problem for everyone, and if it isn't a problem for you, then by all means leave the default settings alone. However, much better photographers than I am have confided to me that they usually want to see a consistent interpretation of their images. Beginners will likely find that Use Auto Adjustments provides a quick way to get decent results, but it also makes it much more difficult for them to learn the relationship between shutter speed, aperture setting, and the photographic result. Fortunately, Use Auto Adjustments isn't an all-or-nothing proposition, but the alternate methods of using it aren't terribly obvious. First, you can toggle Use Auto Adjustments on and off by pressing Command/Ctrl-U, but if you do so on an already-edited image, you may get some surprises. The autocorrection algorithms ignore any adjustments made in the Curve tab, and also ignore any Vignetting adjustments made in the Lens tab: they're really designed to work on top of Camera Raw default settings. If you toggle Use Auto Adjustments on when the values for Curve or Vignetting are significantly different from defaults, you won't get good results! Auto adjustments for initial previewsThe Command/Ctrl-U toggle is useful for comparing auto adjustments with a static baseline interpretation, either the old Camera Raw 2.4 defaults (which are what you get if you just turn Use Auto Adjustments off without doing anything else), or with your own customized camera defaults that don't use auto adjustmentssee the next section, Setting Camera Raw defaults. If you want to take advantage of the auto adjustments to generate the initial previews and thumbnails in Bridge, just keep the Camera Raw defaults at their factory settings. Then you can either use the auto adjustments as a starting point for edits, or press Command/Ctrl-U to turn them off before you start editing. Applying auto adjustments over baseline defaultsIf you need to see a baseline interpretation of your images, but want to apply autocorrections quickly as a reality check or starting point, you'll need to create a new camera default setting without auto adjustmentssee the next section. Then you can simply use the Command/Ctrl-U toggle to switch the autocorrections on and off. Comparing auto adjustments with your own editsThis is a little trickier, because, as previously noted, if you simply toggle Use Auto Adjustments on top of edits that include Curve or Vignetting adjustments, you may get very nasty results. If you've kept Use Auto Adjustments as part of your camera default settings, you can simply toggle between Camera Default and Image Settings (for a newly opened but already-edited image) or Custom (for edits in progress) by choosing them from the Settings menu. If you prefer a baseline default that treats all images identically, create that default setting (which I'll tell you how to do in the next section) then open an unedited image and press Command/Ctrl-U to turn on the auto adjustments. Once you've done so, choose Save Settings from the Camera Raw menu, make sure that you're saving them in the appropriate folder for your platform, and name the setting Auto. It will then appear on the Settings menu, so you can toggle between Auto and Image Settings or Auto and Custom to compare the auto adjustments with your own edits. See "Loading and Saving Settings," earlier in this chapter. Setting Camera DefaultsCamera Raw contains factory default settings for each supported camera model, which are used as the defaults for images originated by that model of camera. But you can create your own defaultsthe image metadata tells Camera Raw which default to use for each camera model. The Reset Camera Raw Defaults command resets the default setting for the camera that shot the current image to Camera Raw's factory default, so you can always get back to the factory default behavior. If you don't want auto adjustments on by default, you'll need to create new default settings for each camera model you use. If you want the old Adobe Camera Raw 2.x behavior, open an unedited image, turn off Use Auto Adjustments, then choose Save New Camera Raw Defaults from the Camera Raw menu. If you want different default behaviorfor example, you may find the default Shadows setting of 5 a little too highset the controls the way you want, then choose Save New Camera Raw Defaults from the Camera Raw menu. Likewise, if you notice that you consistently find yourself lowering the Color Noise Reduction slider, or consistently raising the Contrast slider, you may as well incorporate those settings in your camera default. Getting good default settings ("good default settings" means different things to different shooters) is generally an iterative process. Don't be afraid to experiment. It won't harm your raw files in any way, and if you get hopelessly messed up, you can easily set everything back to the shipping defaults and start over. No set of defaults will do equal justice to every image, so just try to find default settings that reduce the amount of work you need to do on each image. Default settings are only one arbitrary interpretation of your raw images, and there's nothing special about that arbitrary interpretation. The goal is to come up with settings that provide a good starting point for your images, and hence save you time. |
EAN: N/A
Pages: 112