Sharpening for Output
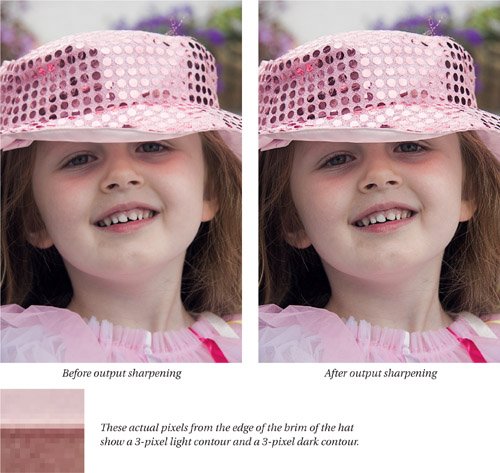
| Where optimizing for content and creative sharpening require human skill, sharpening for output is essentially a deterministic process, since any given print process always turns pixels into marks on paper the same way no matter the input. Creativity at this stage is not only unneccesary, but should be actively discouraged. In the previous workflow phases, we tried to avoid obvious sharpening haloes. When we sharpen for print, haloes are not only desirable, but necessary. The trick is to keep them small enough that they don't appear as discrete features on the print when viewed at reasonable viewing distances. The rule of thumb that has served me well is to keep the sharpening haloes no smaller than 1/100th of an inch and no larger than 1/50th of an inch, with the smaller number being preferred for small (up to 11 x 14-inch) prints, dropping to the larger number as dictated by the resolution of the image and the size of the print. Some pundits recommend resampling images to reach print resolution. I cheerfully downsample images, particularly for halftone printing where it's certain that any additional resolution beyond 2.5 times the screen frequency will simply be discarded. But I tend to avoid upsampling unless there's really no choice. I've made a good many satisfying 20-inch prints from an 8-megapixel camera by sending the printer 180 real pixels per inch. I've yet to see a benefit to forcing Photoshop to make up more pixels by upsampling. If you're trying to make much larger prints from an 8-megapixel camera, you'll have to upsample, but be warned that the results tend to be reminiscent of making huge prints from 35mm film. Do the MathWith the goal of the sharpening haloes in mind, remember that all you can do is to sharpen the pixels themselves. So the amount of sharpening required is a function of the size of the pixels, which in turn is a function of the resolution you're sending to the output process. For example, this book is printed using a 150-line-per-inch screen, and most of the images are printed at 300 pixels per inch. Simple arithmetic dictates that a halo of 1/100th of an inch is 3 pixels wide, so that's my goal when I sharpen images for this print process. For larger prints at lower resolutions, the same-sized halo will obviously have smaller pixel dimensions. At 180 ppi, which I regard as the lower limit for inkjet printing, a 1/100th-inch halo is 1.8 pixels wide, and a 1/50th-inch halo is 3.6 pixels wide, so again a 3-pixel halo is a reasonable aim point. Output Sharpening TechniquesThe first and most important rule in output sharpening is that it must be done at the final output resolution, after any required resampling. There are no exceptions to this rule. For halftone sharpening, I use plain old Unsharp Mask on a layer set to Luminosity blending at 66 percent opacity. In practice, it's extremely rare that I'll adjust the layer opacity of the output sharpening layer, but it's always nice to know that I can! I also set the Blend If sliders to the values shown in Figure 5-51. There's really no point in applying sharpening to pixels lighter than level 250 (which in halftone terms is a 1 percent dot), and I feather off the sharpening in the deep shadows below level 10 (which is a 99 percent dot). Figure 5-51. Halftone sharpening at 300 ppi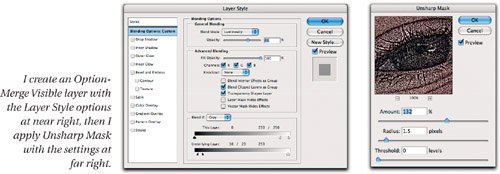 Halftone SharpeningThe very simple sharpening shown in Figure 5-50 works very well for 300 ppi, 150 lpi halftone printing on coated paper. For uncoated papers, I increase the Amount setting in Unsharp Mask to 158. I arrived at these numbers empirically, which is to say, by trial and error, but they have now been through extensive testing on tens of thousands of images, and I stand by them. Figure 5-52 shows an image before and after output sharpening for this book's halftone process. For lower screen freqencies, I use a smaller Radius value and a higher Amount, and for higher screen frequencies I use a larger Radius and a lower Amount, always with the goal of keeping the sharpening haloes around 1/100th of an inch. Figure 5-52. Before and after output sharpening
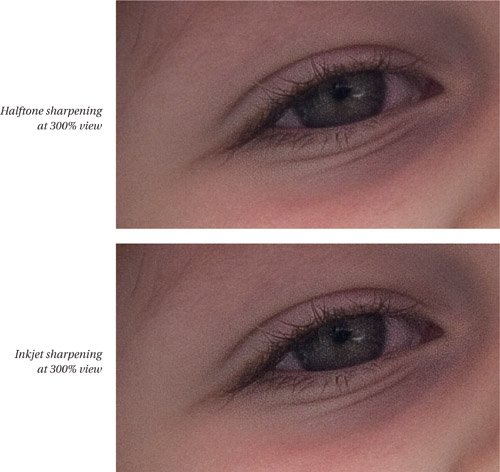
Inkjet SharpeningInkjet printers use error-diffusion screening rather than halftone dots, which produces a rather different effect that in turn requires a rather different type of sharpening. I use the same Blend If settings in the Layer Style dialog box as for halftone sharpening, but I use a combination of Unsharp Mask and Overlay/High Pass sharpening. For a 300 ppi inkjet print on glossy or semi-gloss paper, I create the sharpening layer, but leave it with Normal blending for the Unsharp Mask step, which is Unsharp Mask with Amount 320, Radius 0.6, Threshold 4. I then immediately choose Edit>Fade with Opacity at 70 percent and blend set to Luminosity. Then I set the layer to Overlay blending with an opacity of 50 percent, and run the High Pass filter with a Radius setting of 2 pixels. Obviously I can't show you inkjet screening in this book. The results of the inkjet sharpening are very similar in pixel terms to those of the halftone output sharpening, but the haloes are very slightly more intense for the inkjet sharpening than they are for the halftone sharpening even though they're the same size. The tighter dither of the inkjet screen can render the contrast a little more precisely than halftone output can, so the higher contrast is effective. Figure 5-53 shows a detail from the image in Figure 5-52, comparing halftone sharpening and inkjet sharpening. Figure 5-53. Halftone and inkjet sharpening at 300 ppi
Continuous-Tone SharpeningFor continuous-tone printers such as the Durst Lambda or the Fuji Frontier, I use the same sharpening technique as for inkjet, but with slightly different values (which again were the product of much trial-and-error testing). For 300 ppi output, I use Unsharp Mask with Amount 350, Radius 0.6, Threshold 4, faded to 70 percent opacity with Luminosity blend mode, then I set the layer to Overlay at 50 percent opacity and run the High Pass filter with a Radius of 1.5 pixels. For lower resolutions, I use smaller Radius settings and higher Amount settings, and for higher resolutions I use larger Radius settings and lower Amount settings, always keeping in mind the final size of the sharpening haloes. Magic NumbersThe numbers I've quoted for the sharpening settings for different output processes may seem like voodoo, but they're the product of exhaustive testing, and I use them every day. That said, it's entirely possible that you can come up with numbers that you prefer to mine. If you wish to do so, take heed of this key piece of advice: The only way to evaluate print sharpening is to sharpen the image, make a print, and examine it carefully. Looking at image pixels on the screen can give you a gross picture of the size of the sharpening haloes, but subtle differences like the ones shown in Figure 5-53 can only be evaluated in the print itself. |
EAN: 2147483647
Pages: 71