Sharpening Tools
| Photoshop offers a variety of sharpening tools, ranging from the indispensable Unsharp Mask to the extremely hard to control Sharpen tool. But Photoshop also offers ways to sharpen images using features that don't provide any hint by their names that sharpening is one of their capabilities. Everyone has their preferred sets of tools, but few of us actually spend time analyzing what they do, so before examining the tools themselves, let me show you an easy way to see the effects of different sharpening routines. Analyzing SharpenersOne very easy way to compare the effect of different sharpening routines is to look at what they do to a variety of edges with different contrast. Figure 4-1 shows a simple test file that you can make yourself, which contains a single edge with varying contrast from solid black on white to midtone gray on midtone gray. Figure 4-1. Sharpener analysis target
There are (of course) several ways to create a target like this. For onscreen use (which is what this target is best for), I do the following:
If you zoom to around 400% or 500% the target will still fit most screens and you can easily see what happens at the pixel level. This target helps you understand what different sharpening tools do to edges, with the important caveat that their behavior on real images may be more complex than on this simple target. SharpenLocated on the Filter>Sharpen submenu, the Sharpen filter applies a simple, nonadjustable sharpening routine that creates a single-pixel halo for the light contour and a single-pixel halo for the dark contour. The haloes reach maximum intensity (solid black and pure white) when the difference between the light and dark sides of the edge is 169 levels. Sharpen is virtually identical to running the Unsharp Mask filter (discussed later in this chapter) with Amount 130, Radius 0.4, and Threshold 0. Figure 4-2 shows the target from Figure 4-1 after applying the Sharpen filter. Figure 4-2. The Sharpen filter
Sharpen MoreAs its name suggests, Sharpen More is a stronger version of Sharpen. It also creates a single-pixel halo, but reaches maximum intensity sooner, when the difference betwen the light and dark sides of the edges is 85 levels. Sharpen More is virtually identical to running the Unsharp Mask filter with Amount at 390, Radius at 0.4, and Threshold at 0. Figure 4-3 shows the target from Figure 4-1 after applying the Sharpen More filter. Figure 4-3. The Sharpen More filter
I personally never use these filters since I can obtain the same results using the Unsharp Mask filter. Sharpen EdgesSharpen Edges, which appears on the Sharpen submenu of the Filter menu in between Sharpen and Sharpen More, is a little different inasmuch as its effect can't be replicated exactly using Unsharp Mask. However, Unsharp Mask with Amount at 140, Radius at 0.4, and Threshold at 3 comes very closethe Unsharp Mask produces very slightly stronger contrast in the midtones. Like Sharpen, Sharpen Edges reaches maximum intensity at a difference of 169 levels. The main difference between the two is that Sharpen Edges has a gentler start on values that differ only slightly. Sharpen Edges isn't really any more useful than Sharpen or Sharpen Morethe difference between what it does and what I can accomplish with Unsharp Mask is so small as to be merely academically interesting, and the lack of control makes it inflexible. Figure 4-4 shows the target from Figure 4-1 after applying the Sharpen Edges filter. Figure 4-4. The Sharpen Edges filter
If the first three entries on the Filter>Sharpen submenu are mostly of academic interest, the last two, Smart Sharpen and Unsharp Mask, are essential sharpening tools. However, it's just about impossible to understand Smart Sharpen until you've mastered Unsharp Mask, so I'll discuss Unsharp Mask first. Unsharp MaskThe Unsharp Mask filter is by far the most important item in the sharpening toolboxif I were forced to rely on a single sharpening tool, I'd choose Unsharp Mask for its speed, power, and flexibility. In short, Unsharp Mask is indispensable! Unlike Sharpen, Sharpen Edges, and Sharpen More, all of which simply apply preset routines, the Unsharp Mask filter offers a great deal of control over sharpening. Figure 4-5 shows the Unsharp Mask filter dialog box at its default settings, Amount at 100, Radius at 1, Threshold at 0. Mastery of these three controls, Amount, Radius, and Threshold, is key to good sharpening. Figure 4-5. The Unsharp Mask dialog box
Amount sets the intensity of the sharpening halo. At low settings, it takes more difference between levels for the sharpening haloes to reach pure white and solid black; at higher settings, it takes less difference. Figure 4-6 shows the effect of the Amount slider at constant Radius and Threshold settings. Figure 4-6. The Amount control Radius is the control that sets the width of the sharpening haloes, though it also has some effect on their intensity. However, since it was designed by engineers rather than photographers, the number you enter into the Radius field doesn't actually produce haloes of that size (not that it's possible to produce a sharpening halo 0.4 pixels wide). What the Radius setting actually does is a little more complicated. The Unsharp Mask filter changes pixels one at a time, examining the surrounding pixels to determine the difference in contrast between the subject pixel and its neighbors. The Radius setting tells the filter how many surrounding pixels to take into account when calculating the new value for the subject pixel. The net effect, however, is that low Radius settings produce narrow sharpening haloes and higher settings produce wider ones. (At very high settings, the sharpening haloes collide and merge into one another, so the effect changes from a pure sharpening to an overall contrast adjustmentsee "Midtone Contrast," later in this chapter.) Figure 4-7 shows the effect of the Radius setting at constant Amount and Threshold settings. (I've zoomed and cropped the target to exclude the higher-contrast edges so that the difference between settings is more obvious.) Lower settings produce narrower haloes, higher settings produce wider ones, but the width of the haloes also depends on the contrast of the edge that's being sharpened. Figure 4-7. The Radius control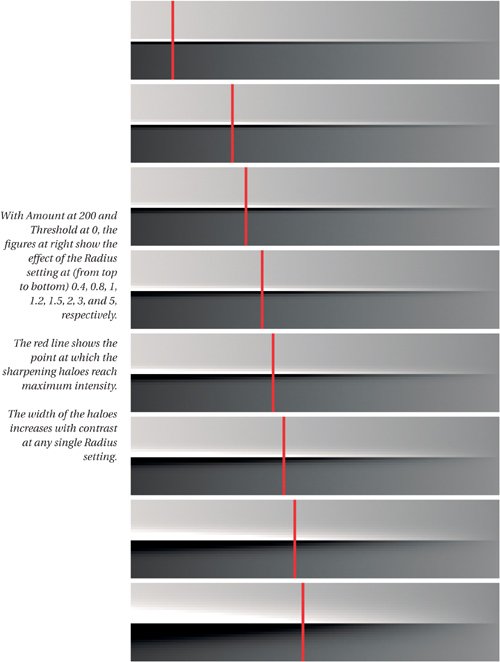 Notice also that the intensity of the haloes increases with Radiusat higher settings, the sharpening haloes reach solid black and pure white earlier than they do at lower settings. However, Radius has a much smaller effect on intensity than does Amount. The Radius control determines the "flavor" of the sharpening. Low-frequency images with wide edges and soft detail require higher Radius settings than high-frequency images with narrow edges and sharp tonal transitions. When I sharpen images for content, matching the Radius setting to the edges in the image is one of the most important aspects of the sharpening. One aspect of Unsharp Mask that's less than optimal is the fact that it increases the width of the sharpening haloes as the contrast of the edge being sharpened increases. This is rarely the behavior I want. I'll discuss techniques for exercising additional control over the results produced by Unsharp Mask later in this chapter. Threshold delays the onset of the sharpening haloes by telling the Unsharp Mask filter to ignore a certain amount of difference between pixels before applying any sharpening. Figure 4-8 shows the effect of the Threshold setting at constant settings for Radius and AmountI've cropped the target to show the areas of interest. Figure 4-8. The Threshold control The Threshold control is designed to allow you to protect textured areas such as skin tones or slightly noisy skies from being sharpened. At low settings (14), it works reasonably well on lightly textured areas, but may not provide enough protection. At higher settings, it has a tendency to create unnatural-looking transitions between the sharpened and unsharpened areas. Because of this tendency, I tend to rely on layer masks to protect textured areas rather than using Threshold. I'll cover techniques for doing so later in this chapter. Working the ControlsWhether I apply Unsharp Mask globally or through a layer mask, I always set the Radius first, because more than either of the controls, it dictates the character of the sharpening. Many different combinations of Amount and Radius produce the same apparent amount of sharpening, but with subtly different characteristics. As you increase the Radius, you need to reduce the Amount, and vice versa, to maintain the same degree of apparent sharpness. Figure 4-9 shows the same image detail with two very different Unsharp Mask settings that nevertheless produce approximately the same degree of sharpness. Figure 4-9. Amount and Radius The difference between the two versions above is extremely subtleI'd be surprised if you can see itbut that subtle difference becomes more obvious when a second round of sharpening is applied for the output. Figure 4-10 shows the same image detail sharpened for output, along with a zoomed-in view of the output-sharpened pixels. Figure 4-10. Amount and Radius with output sharpening
Before output sharpening, the two versions seemed identical, but after output sharpening we begin to see subtle differences. The high-frequency detail on the birch bark at the upper left is revealed more clearly in the lower, small-radius version, than in the upper, larger-radius version, as is the puff-ball. Examination of the zoomed-in pixels confirms thisthe detail on the puff-ball has higher contrast, and hence is more visible, in the upper, small-radius version than in the lower, larger-radius one. Figure 4-10 shows something else important: while targets like the one first shown in Figure 4-1 can help us understand a good deal about the basic behavior of sharpening tools, the application of those tools to real photographic images is a good deal more complicated than to the target, because edges in real images are often more complex than a single row of dark pixels against a single row of white pixels. So, while the behavior of the target might lead you to expect that the versions of the image in Figure 4-10 that were sharpened with a Radius setting of 1.1 might feature wider sharpening haloes than the one sharpened with a Radius setting of 0.4, in practice what happens is that the haloes have essentially the same width in both versions, because the image edges themselves constrain the width of the haloes. The higher-Radius version simply ends up with weaker contrast on the haloes. Unsharp Mask LimitationsUnsharp Mask is an immensely useful and powerful tool, but it suffers from two significant limitations:
I'll discuss techniques for dealing with these problems later in this chapter, but first, let's look at Smart Sharpen, which also tries, in its own way, to address these issues. Smart SharpenThe Smart Sharpen filter is a good deal more complex than the Unsharp Mask filter since it offers more options. Figure 4-11 shows the Smart Sharpen dialog box in Basic mode. Figure 4-11. The Smart Sharpen dialog box Smart Sharpen has no Threshold control, only Radius and Amount, but the additional controls it offers add up to many different permutations.
Gaussian BlurWhen Gaussian Blur is selected from the Remove menu, the More Accurate checkbox is unchecked, and the filter is in Basic mode, it behaves identically to Unsharp Mask with the same Amount and Radius settings and Threshold at 0. When the More Accurate checkbox is checked, the filter behavior changes, producing a wider halo with gentler contrast. Figure 4-13 shows the difference between Gaussian Blur, Basic mode, with More Accurate unchecked (which is the same as Unsharp Mask), and Gaussian Blur, Basic mode, with More Accurate checked. Figure 4-13. Smart Sharpen, Remove Gaussian Blur, Basic mode, with and without More Accurate
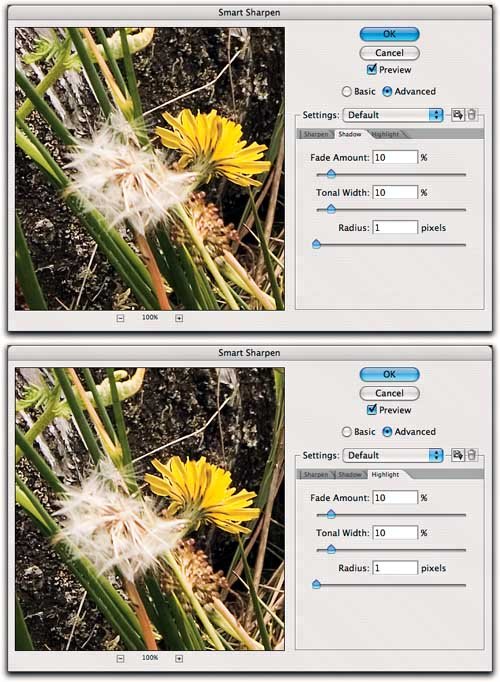
On real images, Gaussian Blur with More Accurate checked produces much weaker sharpening than when it's unchecked, so much so that small-radius sharpening is very weak indeed. Figure 4-14 shows an image detail that had Smart Sharpening applied for content before being sharpened for output, using Amount 500 and Radius 0.4, with More Accurate unchecked, and with More Accurate checked. Figure 4-14. Smart Sharpen, Remove Gaussian Blur, Basic mode, with and without More Accurate Both versions are acceptable, but the one that had More Accurate unchecked ("Less Accurate?") has a little more snap. Numerous similar examples have led me to conclude that in the majority of cases, Smart Sharpen with Gaussian Blur in Basic mode offers little or no advantage over Unsharp Mask. Gaussian Blur Advanced ModeWhen the Advanced radio button is selected, the Shadow and Highlight tabs (see Figure 4-12) become active. These tabs let you fade the contrast of the dark and light sharpening contours, respectively. Both tabs offer the same three controls; Fade Amount, Tonal Width, and Radius, which together determine the way the Shadow (dark) and Highlight (light) contours along edges have their intensity reduced.
When used in conjunction with Gaussian Blur, the effect of the Radius setting is barely detectable (and is only detectable by doing actual pixel-value comparisonsyou can't see it). However, it has an obvious effect, not on the image, but on the speed of the filterit's much, much slower at high Radius settings than at lower ones! Figure 4-15 shows the effect of the Advanced mode options at several different settings. The difference between (Advanced) Radius set at 1 and the much slower (Advanced) Radius set at 100 is detectable, though not terribly visually significant, when the Tonal Width is set to a low amount, but it's basically insignificant at higher Tonal Width settings. Figure 4-15. Smart Sharpen, Gaussian Blur, Basic and Advanced modes
The ability to fade the highlight and shadow contours, and thus force more of the sharpening into the midtones, is useful for early-stage sharpening for image content, but you can lose a lot of time fiddling with settings that make almost no difference to the result! See "Sharpening Tonal Ranges," later in this chapter, for a technique that provides most of the benefits of Smart Sharpen's Advanced mode using plain old Unsharp Mask. Lens BlurChoosing Lens Blur from the Remove menu makes Smart Sharpen use a different algorithm that sharpens the midtones rather more aggressively than either Unsharp Mask or Smart Sharpen with Gaussian Blur. The More Accurate and Advanced options modulate the effect of the sharpening much like they do when Gaussian Blur is selected. Figure 4-16 compares the the Lens Blur and Gaussian Blur "flavors" of sharpening at two different strengths, with More Accurate on and off. Figure 4-16. Smart Sharpen, Gaussian Blur, and Lens Blur compared The More Accurate option works approximately the same with Lens Blur as it does with Gaussian Blur, making a slightly wider but gentler sharpening halo. But the most obvious difference between Gaussian Blur and Lens Blur is that the latter does a much better job of controlling the width of the halo along high-contrast edges than does Gaussian Blur, which creates ever-widening haloes as contrast increases. Lens Blur Advanced ModeThe Advanced option enables Smart Sharpen's Shadow and Highlight tabs, allowing you to fade the light and dark contours of the sharpening haloes. The controls operate similarly to the way they do with Gaussian Blur (including the dramatic slowdown produced by high Radius settings in the Shadow and Highlight tabs), but the effect of the Shadow and Highlight Radius settings is a little more discernible than with Gaussian Blur, as shown in Figure 4-17. Figure 4-17. Smart Sharpen, Lens Blur, Basic and Advanced modes With Lens Blur, the Advanced options do a better job of sharpening midtones while protecting extreme highlights and shadows than they do with Gaussian Blur. But the effects of the Radius setting are still quite subtle, and the extreme slowdowns caused by high Radius settings in the Shadow and Highlight tabs provide an exercise in frustration. Figure 4-18 shows the same image detail sharpened with Smart Sharpen using Radius 1 and Radius 100 in the Advanced tabs, then sharpened for output, along with a version that used Unsharp Mask for the preliminary sharpening. Figure 4-18. Smart Sharpen and Unsharp Mask Smart Sharpen does a good job on the high-frequency detail (though the difference between Radius 1 and Radius 100 in the Advanced tabs is very subtle indeed), but copes less well with the soft edges of the puff-ball. I cheated slightly on the Unsharp Mask version, duplicating the Background layer, sharpening it with Unsharp Mask, then using the Blend If sliders in the Layer Options dialog box to fade the extreme shadow and highlight contoursI'll explore this technique in detail in "Sharpening Tonal Ranges," later in this chapter. Warning: Advanced Options Persist Even When Hidden One of the more infuriating aspects of Smart Sharpen is that switching from Advanced to Basic mode doesn't actually turn off the settings in the Shadow and Highlight tabsit just hides them. So it's all too easy to fade the highlights and shadows without meaning to. The only safe solution is to always use Advanced mode, and always check the settings in the Shadow and Highlight tabs before doing anything else. Otherwise you may find yourself getting entirely unexpected results. Motion BlurThe third and final Smart Sharpen flavor, Motion Blur, is (as its name suggests) designed to undo motion blur caused by subject or camera movement. Don't expect miraclesthose only happen on TV crime showsbut with care, Smart Sharpen with Motion Blur can do a reasonable job of extracting detail from a moving subject. Figure 4-19 shows one such example. Figure 4-19. Smart Sharpen with Motion Blur When Motion Blur is selected from the Remove menu, one additional control, Angle, becomes enabled. The Angle setting is the key parameter in using Smart Sharpen's Motion Blur mode to undo motion blur. Once the Angle is correct, the next step is to set the Radius and Amount, followed by the options in the Shadow and Highlight tabs. Unlike the other Smart Sharpen flavors, Motion Blur rarely works when it's applied to an entire image. It's best used for un-blurring specific subjects in the image, and the work goes much faster if you make a rough selection of the subject, then copy it to a new layer. Once the sharpening is applied, you can either erase the unwanted areas from the rough selection, or mask them using a layer mask as I did in the example shown in Figure 4-19. Smart Sharpen IssuesSmart Sharpen is an intriguing tool that has won its share of devotees. I confess that I can't number myself among them. I do use Smart Sharpen for some tasksthe Motion Blur option is the only game in town for undoing motion blur, and Smart Sharpen works very well indeed for on-screen output, which typically involves fairly small files. On print-resolution images, however, Smart Sharpen is often infuriatingly slow. The persistence of the Shadow and Highlight settings when the filter has been switched back to Basic mode has undoubtedly caused a great deal of head-scratching, and is at best a questionable design decision. And while the Shadow and Highlight tabs attempt to address a real issuereducing the intensity of the highlight and shadow contoursthey simply don't offer the degree of control I need. As a result, I still rely on the Unsharp Mask filter for the majority of my sharpening tasks. However, it's relatively rare for me to simply apply Unsharp Mask globally to an image. Instead, I use the techniques described in the next section. At first glance, they may seem to require more work than Smart Sharpen, but much of that work can be automated, and the actual routines run quite quickly. |


EAN: 2147483647
Pages: 71