Tools
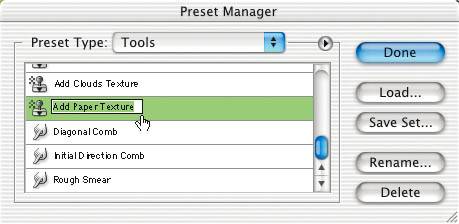
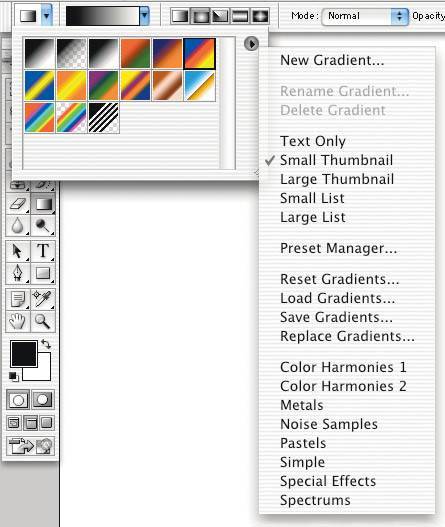
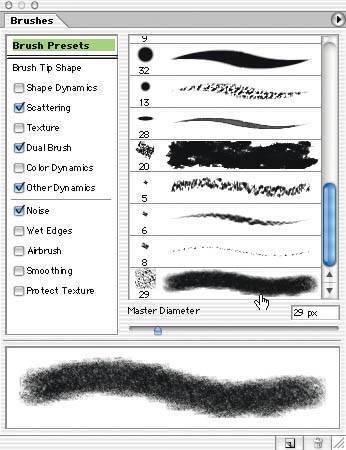
| After you're finished moving around in your image, zooming in and out, and moving pixels hither and yon, it's time to get down to work with Photoshop's tools. The tools have all sorts of hidden properties that can make life easier andmore importantmore efficient. Let's look at a number of tips and techniques for getting the most out of these instruments of creation. Tip: Tool Keystrokes The most important productivity tip we've found in Photoshop to date has been the ability to select each and every tool with a keystroke. Unlike most programs, the keystrokes for Photoshop's tools do not use any modifier keys. You press the key without Command, Control, or Option. Figure 2-12 shows the keystroke for each tool. Figure 2-12. Keystrokes for tools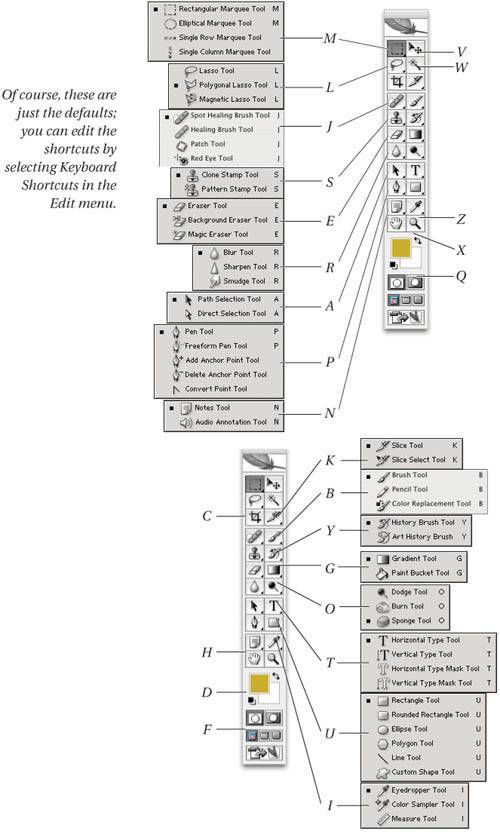 Some tools in the Tool palette have multiple modes. For instance, the Dodge tool also "contains" the Burn and the Sponge tools. The slow way to access the different modes is to press the tool icon to bring up the flyout palette containing the different modes. A faster method is to press the tool's keystroke once to select it, and then hold down the Shift key while pressing it again to toggle among the choices. Press M once, and you jump to the Marquee tool; then press Shift-M, and it switches to the elliptical Marquee tool; press Shift-M once more, and it switches back to the rectangular Marquee tool. Note that this keystroke doesn't cycle through the single-row marquee or the single-column marquee. (Photoshop lets you change this behavior: If you turn off the "Use Shift Key for Tool Switch" checkbox in the General panel of the Preferences dialog boxsee "Preferences," later in this chapterthen you don't have to hold down the Shift key to rotate through the tools; each time you press M, you'll get a different tool.) Tip: Changing Blend Modes You can also change blend modes (Normal, Screen, Multiply, and so on) by pressing Shift-minus and Shift-plus, or by holding down Shift and Option and pressing the first letter of the mode (such as Shift-Option-S for Screen). If you have a painting tool selected (like the Brush tool), this changes the mode of the selected tool; otherwise, it changes the mode of the layer itself. Tip: Swap Tool Effect While we rarely use the Blur, Sharpen, Dodge, or Burn tools (the first two are kind of clunky and we prefer to use adjustment layers rather than the last two), it is kind of fun to know that if you hold down the Option key, the Blur tool switches to the Sharpen tool (and vice versa), and the Dodge tool switches to the Burn tool (and vice versa). Tip: Options Bar Keystrokes The tools on the Tool palette only go so far. You often need to modify the tool's default settings on the Options bar. Try this: select a tool, then press Return. The Options bar, even if hidden, appears at this command. Plus, if there is a number-input field on the Options bar, Photoshop selects it for you. When you press Return with the Lasso or Marquee tools selected, for example, the Feather field becomes highlighted on the Options bar. If there is more than one number-input field on the Options bar, you can press Tab to jump from one to the next. Finally, when you're finished with your changes, press Return again to exit from the bar and resume work. Tool PresetsEach tool in the Tool palette offers one or more options, such as how large a brush diameter, or whether a selection is feathered, or what mode a tool will paint in (Multiply, Screen, and so on). It's a hassle to remember to set all the tool options, but fortunately Photoshop can remember them for you if you use the Tool Presets feature. The Tool Presets feature lives in two places: at the far left side of the Options bar, and in the Tool Presets palette (which you can select from the Window menu). We find that the palette is most useful for fine artists who need to switch among various tool presets often within the same image (see Figure 2-13). Production folks like us tend to keep the palette closed and select tools from the Tool Presets popup menu in the Options bar (see Figure 2-14). Figure 2-13. Tool Presets palette Figure 2-14. Tool Preset popup menu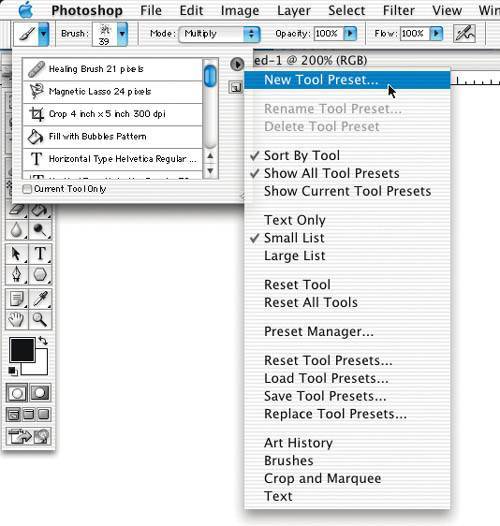 To create a new tool preset, select any tool in the Tool palette, change the Options bar to the way you want it, click on the Tool Presets popup menu in the Options bar, then click the New Tool Preset button (it looks like a little page with a dog-eared corner). Or, faster, after setting up the tool, you can Option-click on the Tool Presets icon in the Options bar. When Photoshop asks you for a name, we suggest giving the tool preset a descriptive name, like "ShapeTool Circle 50c20m." Photoshop also comes with several premade collections of tool presets, such as Art History and Brushes. The trick to finding these (and doing all sorts of other things with tool presets, like saving your own sets), is to click once on the Tool Presets flyout menu in the Options bar, and then click once on the popout menu icon (the little triangle on the side of the menu). Or, if the Tool Presets palette is open, you can find all these same options in the palette's flyout menu. Unfortunately, there's no way to edit a tool preset once you make ityou can only create a new one and delete the old one by choosing Delete Tool Preset from the Tool Preset flyout menu. Tip: Resetting the Tools Photoshop power users are forever changing the settings for the tools on the Options bar. But every now and again, it's nice to level the playing field. You can reset the tool options for either a single tool or for all the tools by Control-clicking on the Tool Presets popup menu on the far left edge of the Options bar (or right-mouse-button in Windows). EyedropperMatching colors by eye can be difficult. Instead, use the tool designed for the job: the Eyedropper. Tip: Eyedropper Keystroke You can always grab the Eyedropper from the Tool palette (or press I), but if you already have a painting tool selected, it's faster just to use the Option key to toggle between the Eyedropper tool and the painting tool. Tip: How Many Pixels Are You Looking At? Almost every image has noise in itpixels that are just plain wrong. If you're clicking around with the Eyedropper tool, there's a reasonable chance that you'll click right on one of those noise pixels, resulting in a color you don't expect (or want). The key is to change what the Eyedropper is looking at. David usually changes the Sample Size popup menu in the Options bar to 3 by 3 Average. This way, the Eyedropper looks at nine pixels (the pixel you click on, plus the eight surrounding it) and averages them. If he's working on a very high-resolution image, however, he switches to 5 by 5 Average. Bruce, on the other hand, lives on the edge: he always leaves the Eyedropper set to Point Sample. If he thinks there's a danger of picking up a noise pixel, he just zooms in far enough to see exactly which pixel he's sampling. Tip: Don't Limit Your Eyedropping Don't forget that when you're working with the Eyedropper tool, you can click on any open Photoshop document, or even the Picker, Swatches, or Scratch palettes. This usually even works when a dialog box is open. If you want to select a color from someplace else on screen (outside of Photoshop), first click down inside a Photoshop document, and then drag the mouse (with the button held down) over the color you want. Note that this only captures the RGB color values of whatever is visible on screen (there's no way for Photoshop to find out what the underlying color value is if you sample, say, a CMYK color from a QuarkXPress document). Tip: Lock Your Sample Points The Color Sampler (which is hidden as an alternate to the Eyedropper tool) lets you place a sample point at any location in your image and expands the Info palette to show the readings at this coordinate (see Figure 2-15). This is most helpful when performing color or tonal adjustments, because you can quickly see how your tweaks affect various areas of your image while you're making changes. (See Chapter 6, Image Adjustment Fundamentals, for more on this technique.) Figure 2-15. Locking sample points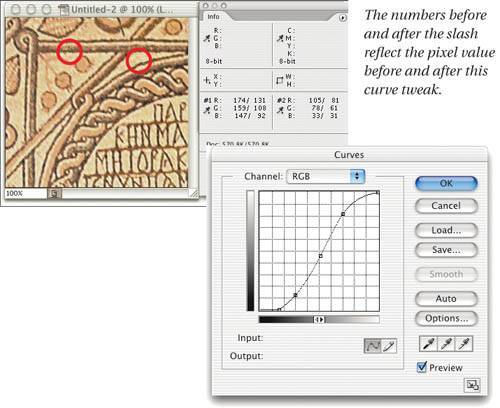 We almost never choose the actual Color Sampler tool from the toolbox. Instead, we just Shift-click with the normal Eyedropper tool (or Option-Shift-click with any of the painting tools), which does the same thing. If you want to move a sample point someplace else, you can just click-and-drag it with the Color Sampler tool (or Shift-drag with the Eyedropper tool). To delete a sample point, just Option-click with the Color Sampler tool (or Option-Shift-click on it with either the Eyedropper tool or any painting tool). Gradient ToolOne of the complaints Adobe heard most in times gone by was that blends in Photoshop resulted in banding. The answer they always gave was to "add noise" to the blend. It's true; adding noise reduces banding significantly. Fortunately, Photoshop adds noise for us. Of course, you can stop it by turning off the Dither checkbox in the Options bar, but there's almost no reason to do so. You may want to turn dithering off if you're doing scientific imaging or printing to a continuous-tone device that can actually reproduce the gradient without banding. Tip: Adding More Noise If you're still getting banding even with Dither turned on, you may want to add even more noise to a blend. However, note that you don't always need to apply the Add Noise filter to the entire gradient; use the filter selectively. Instead, you might find it better to add noise to only one or two channels. View each channel separately (see Chapter 8, Making Selections) to see where the banding is more prevalent. Then add some noise just to the blend area in that channel. Tip: Blends in CMYK Eric Reinfeld pounded it into our heads one day: if you're going to make blends in Photoshop images that will end up in CMYK mode, create them in CMYK mode. Sometimes changing modes from RGB to CMYK can give you significant color shifts in blends. Many custom CMYK profiles produce strange results when you make a blendin particular, blues tend to have a saturation "hole" and become less saturated when you expect them to become more so. You can often get better results by creating the blend in one of the CMYK working spaces that ship with Photoshop, then assigning your custom profile to the result. Photoshop's CMYK profiles may not represent your printing conditions, but they tend to offer much smoother gradients than third-party profiles built with any of the common profiling tools. This is a mildly perverse use of color management, but it workssee Chapter 5, Color Settings, for more detail about assigning profiles. Tip: Gradients on Layers Some people make hard work of creating a blend that fades away into transparency. They go through endless convolutions of Layer Masks and Channel Options, or they spend hours building custom gradients, and so on. They're making it difficult for themselves by not opening their eyes. When you have the Gradient tool selected, the Options bar offers a popup menu with various gradients in it, and one of the defaults blends from Foreground to Transparent, or from Transparent to Foreground. If that option isn't available, someone may have edited your gradient presets. You can create or edit a gradient by clicking once on the gradient swatch in the Options bar. You can also select a different set of gradient presets from the popout menu to the right of the swatch (see Figure 2-16). Figure 2-16. Gradient options Paint BrushesWe can't tell you how to make great art using Photoshop's painting tools, but we can give you some hints about how to use them more efficiently. Photoshop 7 dramatically increased the ability to customize your brushes (see Figure 2-17). It's important to remember that these brush styles aren't only for painting with the Brush toolthey also work with the Eraser tool, the Clone Stamp tool, the History Brush tool, and so on. While most of the new brush features are designed for fine art work (simulating charcoal, water colors, and so on), every now and again you may find them helpful in a production environment, tooespecially for detailed retouching. Note that in Photoshop CS and later you can use the Brush tool in 16-bit images, too. Figure 2-17. The Brushes palette Tip: Brush Keystrokes Did you know that the [ and ] keys (the square brackets) increase and decrease the diameter of a brush? Plus, Shift-[ and Shift-] change the brush's hardness. We now keep one hand on the keyboard and one on our mouse (or tablet pen); when we want to change tools, we press the key for that tool. When we want to change brush size, we cycle through the brushes with the [ and ] keys until we find the size we like. Here's one more shortcut, too: the Command and period keys move up and down through the brush presets. Tip: Fastest Brush Selection Actually, one of the best ways to select a brush is probably via the context-sensitive menu. On the Macintosh, hold down the Control key when you click with any of the painting tools and Photoshop displays the Brushes menu wherever you click. In Windows, right-mouse-button-click to see the menu. After selecting a brush size, press Enter or Esc to make the palette disappear. Tip: Hovering Pseudo-Selections Instead of selecting a brush from the Brushes palette, then painting with it to see how it will really look, hover the cursor over the preset for a moment and Photoshop will display a sample of that brush at the bottom of the palette. If you don't like it, hover over another brush. When you find one you like, click on it to select it. Tip: Opacity by the Numbers In between changing brush sizes, we're forever changing brush opacity while painting or retouching. If you're still moving the sliders around on the Options bar, stop it. Instead, just type a number from 0 to 9. Zero gives you 100-percent opacity, 1 gives you 10 percent, 2 gives you 20 percent, and so on. For finer control, press two number keys in quick successionfor example, pressing 45 gets you 45-percent opacity. If you have a non-painting tool selected in the Tool palette, then typing a number changes the opacity of the layer you're working on (unless it's the Background layer, of course). Note that if the Airbrush feature in the Options bar is turned on, then typing numbers affects the Flow percentage rather than the Opacity setting. Tip: Touching Up Line Art We talk about scanning and converting to line art in Chapter 12, Essential Image Techniques, but since we're on the topic of painting tools, we should discuss the Pencil tool for just a moment. One of the best techniques for retouching line-art (black-and-white) images is the Auto Erase feature on the Options bar. When Auto Erase is turned on, the Pencil tool works like this: if you click on any color other than the foreground color, that pixelalong with all others you touch before lifting the mouse buttonis changed to the foreground color (this is the way it works, even with Auto Erase turned off). If you click on the foreground color, however, that pixelalong with all others you encounteris changed to the background color. This effectively means you don't have to keep switching the foreground and background colors while you work. Tip: Use All Layers If you're working on a multilayer image, you may find yourself frustrated with tools like the Smudge, Blur, Magic Wand, or the Clone Stamp tools. That's because sometimes you want these tools to "see" the layers below the one you're working on, and sometimes you do not. Fortunately, Photoshop gives you a choice for each of these tools with the Use All Layers checkbox on the Options bar. (Note that in older versions, this was called Sample Merged.) When Use All Layers is turned off, each tool acts as though the other layers weren't even there. But if you turn it on, look out! Photoshop sees the other visible layers (both above and below it) and acts as though they were merged together (see Figure 2-18). Figure 2-18. Use All Layers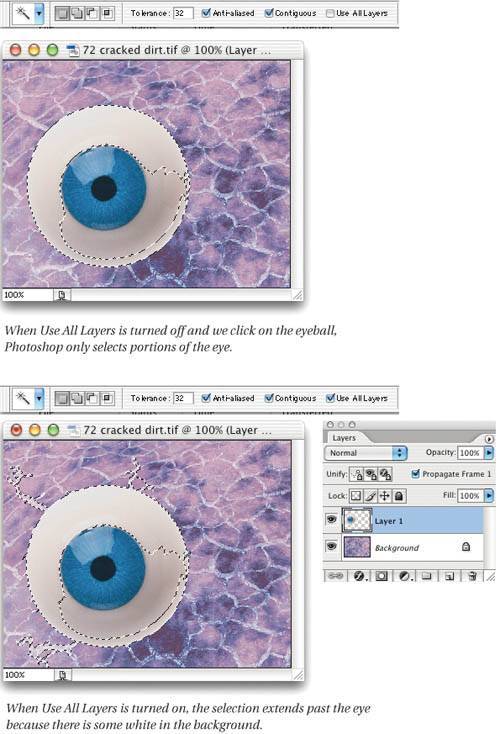 The benefit of this is great, but people often don't see the downside. Let's say your background contains a blue box, and Layer 1 has an overlapping yellow box. When you paint or smudge or blur or whatever with Use All Layers turned on, Photoshop "sucks up" the blue and paints it into Layer 1. If you think about it, that's what it should and has to do. But it can really throw you for a loop if you're not prepared. Cropping ToolWe almost always scan a little bigger than we need, just in case. So we end up using the Cropping tool a lot. The nice thing about the Cropping tool (as opposed to the Crop feature on the Image menu) is that you can make fine adjustments before agreeing to go through with the paring. Just drag one of the corner or side handles. Here are a couple more ways you can fine-tune the crop. Tip: See What Gets Cropped By default, Photoshop darkens the area outside the cropping rectangle so that you can see what's going to get cropped out before you press Enter. However, David likes to change this behavior so that it ghosts the cropped out pixels instead (turns them near white). You can do this by clicking on the Color swatch in the Options bar (when the Cropping tool is selected) and picking white from the Color Picker instead of black. You may want to increase the opacity of the color in the Options bar, too (David usually uses 80 percent). Tip: Rotating and Moving While Cropping If cropping an image down is the most common postscan step, what is the second most common? Rotating, of course. You can crop and rotate at the same time with the Cropping tool: after dragging out the cropping rectangle with the Cropping tool, just place the cursor outside the cropping rectangle and drag. The rectangle rotates. When you press Return or Enter, Photoshop crops and rotates the image to straighten the rectangle. It can be tricky to get exactly the right angle by eyekeep an eye on the Info palette. Also, if the cropping rectangle isn't in the right place, you can always move itjust place the cursor inside the cropping rectangle and drag. Tip: Adjusting for Keystone What do you do about lines in your image that are supposed to be vertical or horizontal but aren't? For example, if you take a picture of a painting hanging on a wall, you often need to do so from one side to avoid flash reflections, so the subject ends up being skewed rarther than rectangular. Fortunately, our faithful Cropping tool offers a cool option: adjusting for perspective. The key is to turn on the Perspective checkbox in the Options bar after drawing the cropping rectangle; this lets you grab the corner points and move them willy-nilly where you will. However, positioning the corner points of the cropping "rectangle" can be tricky. You must first find something in the image that is supposed to be a rectangle, and set the corner points on the corners of that shape. In the example of a building, you might choose the corners of a window. Then, hold down the Option and Shift keys while dragging one of the corner handles; this expands the crop but retains its shape. When you have the cropping shape the size you want it, drag the center point icon to where the camera was pointing (or where you imagine the center of the focus should be). Then press Enter or Return (see Figure 2-19). Figure 2-19. Adjusting perspective with the Cropping tool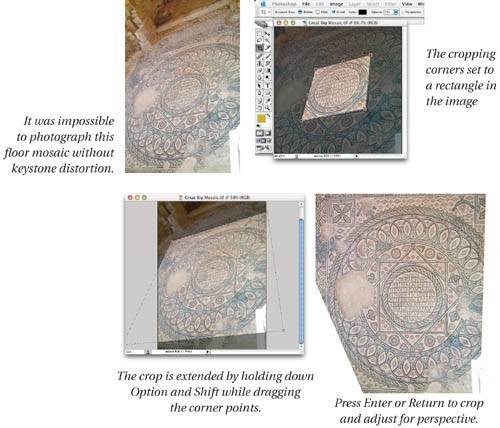 By the way, we find that when using this tool Photoshop often alerts us that either the center point or the corner points are in the wrong position. This usually happens when you haven't selected the corner points of something that should be rectangular. In other words, Photoshop acts as a safety net, stopping you when you choose a distortion that isn't likely to happen in a real photograph. Sometimes simply moving the center point to a different location (by trial and error) does the trick. For serious perspective corrections, though, you're better off using the new Lens Correction filter, which we discuss in Chapter 9, Sharpness, Detail, and Noise Reduction. Tip: Save That Layer Data In early versions of Photoshop, the cropping tool would throw away pixels outside the cropping rectangle. If you changed your mind and wanted to crop the image differently, you would have to select Undo and then try again. But Photoshop now gives you the option (by selecting the Hide button in the Options bar after dragging the cropping rectangle) of saving the cropped-out pixels as big datamaterial that hangs outside the actual visible image rectangle. Then, if you didn't get the crop just right, you can either move the image around with the Move tool or re-crop using a different rectangle (see "Tip: Expand the Canvas by Cropping," later in this chapter). Note that this only works on layers other than the Background layer. Tip: Resampling While Cropping Warning: the Cropping tool may be changing your resolution or even resampling your image data without you knowing it! The Height, Width, and Resolution fields in the Options bar (when you have the Cropping tool selected) let you choose a size and resolution for your cropped picture. Basically, these fields let you save the step of visiting the Image Size dialog box after cropping. But remember that when you use them, they always change your image resolution or resample the image (see Chapter 3, Image Essentials, for more on the pros and cons of resampling). In ancient versions of Photoshop, if you left the Resolution field blank and you specified a Height and Width without specifying any units (like pixels, inches, and so on), the program would constrain the cropping size to a particular aspect ratio (like four-by-six) but it wouldn't mess with your resolution. Alas, now the Height and Width fields always have units attached to them. If you leave the Resolution field blank, Photoshop adjusts the image resolution to accommodate the change in size. That means your image resolution can drop or increase without you realizing it. (In this case, Photoshop is not resampling the datajust adjusting the size of the pixels.) Instead, see the next tip for how to crop to an aspect ratio. If you type a value into the Resolution field, Photoshop resamples the image to that value. This resampling behavior is handy when you want to resample down, but be careful that you don't ask for more resolution than you really have; resampling up is usually best avoided. (Note that you can only set the Height, Width, and Resolution values before you start cropping; once you draw a cropping rectangle, the Options bar changes.) Tip: Cropping to an Aspect Ratio Let's say you want to crop your image to a four-by-six aspect ratio (height-to-width, or vice versa), but you don't want to resample the image (which adds or removes pixels, causing blurring) or change the image resolution. The Cropping tool can't perform this task anymore, so you need a different technique. First, select the Marquee (rectangular selection) tool and choose Fixed Aspect Ratio from the Style popup menu in the Options bar. The Options bar then lets you type values in the Height and Width fields (here you'd type 4 and 6). Next, marquee the area you want cropped, and then select Crop from the Image menu. See Chapter 8, Making Selections, for tips and tricks for the Marquee tool. Tip: Expand the Canvas by Cropping Once you've created a cropping rectangle with the Cropping tool, you can actually expand the crop past the boundaries of the image (assuming you zoom back until you see the gray area around the image in the document window). Then, after you press Enter, the canvas size actually expands to the edge of the cropping rectangle. This is David's favorite way to enlarge the canvas. Tip: Cropping Near the Border If you're trying to shave just a sliver of pixels off one side of an image, you'll find it incredibly annoying that Photoshop snaps the cropping rectangle to the edge of the image whenever you drag close to it. Fortunately, you can turn this behavior off by selecting Snap in the View menu (or pressing Command-Shift-;). Or, you can hold down the Control key to temporarily disable the snapping behavior. Eraser ToolThe Eraser tool has gotten a bad rap because people assume you have to use a big, blocky eraser. No, you can erase using any brushsoft or hard, like an airbrush or even with the textured brushes in the Brushes palette. And what's more, you can control the opacity of the Eraser (don't forget you can just type a number on the keyboard to change the tool's opacity). This makes the eraser fully usable, in our opinion. However, just because a tool is usable doesn't mean you have to use it. Whenever possible, we much prefer masking to erasing. The difference? Masks (which we cover in Chapter 7, The Digital Darkroom) can "erase" pixels without actually deleting them. Masks just hide the data, and you can always recover it later. Nevertheless, the Eraser tool can on occassion get you out of a jam. Here are a few tips. Tip: Erase to History The Erase to History feature (it's a checkbox on the Options bar when you have the Eraser tool selected) lets you use the Eraser tool to replace pixels from an earlier state of the image (see "When Things Go Worng," later in this chapter, for more on the History feature). Erase to History more or less turns the Eraser into the History Brush tool. For instance, you can open a file, mess with it until it's a mess, then revert parts of it to the original using the Eraser tool with Erase to History turned on. The important thing to remember is that you can temporarily turn on the Erase to History feature by holding down the Option key while using the Eraser tool. Tip: Watch Preserve Transparency When Erasing Note that the Eraser tool (or any other tool, for that matter) won't change a layer's transparency when you have the Preserve Transparency checkbox turned on in the Layers palette. That means it won't erase pixels away to transparency; rather it just paints in the background color. Don't forget you can turn Preserve Transparency on and off by pressing / (slash). Tip: Erasing to Transparency When you use a soft-edged brush to erase pixels from a layer (rather than the Background layer), the pixels that are partially erasedthat is, they're still somewhat visible, but they have some transparency in themcannot be brought back to full opacity. For example, if you set the Eraser to 50-percent opacity and erase a bunch of pixels from a layer, there's no way to get them back to 100-percent again. The reason: You're not changing the pixel's color, you're only changing the layer's transparency mask. This isn't really a tip: it's just a warning. What you erase sometimes doesn't really go away. Measurement ToolWe still sometimes hear people complain that Photoshop doesn't have a Measurement tool. Actually Photoshop does have one, but for some reason people don't notice it. That's too bad, because the Measurement tool is extremely useful for measuring distances and angles. The keyboard shortcut for this tool is "I" (or Shift-I if it's hiding under the Eyedropper tool). Here's a rundown of how this tool works.
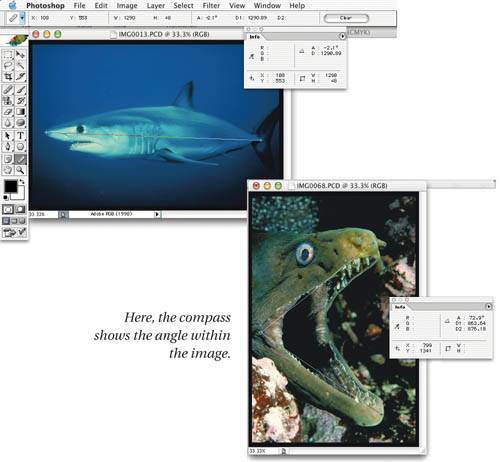
Where do you find the measurement? On the Info palette or the Options bar, of course. The palette displays the angle and the horizontal and vertical distances, along with the total distance in whatever measurement system you've set up in Units Preferences. Tip: Measuring Before Rotating We know you always make sure your images are placed squarely on the scanner before you scan them, but you may occasionally have to level someone else's crooked scan. Again, the Measurement tool can help immensely. If you select Arbitrary from the Rotate Canvas submenu (under the Image menu) immediately after using the Measurement tool, Photoshop automatically grabs the angle and places it in the dialog box for you. There are two things to note here. First, the angle in the Rotate Canvas dialog box is usually slightly more accurate, so the number you see there may be slightly different from the one on the Info palette (usually within half a degree). Second, if the angle is above 45 degrees, Photoshop automatically subtracts it from 90 degrees, assuming that you want to rotate it counterclockwise to align with the vertical axis instead of the horizontal axis. Notes ToolsWhile the majority of images touched by Photoshop are edited by a single person, people are increasingly working on pictures in teams. Perhaps the team is a retoucher and a client, or perhaps it's four Photoshop users, each with specific skillswhatever the case, it's important for these folks to communicate with each other. Enter Photoshop's Notes tools (press N). Photoshop has two Notes tools: one for text annotations and one for audio annotations. We suggest using audio annotations to your images only if you've never learned to type or if you're tired of having so much extra space on your hard driveaudio notes can make your files balloon in size (each 10 seconds of audio you add is about 140 K compared to about 1 K for 100 words of text notes). To add a text annotation, click once on the image with the Notes tool and type what you will. If you type more than can fit in the little box, Photoshop automatically adds a scroll bar on the side. In addition, you can change the note's color, author, font, and size in the Options bar at any time. Double-clicking on a note opens it (so you can read or listen to it) or closes it (minimizes it to just the Notes icon). Single-clicking on the Notes icon lets you move it or delete it (just press the Delete key). Or, if you want to delete all the notes in an image, press the Clear All button in the Options bar. Tip: Move the Notes Away By default, Photoshop places your notes windows at the same place in your image as the Notes icon. However, that means the little notes window usually covers up the image so you can't see what the note refers to. We usually drag the Notes icon off to the side slightly (just click-and-drag the note's title bar to move it), orif there aren't many notes in a filemost of the way off the image, onto the gray area that surrounds the picture. Tip: Show the Notes If you can't see notes in your Photoshop file but you suspect they're there, make sure the Annotations item is turned on in the Show submenu (under the View menu). When this is off, no Notes icons appear. |
EAN: N/A
Pages: 220
- Key #4: Base Decisions on Data and Facts
- Beyond the Basics: The Five Laws of Lean Six Sigma
- Making Improvements That Last: An Illustrated Guide to DMAIC and the Lean Six Sigma Toolkit
- The Experience of Making Improvements: What Its Like to Work on Lean Six Sigma Projects
- Six Things Managers Must Do: How to Support Lean Six Sigma