| Flash allows you to place one timeline inside another this is what you're doing whenever you add a movie clip instance to the main timeline. However, even movie clip instances can contain other movie clip instances many levels deep. Placing one timeline inside another creates a parent-child relationship between the timelines. The parent is the timeline that contains the other movie; the child is the movie contained within the other timeline. 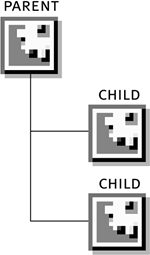
A child movie can easily tell its parent what to do (not so easy in real life!) using the following syntax: _parent.play();
To understand how it works, imagine placing a movie clip instance named myMovieClip_mc on the main timeline and then placing another movie clip instance named myOtherMovieClip_mc inside myMovieClip_mc. The absolute target path of the movie structure would look like this: _root.myMovieClip_mc.myOtherMovieClip_mc
If you wanted an action on myOtherMovieClip_mc's timeline to cause myMovieClip_mc's timeline to go to Frame 50, you would use this syntax: _parent.gotoAndPlay(50);
You could place this same syntax on myMovieClip_mc's timeline, and it would cause the main timeline to go to Frame 50 because the main timeline is that movie clip's parent. In the next exercise, we'll place movie clips inside movie clips, creating parent-child relationships. Such relationships can have all sorts of ramifications within a project, helping you make your movies more interactive. You will also create a simple "effect" clip that you can drag and drop into any timeline, causing that timeline to do something. Open parentTarget1.fla in the Lesson03/Assets folder. The only difference between this file and the file we worked on in the last exercise is that the buttons set up to scale the main timeline have been removed to avoid confusion.
Double-click one of the movie clip instances on the stage to edit it in place. With the Library panel open and the Child Clip layer selected, drag an instance of the Hatfield Child movie clip onto the stage, just to the right of the graphics in the current movie clip. You've just placed one movie clip within another, creating a parent-child relationship: the movie clip instance you just dragged onto the stage is the child, and the timeline you dragged it to is the parent. The child's timeline is set up in the same manner as the parent's timeline. It contains an invisible button that, when pressed, will drag the instance and display a text balloon. The text field in this balloon is named balloon_txt, just as it is in the parent movie.
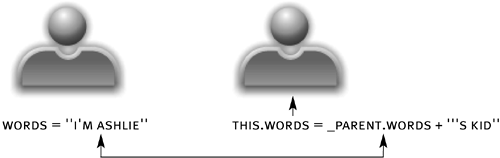
NOTE For visual clarity, you might want to resize the Hatfield Child movie clip to 50 percent of its original size, but you aren't required to do so. With the Actions panel open, select the child movie clip instance and add the script: onClipEvent (load) { var words:String; this.words = _parent.words + "'s kid"; }
When this movie clip instance is loaded loading occurs simultaneously with the parent's loading because the child resides on Frame 1 of its parent timeline data is transferred from the parent to the child. The action can be translated like this: "Make the value of words in this timeline equal to the value of words in the parent timeline, plus the text 's kid." Thus, if words has a value of "I'm Derek" in the parent, then words will have a value of "I'm Derek's kid" in the child. Let's test it.
Choose Control > Test Movie to view the project up to this point. The first thing you'll notice when the movie plays is that each of our instances now includes a child movie clip instance. If you click one of the child movie clip instances, not only does it become draggable, but its text balloon appears with text indicating who its parent is. This is the functionality we set up in the previous step. 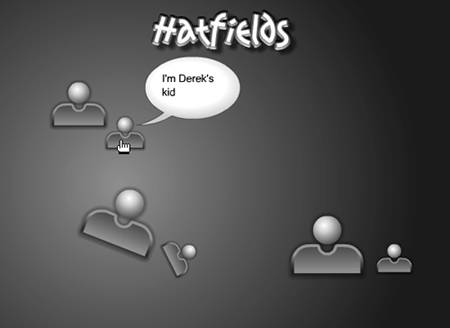
Click and drag one of the parent movies and you'll notice that its child is dragged as well. The same thing occurs with the parent movie that rotates as the mouse moves: its child movie rotates along with it. Data-wise, a child movie clip is independent of its parent: Data in one timeline does not affect data in the other unless you program it to do so. Graphically, however, it's another story. Size, position, transparency, and other graphical changes made dynamically to a parent movie clip will automatically affect its children in the same way. However, changes to a child have no inherent effect on a parent. If you want child clips to affect parent clips, you must specifically program them to do so. This means you can program groups of timelines to work together but remain separate from other groups in the project. Let's look at another use of this parent-child relationship between timelines.
Close the testing environment to return to the authoring environment. With the Library panel open, double-click the Swirl Clip movie clip instance. This step puts Flash in Symbol Editing mode with the Swirl Clip's timeline visible. This clip contains no graphical data, just four empty keyframes to which we will add scripts.
With the Actions panel open, select Frames 1, 2, 3, and 4 and add these scripts: Place on Frame 1: _parent._x = _parent._x - 1; _parent._xscale = _parent._xscale - 1;
Place on Frame 2: _parent._y = _parent._y - 1; _parent._yscale = _parent._yscale - 1;
Place on Frame 3: _parent._x = _parent._x + 2; _parent._xscale = _parent._xscale - 1;
Place on Frame 4: _parent._y = _parent._y + 2; _parent._yscale = _parent._yscale - 1;
The makeup of these scripts isn't terribly important what's important is that the actions all target the parent movie clip, and when an instance of the Swirl Clip is placed inside a timeline, its parent will appear to spiral away into nothingness. Let's demonstrate.
Return to the main timeline. With the Library panel open and the Swirl Clip layer selected, drag a Swirl Clip instance onto the stage. Choose Control > Test Movie to test the project. As soon as the movie begins to play, the main timeline begins to swirl away into nothingness an effect achieved by the movie clip instance we dropped into it. You can apply this effect to any timeline by placing that same movie clip instance inside it, which we'll do next.
Close the test window to return to the authoring environment. Select the Swirl Clip instance on the main timeline and choose Edit > Cut. Double-click one of the Hatfield movie clip instances to go to its timeline. With the Swirl Clip layer selected, choose Edit > Paste in Center to paste the Swirl Clip into this timeline. Choose Control > Test Movie to test the project. When the movie plays, the main timeline no longer swirls away every instance of the Hatfield movie clip does instead. This is because once the Swirl Clip instance was moved, the main timeline ceased being its parent and the Hatfield movie clip became its parent instead. Getting a movie clip to swirl away is just the tip of the iceberg when it comes to exploiting the ability to create drag-and-drop behaviors. To create more sophisticated behaviors, you can use the parent target path to target many levels up:
_parent._parent._alpha = 50;
Close the test window to return to the authoring environment. Save your work as parentTarget2.fla. This step completes the exercise.
|