| Just as a single transmitter broadcasts radio waves to thousands of radio receivers, some events can be "broadcast" to any number of objects so that they respond accordingly. You do this by employing what are known as Listeners events that can be broadcast to objects that have been "registered" to listen for them (listening objects). Suppose you wanted an object (sound, movie clip, text field, array, or custom) to react to a certain event's being triggered in your movie. You would first create an event handler method for that object: myTextField_txt.onMouseDown = function(){ myTextField_txt.text=""; }
Here we've set up a text field named myTextField_txt to react when the mouse button is pressed. The onMouseDown event is not a standard event that a text field can react to, and at this point it still won't. For the text field to react to this event, you must register the text field as a Listener for the event. You can do so by adding this code: Mouse.addListener(myTextField);
Here the text field is registered with the Mouse object because the onMouseDown event is a Listener of that object. Now, whenever the mouse button is pressed, the event handler method we created earlier will execute. You can set up any number of objects for a single Listener event as long as the object has been given an event handler method to deal with the event, and the object has been registered to listen for that event. If you no longer want an object to listen for an event, you can unregister it using this syntax: Mouse.removeListener(myTextField);
Listeners give you a bit more flexibility for scripting how your projects react to various events. NOTE Not all events can be treated as Listeners. With this in mind, be aware of which events are listed as Listeners in the Actions toolbox. If an event is not listed as a Listener, other objects cannot be set up to listen to it.
In the next exercise, in honor of the new History panel found in Flash MX 2004, we'll create our own History panel, named Bygones, using Listeners. Our panel will be used to indicate the following information: When the mouse button has been pressed, and where it was pressed If a key has been pressed, and which one If the stage has been resized, and to what new size
Open Listeners1.fla in the Lesson02/Assets folder. This project contains a single scene with four layers that are named according to their contents. The Background layer contains all of the nonfunctional interface graphics. The Components layer contains a List component instance named historyList_lb (in which _lb stands for ListBox). NOTE For more information on components, see Lesson 10, "Scripting UI Components." The Buttons layer contains two buttons: one named enable_btn, and the other named disable_btn. Obviously, the enable_btn button will be used to activate the Bygones panel's functionality, while the disable_btn will be used to deactivate it. The Actions layer is currently empty but will eventually contain all the scripts for this project.
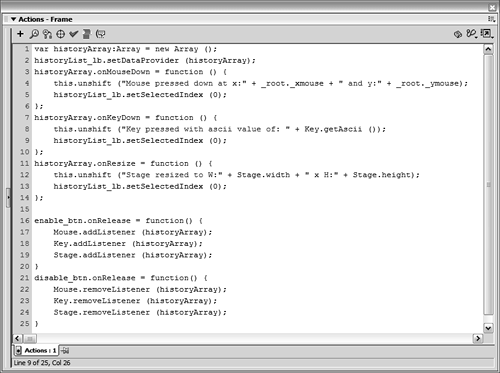
With the Actions panel open, select Frame 1 of the Actions layer and add this script: var historyArray:Array = new Array ();
This line of script creates an Array object named historyArray. An Array object is simply an object that can hold multiple pieces of data in indexed positions. You can think of it as a mini-database. Look at this example: var directions:Array = new Array();
The script creates a new Array object named directions. We fill this object with data in this manner: directions[0] = "North"; directions[1] = "East"; directions[2] = "South"; directions[3] = "West";
Our directions array now contains four pieces of data. To access data in the array, you use this syntax: myTextField_txt.text = directions[2];
The script will cause "South" (the text in index position 2 of the array) to appear in the text field. In the case of this project, we will be using the historyArray Array object to store information about recorded interactions. For example, a new piece of data will be added to historyArray each time the mouse button is pressed, a key is pressed, or the stage is resized. If the mouse button has been pressed twice and three keys have been pressed, historyArray will contain five items. These five items will each be text descriptions of the particular interaction.
NOTE For more information about arrays and how to use them, see Lesson 6, "Creating and Manipulating Data." Add this script below the script added in the preceding step: historyList_lb.setDataProvider(historyArray);
The List component we placed in our project is used to provide a mechanism to display the data that will be added to the historyArray Array object. This line of script tells the historyList_lb List component to use the historyArray Array object as its data source. As a result, when we add a new item to the historyArray Array object, it will appear in the historyList_lb List component.
Add this script below the script added in the preceding step: historyArray.onMouseDown = function () { this.unshift ("Mouse pressed down at x:" + _root._xmouse + " and y:" + _root._ymouse); historyList_lb.setSelectedIndex (0); };
This script tells the historyArray Array object what to do when the mouse button is pressed. The onMouseDown event is not one that an Array object can normally respond to, but because this event is also a Listener event of the Mouse object, any object including our Array object can be programmed to listen for it when it is triggered. This is only part of the equation that makes this work, however. Eventually, we'll tell the Mouse object to register the historyArray to listen for its events using this syntax: Mouse.addListener(historyArray);
We won't do this yet. We explained it here to help you understand that using Listeners is a two-step process. Let's discuss what this script does. The script is triggered when the mouse button is pressed. It adds a new item to our historyArray using this syntax: this.unshift(item to add);
Because this line of our script exists within the overall script that tells historyArray how to react to onMouseDown events, this, in this context, is a relative reference to the historyArray Array object. It could have also been written this way: historyArray.unshift(item to add);
unshift() is a method that an Array object can use to place a new item in the first position of its index, while moving (shifting) all existing items up one position. The data you want to add is placed within the parentheses. According to the directions Array object we discussed earlier, this syntax: directions.unshift("North");
would place the value "North" in index 0 of the directions Array object: directions[0]; //has a value of "North"
Using the unshift() method again: directions.unshift("East");
places the value "East" in index position 0, while moving the value "North" up to index position 1: directions[0]; //has a value of "East" directions[1]; //has a value of "North"
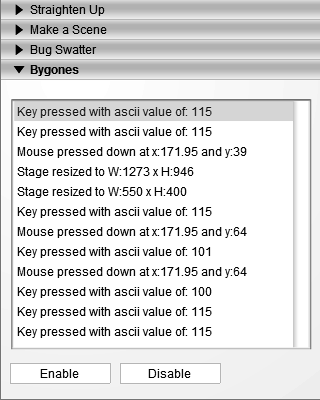
In our script, then, every time the mouse button is pressed, the unshift() method is executed and adds the information in the parentheses (which we'll discuss in a moment) to index 0 of historyArray, while moving existing items in the array up one index position. As a result, what appears in the historyList_lb List component will be updated as well. Let's look at the information that gets added to the array each time the mouse button is pressed and the unshift() method is executed. Our script shows that what is added looks like this: "Mouse pressed down at x:" + _root._xmouse + " and y:" + _root._ymouse
This represents the structure of the information that will be added to our panel each time the mouse button is pressed. In this case, the x and y positions of the mouse (_root._xmouse and _root._ymouse, respectively) are captured and inserted into the message. When the mouse is pressed down, if it has an x position of 350 and a y position of 100, the message that gets inserted into the historyArray Array object reads as follows: "Mouse pressed down at x:350 and y:100"
Once this gets added to historyArray, this information will also appear in our List component, as a result of earlier scripting of our historyArray (Step 3) to feed data to the List component. Pretty simple, don't you think? In the script we added in this step, the last line before the final curly brace reads: historyList_lb.setSelectedIndex (0);
This will cause the top item in the historyList_lb List component to be highlighted. This is simply for cosmetic purposes, so that the last piece of data added to the list will always stand out. 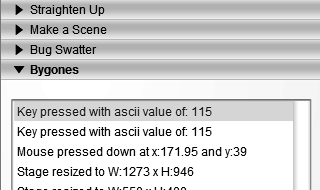
Next, we script historyArray to listen for when the user presses a key on the keyboard. Fortunately, this script is similar to the one we just discussed.
Add this line of script below the one added in the preceding step: historyArray.onKeyDown = function () { this.unshift ("Key pressed with ascii value of: " + Key.getAscii ()); historyList_lb.setSelectedIndex (0); };
This part of our script tells historyArray what to do when a key on the keyboard is pressed. The onKeyDown event specified here is not one that Array objects can normally respond to. But because it is an available Listener event of the Key object, we can use it to program our Array object to do something when a key is pressed. This script also uses the unshift() method described in the preceding step. As you can see, this again refers to the historyArray Array object. Thus, whether the mouse button or a key on the keyboard is pressed, the message generated by our script is placed into index 0 of our single Array object (while moving all existing index items up one index number). As a result, our List component will display all messages generated from mouse clicks and key presses. The message created when a key is pressed is built around this syntax: "Key pressed with ascii value of: " + Key.getAscii ()
This part of the script uses the Key.getAscii() method to determine the ASCII code for the currently pressed key on the keyboard. As a result, if the Spacebar is pressed, it generates a message that looks like this: Key pressed with ascii value of: 32
NOTE For a complete list of ASCII values, consult the ActionScript dictionary that comes with Flash. As described in Step 4, historyList_lb.setSelectedIndex (0); will highlight the first item in the historyList_lb List component. This action causes all the recently added items to always appear highlighted. Finally, let's script historyArray to listen for when the stage is resized.
Add this line of script below the one added in the preceding step: historyArray.onResize = function () { this.unshift ("Stage resized to W:" + Stage.width + " x H:" + Stage.height); historyList_lb.setSelectedIndex (0); };
This script is similar to the last two. It scripts historyArray to react to the resizing of the stage (using the onResize event, which is a Listener event of the Stage object). The message generated by this script will also be added to historyArray. If the stage is resized to a width of 550 and a height of 400, this message will read: Stage resized to W:550 x H:400
It's time to register historyArray with the Mouse, Key, and Stage objects so that it can begin reacting to the events those objects generate. Before we do, however, let's do a test, just so you understand the importance of this registration process.
Choose Control > Test Movie. When the movie appears, you can press the mouse button, type keys, and resize the stage to your heart's content, but nothing happens. Simply scripting the historyArray Array object to react to these events doesn't mean it will react. Not yet, at least. Let's go back to the authoring environment and finish the job.
Close the test window to return to the authoring environment. Open the Actions panel and add this script at the end of the current script: enable_btn.onRelease = function () { Mouse.addListener (historyArray); Key.addListener (historyArray); Stage.addListener (historyArray); };
This script will execute when the Enable button (named enable_btn) is pressed and released. It registers the historyArray Array object as a Listener of the Mouse, Key, and Stage objects. As a result, the functionality we scripted in the previous steps will come to life when the project is tested again and the Enable button is pressed.
Add this script at the end of the current script: disable_btn.onRelease = function () { Mouse.removeListener (historyArray); Key.removeListener (historyArray); Stage.removeListener (historyArray); };
This script will execute when the Disable button (named disable_btn) is pressed and released. It does just the opposite of the script added in the preceding step. Using removeListener(), it unregisters the historyArray Array object as a Listener of the Mouse, Key, and Stage objects. As a result, historyArray will no longer react to Mouse, Key, and Stage events (until the Enable button is pressed again). Let's test the project now.
Choose Control > Test Movie. When the movie appears, press the Enable button to activate the Bygones panel. Press the mouse button, type on your keyboard, and resize the window the movie is playing in. Each time you perform one of these actions, historyArray will trigger a script as it was set up to do. As a result, you'll see updated information displayed in the List component, representative of the way you are interacting with the movie. Press the Disable button to turn off the functionality of the Bygones panel. That's all there is to using Listeners. As a side note, be aware that the Mouse, Key, and Stage objects can generate a total of seven Listener events. While the registering process (shown in Step 8) registers historyArray to listen for all of these objects, it is scripted to react to only three of them. For example, the following line in our script: Mouse.addListener(historyArray);
registers historyArray to listen to all four Mouse Listener events, but it is only scripted to react to the onMouseDown event. For historyArray to react to the other three Listener events, you would need additional scripts (as described in Steps 4 through 6).
Close the test movie to return to the authoring environment and save your work as Listeners2.fla. This completes the exercise and the lesson.
|