| Changing the depth of movie clip instances is known as z-sorting. The letter z is used in the name because changing the depth gives the effect of a third dimension in Flash: z (in addition to x and y). You can use duplicateMovieClip() or attachMovie() to set the depth of movie clip instances when you create them, or you can change the depth dynamically using the swapDepths() method of the Movie Clip class. With swapDepths() you can exchange the depth of any two movie clip instances or move an instance to a specified depth. Here's the syntax for swapping the depths of two movie clip instances: movieClip1_mc.swapDepths(movieclip2_mc);
If movieClip2_mc is above movieClip1_mc, this script swaps their depths, causing movieClip1_mc to appear above movieClip2_mc. Here's the syntax for sending any movie clip instance even one created using duplicateMovieClip() or attachMovie() to a specific depth: movieClip1_mc.swapDepths(anyDepth);
The anyDepth parameter is an integer. The swapDepths() method is easy to use and can add a nice effect to applications and games. There are two more Movie Clip class methods that can assist you with z-sorting: getDepth() and getNextHighestDepth(). The getDepth() method returns the numeric depth of a movie clip. For example: var mc_depth:Number = myClip_mc.getDepth();
The getNextHighestDepth() method returns the highest unused depth that has no other depths above it filled. For example, imagine that you had a movie clip with an instance name of holder_mc and you attached a movie clip at depth 2050 inside it. This ActionScript: var nextDepth:Number = holder_mc.getNextHighestDepth();
creates a variable named nextDepth with a value of 2051. These methods, both new in ActionScript 2.0, make managing the depth of dynamically added instances much simpler than before. In this exercise, you'll make the two windows in the drawing application draggable, use swapDepths() to bring the window of interest to the top of the stack, and add actions to some of the buttons. Open draw2.fla. This is the file as you left it at the end of the preceding exercise. In this exercise, you'll add more ActionScript to Frame 1 in the Actions layer on the main timeline and work with the window clips.
With the Actions panel open, select Frame 1 of the Actions layer and add these two lines of script at the end of the current script: window1_mc.gotoAndStop("color"); window2_mc.gotoAndStop("admin");
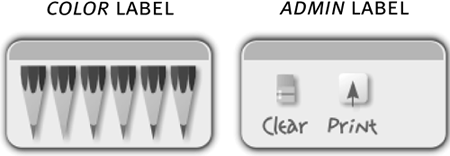
window1_mc and window2_mc are instances of the same movie clip they just have different instance names. The ActionScript in this step is used to direct these instances to the frames labeled color and admin, respectively. The color frame label contains several buttons that will be used to change the drawing color. (You will soon add the ActionScript to handle this task.) The admin frame contains two buttons one to clear the canvas and one to print what's on the canvas. You will not add the ActionScript for the buttons on the admin frame until the last exercise in this lesson.
Double-click window1_mc and move to the color frame label. Select the frame in the Actions layer and add the following script: var colors:Array = ["7F6696", "FAC81C", "E72638", "1091CB", "1FA900", "BC0077"]; for (var i:Number = 1; i <= 6; ++i) { var temp_btn = this["pencil" + i + "_btn"]; temp_btn.color_index = i - 1; temp_btn.onRelease = function() { changeColor(this.color_index); }; }
This frame has six button instances pencil1_btn through pencil6_btn. This script is used to set up their functionality. The first line creates an array. Each element in the array is a string that stores a color. Notice that there are a total of six color values, each of which will eventually be associated with a button. The for loop adds an onRelease event handler to each of the six buttons. It also stores a variable on each button called color_index. The color_index variable is a number that corresponds to a position in the colors array. For example, the button instance pencil1_btn will be assigned a color_index value of 0, and pencil6_btn will get a color_index value of 5. The onRelease event handler added to each button instance calls a function (not yet added) called changeColor() and passes in the color_index of the button instance that calls the function. The changeColor() function will use the value of color_index to grab a color from the colors array, and use that color to change the drawing color.
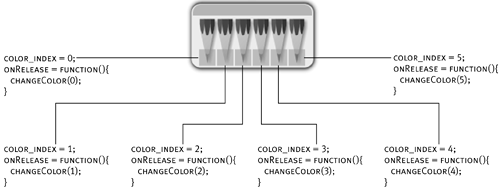
Add the following changeColor() function to this frame: function changeColor(color_index:Number) { _root.currentColor = colors[color_index]; }
This function is called when any of the six button instances is released. It changes the value of the variable called currentColor on the _root timeline to that of one of the color values in the colors array, depending on which button is clicked. Every time the draw() function is called, it uses the value of currentColor to color the line that it's drawing. By changing the value of the currentColor variable, you're changing the color of the lines that will be drawn.
Move the current movie clip timeline to Frame 1. With the Actions panel open and the Actions layer selected, add the following script below the stop() action that's already there: drag_btn.onPress = function() { startDrag(this._parent); _root.swap(this._parent); }; drag_btn.onRelease = function() { stopDrag(); };
The yellow button at the top of this movie clip has an instance name of drag_btn. This script tells the button what to do when it's pressed or released. When pressed, two things occur. The startDrag() method begins dragging the button's parent, which is the window movie clip the button is part of. The second action calls a function (not yet written) on the _root timeline called swap(), the purpose of which is to change the z-order of the window to bring it to the front of the stack. When the function is called, it's passed a reference to the button's parent, which once again is the window movie clip the button is part of. Because our project contains two instances of this movie clip window1_mc and window2_mc the actions on this button will work as follows: when the button is clicked in the window1_mc instance, that instance becomes draggable and a reference of the instance is passed to the swap() function. When the button in window2_mc is clicked, that instance becomes draggable and a reference of that instance is sent to the swap() function.
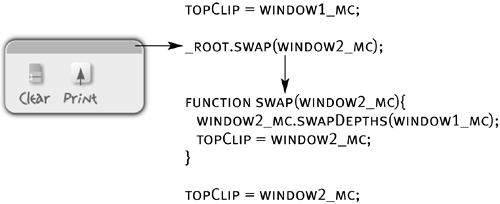
Return to the main timeline. With the Actions panel still open, select Frame 1 of the Actions layer and add the following line of script at the end of the current script: var topClip:MovieClip = window1_mc;
We will be using the swapDepths() method to swap the depths of the window1_mc and window2_mc movie clip instances. The topClip variable is used to store the reference of the instance, which is currently at the higher depth. When the movie is exported, window1_mc is at a higher depth, so that's how we initialize this variable's value.
Add the following function definition to the frame: function swap(clip:MovieClip) { clip.swapDepths(topClip); topClip = clip; }
This function accepts a parameter named clip. This parameter is a reference to the movie clip that's requesting to be forced to the top depth (as discussed in Step 5). The first line of this function swaps the depths of the movie clip reference passed in, clip, and the one currently stored as the top clip, topClip. If both clip and topClip are references to the same movie clip, the function changes nothing. The last line of the function changes the value of topClip to store a reference to the clip that was just forced to the top. When the Flash movie first starts, topClip points to window1_mc. If the drag_btn button instance in window2_mc is pressed, the swap function is called and window1_mc and window2_mc exchange depths.
Choose Control > Test Movie to test the movie. Click the windows and drag them around. Change the color of the lines. When you click the button at the top of one of the windows, its depth is set to the highest in the stacking order and a drag is initiated. The only thing that happens when you click the color buttons is that the value of the currentColor variable on the _root timeline changes, allowing you to draw lines of different colors.
Close the test movie and save your work as draw3.fla. You've now used swapDepths() to bring the window of interest to the front of the window stack but you're not finished yet! You still need to script the functionality to clear the canvas and add drag-and-drop functionality to the icons.
|