| Although you're presented with a variety of options when creating and configuring text fields in the authoring environment, being able to create text fields on the fly while your movie is running gives you even greater control over the way your project handles text. Let's take a look at the dynamic creation process. To create a text field using ActionScript, you use the createTextField() method, as follows: createTextField(instanceName, depth, x, y, width, height);
Now note the following example, which uses the createTextField() method to create a text field: createTextField("myField_txt", 10, 20, 50, 200, 30);
This script creates a text field named myField_txt, with its initial depth, x, y, width, and height properties set as shown. Every text field, whether placed on the stage while authoring the movie or created dynamically, is considered an instance of the TextField class. As such, text fields can be treated in several ways similarly to movie clip instances. Individual text fields are given instance names from the Property Inspector (or when created dynamically, as shown in the preceding code). When targeting a text field instance with a script, you use its target path, which includes its instance name. You may not be able to tell by looking at the Actions toolbox in the Actions panel, but several methods similar to Movie Clip object methods are available to text field instances. For example, this script makes the myField_txt text field draggable: startDrag("myField_txt", true);
Unlike movie clips, text fields are not timelines; therefore, certain methods such as prevFrame(), attachMovie(), loadMovie(), and so on have no meaning when used in the context of a text field instance. Text field instances have several properties similar to those of movie clips. For example, myField_txt._alpha = 50;
makes the myField_txt text field 50 percent transparent. With a little bit of experimentation, you'll be able to see which methods and properties are shared by movie clip and text field instances. In addition to the properties and methods discussed thus far, text fields have numerous unique methods and properties for manipulating and controlling text within the text field (rather than the text field itself, as previously discussed). Several of these methods are employed to format text-field text using TextFormat and Cascading Style Sheet (CSS) objects we'll save our discussion of those for the later sections of this lesson. In the meantime, let's look at a couple of useful methods that don't pertain to formatting. To remove a text field instance that was created dynamically, use the removeTextField() method in the following manner: myField_txt.removeTextField();
This script removes the text field named myField_txt. NOTE Only text fields created dynamically can be removed using this method. Text fields placed on the stage while authoring your movie cannot be removed in this way.
Two of the most common actions you can perform in conjunction with text fields are adding and deleting text both of which can use the replaceSel() method. You can invoke this method to replace the currently selected text with anything you define. In the following example, assume that the myField_txt text field contains the text, "I love my dog and cat very much!" Then assume that the "dog and cat" portion of the text has been selected. You can use the replaceSel() method, as shown in the following code, to replace that text: myField_txt.replaceSel("bird and snake");
The myField_txt text field now reads, "I love my bird and snake very much!" The value placed within the replaceSel() method when it's invoked can be a string of text, an empty string (""), or even a variable. 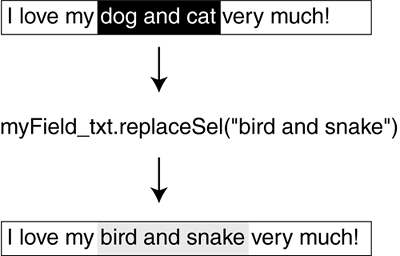
As mentioned earlier in this lesson, text fields have numerous properties that you can configure using ActionScript while the movie is playing. These properties affect not only the way the field looks and reacts to text, but how it functions. Some of these properties are familiar because we've already used and discussed them; others don't warrant much discussion because they do the same thing as the corresponding properties that you set with the Property Inspector when creating a text field in the authoring environment. For example, consider the selectable property. You would use the following syntax to make the text in the myField_txt text field instance selectable: myField_txt.selectable = true;
Now let's review some of the less obvious properties of text field instances: autoSize. This property determines whether a text field expands and contracts its borders automatically to accommodate the amount of text it contains. A text field's width and height are normally set using static (unchanging) values. The AutoSize property allows a text field's size to be dynamic that is, determined by the text that's typed into it. borderColor. This property represents the color of the border around a text field. You can set it using a hex value: myField_txt.borderColor = 0x336699;
Setting the border color has no visible effect unless the border itself is visible: myField_txt.border = true;
The same logic applies to the background and backgroundColor properties. bottomScroll. This read-only property represents the line number of the bottom-most visible line of text in a text field. 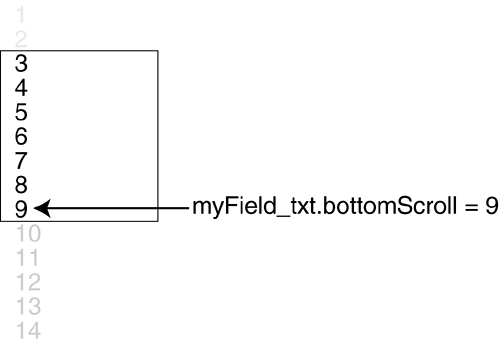
hscroll. This property is a numeric value representing in points the current horizontal scrolling position. If the hscroll property of a text field is set to anything greater than 0, all the text is shifted to the left. With a setting of 10, for example, the text is left-shifted by 10 points. This property cannot be set to a value higher than the maxhscroll property value for the same field and is only useful if word wrapping is disabled in the text field, thus requiring horizontal scrolling to see text that exists beyond the right boundary of the field. maxhscroll. This read-only property represents the maximum amount that text can be scrolled horizontally. 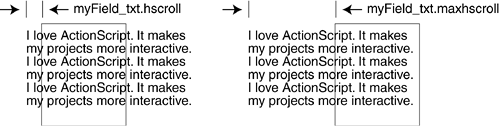
maxscroll. This read-only property represents the highest line number to which text can be scrolled vertically in a field. To understand this property better, imagine that a particular text field contains 14 lines of text, but can display only 7 lines at a time. Because you don't want the user to be able to scroll beyond line 14, you would set the maxscroll property value to 8 a value that can change if lines are added. 
restrict. This property determines which characters can be entered into the field. A value of null or "" indicates that any character can be entered into the field: myfield_txt.restrict = null;
A specified string of text means that only characters included in that string can be entered into the field: myField_txt.restrict = "meatloaf";
A range of characters can be indicated using a hyphen: myField_txt.restrict = "A-Z 0-9 a-z";
Using the caret symbol (^), you can specify a range of characters to accept, with exceptions. For example: myField_txt.restrict = "0-9^567";
This range allows 0, 1, 2, 3, 4, 8, and 9, but not 5, 6, or 7. To include all characters with some exceptions, use the caret in the following manner: myField_txt.restrict = "^bug";
In this example, all characters except b, u, and g are allowed. The restrict property applies only to text entered by the user; ActionScript can place any text in the field regardless of this property's setting. scroll. This property represents the number of the top line displayed in the text field. For example, if you want to scroll the text in a field so that the fourth line is the highest displayed in the field, use the following syntax: myField_txt.scroll = 4;
This property's value cannot exceed the maxscroll property value for the same field. tabEnabled. This property determines whether the field is included for selection when using the Tab key to select elements in the scene. A value of true or undefined includes the field. A value of false causes the field to be skipped. tabIndex. If a field's tabEnabled property is set to true or undefined (allowing the field to be included in tab selecting), the tabIndex property value indicates the field's selection position in the process. textHeight. This read-only property determines the height of text in a field not the height of the field itself, which can differ from the height of the text. textWidth. This read-only property represents the width of text in a field not the width of the field itself. type. This property determines whether the field is an input or dynamic text field. For example, this script makes myField_txt an input text field: myField_txt.type = "input";
variable. This property represents the name of the variable associated with the text field. As mentioned earlier, associating a variable with a text field causes that variable's value to be displayed in the field. You can change this property at any time to display a different variable's value.
Most of these property values can be set or retrieved for use in other scripts. When a text field is created, it has the following default property settings: type = "dynamic"; border = false; background = false; password = false; multiline = false; html = false; embedFonts = false; variable = null; maxChars = null;
In the following exercise, we'll dynamically create, configure, and control a couple of text fields as we build an interactive typing application. Open flashWriter1.fla in the Lesson14/Assets folder. This project contains five layers named according to their content. The Background layer contains the scene's graphical content, with the exception of the buttons (named style1_btn, style2_btn, style3_btn, and style4_btn) that reside on the Buttons layer. The Components layer contains the applyToAll_cb Checkbox component that appears at the upper-left of the stage. The Box layer contains the movie clip instance named box_mc, just to the left of the stage; it looks like a transparent white box with a white border. Other than some ActionScript, which will be placed on Frame 1 of the Actions layer, the white box is the only element in the scene used in this exercise. The buttons and Checkbox component will be used and scripted in the next exercise. 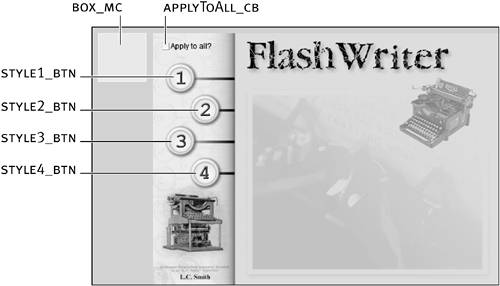
The goal of this exercise is to dynamically create a couple of text fields as the movie plays. One field is larger than the other and is used for entering text. The smaller one is used to keep a running total of the number of characters (including spaces) in the larger field. Both fields move from left to right as text is typed into the larger field. Because transparent backgrounds behind text fields are not inherently possible, the white box (which is semitransparent) mimics the movement and size of the larger text field to act as its background.
With the Actions panel open, select Frame 1 of the Actions layer and add the following script: createTextField("movingField_txt", 10, 150, 80, 200, 20); with (movingField_txt){ autoSize = true; html= true; multiline = true; text = "Enter text here"; type = "input"; wordWrap = true; }
The first line of script creates a text field named movingField_txt, placed initially at x/y positions of 150 and 80, respectively, and with a width of 200 and a height of 20. Using a with statement that references movingField_txt, the initial property settings are configured for this field. Initially, this field (which is set to autosize text as it's entered), displays the text Enter text here. Notice that movingField_txt has been set up as an input text field and can wrap lines of text. It's the larger of the two text fields that this project contains.
TIP A with statement provides a quick and easy way to address an object (text field, movie clip, and so on) when several lines of script need to reference the object. Add the following script at the end of the current script: createTextField("statusField_txt", 20, 150, 80, 100, 20); with (statusField_txt){ autoSize = true; background = true; html = true; multiline = false; selectable = false; text = "0"; type = "dynamic"; wordWrap = false; }
The first line of script creates a text field named statusField_txt, placed initially at x/y positions of 150 and 80, respectively, and with a width of 100 and a height of 20. Using a with statement that references the newly created statusField_txt, the initial property settings are configured for this field. The field, which is set up to autosize, initially displays the text 0. statusField_txt has been set up as a dynamic text field and cannot wrap lines of text. As the smaller of the two text fields, it mimics the larger field's movement. Next, let's script a function for statusField_txt.
Add the following function definition at the end of the current script: function updateStatus(){ statusField_txt._x = movingField_txt._x; statusField_txt._y = (movingField_txt._y + movingField_txt._height) + 10; statusField_txt.text = movingField_txt.length; }
In a moment we'll script the movingField_txt to move as text is typed into it. The updateStatus() function accomplishes two things when called: it keeps statusField_txt at a specific relative distance from the movingField_txt text field as the latter field moves, and updates the text displayed in the statusField_txt text field. The function begins by setting the x position of the statusField_txt to match that of movingField_txt. The next line places the top of statusField_txt (its y position) 10 pixels below movingField_txt. It does this by adding the movingField_txt y position to its height (which gives us the coordinate of its bottom boundary) and then adding 10 to that result. 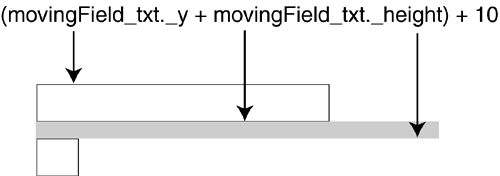
The last action updates the text in statusField_txt to indicate the number of characters in movingField_txt. In a moment, we'll script this function to be called every time text is added to or removed from movingField_txt.
Add the following function definition at the end of the current script: function reshapeBox(){ with(box_mc){ _x = movingField_txt._x; _y = movingField_txt._y; _width = movingField_txt._width; _height = movingField_txt._height; } }
When called, this function causes the box_mc movie clip instance to mimic the position and size of the movingField_txt text field, using familiar actions. As with the function defined in Step 4, we'll soon script this function to be called every time text is added to or removed from movingField_txt, making the box_mc movie clip instance act as the background for that text field.
Add the following function calls at the end of the current script: updateStatus(); reshapeBox();
These two lines of script call the functions we just defined so that the statusField_txt text field and the box_mc movie clip instance can be configured (as defined in the function definitions) as soon as the movie begins to play. These same functions will eventually be scripted to be called repeatedly.
Add the following script at the end of the current script: movingField_txt.onChanged = function(){ movingField_txt._x += 4; if (movingField_txt._x + movingField_txt._width > 500){ movingField_txt._x = 150; } reshapeBox(); updateStatus(); }
This section of script uses the onChanged event handler method (available to text field instances) to deal with what happens each time text is added to or removed from the movingField_txt text field. The function first moves movingField_txt four pixels from its current position, causing the text field to move to the right each time a character is added to or deleted from the field. The if statement prevents the field from moving off the stage when it moves to the right. It does this by comparing the right side of the field's position (achieved by adding the x position to the width of the field) with the value 500 the farthest right we want to allow the field to move. If the right side of the field exceeds this amount, the field is set back to its starting x position of 150. The last two lines call the functions we defined earlier, updating the statusField_txt text field and box_mc movie clip instance immediately each time text is added to or removed from the movingField_txt text field.
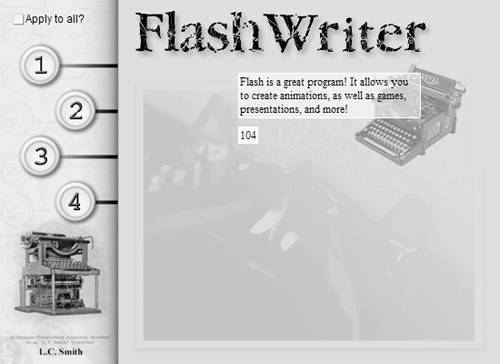
Choose Control > Test Movie to view the project up to this point. As soon as the movie begins to play, two text fields are created and their properties set. The statusField_txt text field appears below the movingField_txt text field, and the box_mc movie clip instance has the same position and size as the movingField_txt text field. As text is typed into the movingField_txt text field, it moves to the right; statusField_txt follows the movement of movingField_txt, but displaying the current number of characters in the movingField_txt text field. After movingField_txt moves too far to the right, it's moved back to its original position.
Close the test movie and save your work as flashWriter2.fla. We'll continue building on this file in the next exercise. As you've seen, creating and controlling text fields dynamically is a straightforward process that enables you to add a new dimension of interactivity to your projects.
|