| One of the most exciting enhancements to ActionScript in Flash MX is the ability to easily create subclasses of movie clips. You can now create a custom class (as described earlier in this lesson); use movie clip event handlers, custom methods and more to add functionality to that class; and then associate one or more movie clip symbols in the library with that class so that every instance of that symbol automatically inherits the functionality of the custom class. Although this may seem like a complex concept (since it's so powerful), it's actually quite simple. Let's take a look at an example. To begin with, assume there are a couple of symbols in the library with Linkage identifier names of clipOne and clipTwo. NOTE It's important to note that in the following text, when we refer to a movie clip or clip, we're talking about the master clip in the library. Movie clip instance or simply instance refer to, well, instances of the clip.
Next, we'll create a custom class: _global.CustomClass = function(){ } This creates a new class named CustomClass. Next, let's set this class to inherit the functionality of the MovieClip class by placing the following line of script just below the last. CustomClass.prototype = new MovieClip(); Next we'll add additional functionality to the class by adding to its prototype object: CustomClass.prototype.onRollOver = function(){ this._alpha = 50; } CustomClass.prototype.onRollOut = function(){ this._alpha = 100; } CustomClass.prototype.onEnterFrame = function(){ this._rotation += 10; } Our custom class is now set up to handle interactivity in three ways using event handler methods. Now we want instances of the clipOne movie clip (as mentioned earlier) to inherit this functionality. To do this, we'll use the Object.registerClass() method as follows: Object.registerClass("clipOne", CustomClass); Instances of the clipOne movie clip will now react to rollOver , rollOut , and enterFrame events as defined by CustomClass. The reason for this is that they're no long technically considered instances of the MovieClip class of object but rather instances of the CustomClass class of objects. NOTE The use of this when scripting the functionality of the event handler methods as shown refers to the individual instance that inherits the functionality.
If you no longer wish instances of the clipOne movie clip to inherit the functionality of CustomClass, you would use the following syntax: Object.registerClass("clipOne", null); The effect of registering and unregistering a movie clip with a custom class is not applied to existing instances of the specified movie clip; it's only applied to new instances placed in your movie (either directly on the timeline during development, or dynamically using duplicateMovieClip() or attachMovie() ). Existing instances retain their current functionality. To better understand this, let's take a look at our current example. Say you define CustomClass on Frame 1 of your movie. On this same frame you've placed an instance of the clipOne movie clip and named it myInstance. On Frame 2, you place the action that registers clipOne with CustomClass: Object.registerClass("clipOne", CustomClass); At this point, even though we've registered clipOne with CustomClass, the instance of clipOne named myInstance (which we placed on Frame 1) does not inherit the functionality of CustomClass because it was created within the movie (on Frame 1) before the registerClass() method was invoked (on Frame 2). Only instances of clipOne placed manually in the movie on Frame 3 and beyond, or dynamically from that point forward, will inherit the functionality of CustomClass. 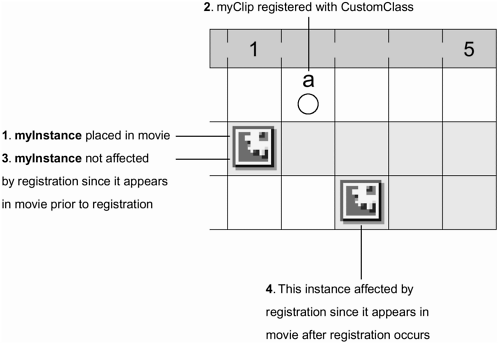 But what do you do if you want to place instances of clipOne on Frame 1 and have them inherit the functionality of CustomClass on that same frame? We'll address that issue in the exercise for this section. Just be aware of how this works; otherwise, it may lead to hours of frustration. A movie clip, such as clipOne, can only be registered with one class at a time. If a clip is registered with a class and you then register it with a different class, the latter registration will replace the former. However, this does not mean that you can't register multiple clips with CustomClass you can! To register additional movie clips with a class, simply invoke additional registerClass() methods: Object.registerClass("clipTwo", CustomClass); Object.registerClass("myClip", CustomClass); Object.registerClass("anotherClip", CustomClass); These actions cause instances of clipTwo, myClip, and anotherClip inherit the functionality of CustomClass. TIP If you only want to associate individual instances of a clip to a custom class, just set the instance's __proto__ property to the prototype object of the custom class, as follows: myMovieClip.__proto__ = CustomClass.prototype; In this case only the myMovieClip instance will inherit the functionality of CustomClass. When changing the __proto__ property in this manner, the change is immediately reflected in the instance.
In the following exercise we'll create a custom class, set up the class' functionality, and then assign a movie clip symbol in the library to that custom class using the registerClass() method. -
Open registerClass1.fla in the Lesson06/Assets folder. Since we worked on this project in the previous exercise, you should be familiar with its elements: however, we've altered its structure slightly from the way we left it in the previous exercise. The project now contains two scenes that are identical but for one thing: Scene1 has a button to navigate the project to Scene 2, and Scene 2 includes a button to navigate to Scene 1. In addition, a stop() action has been added to Frame 1 of Scene 1 so that the user can navigate between scenes by using the buttons. The buttons to the right of the bigHead instance have been replaced with four instances of a movie clip symbol named Icons. In the authoring environment, these instances appear the same (as a graphic of a mouth); however, the Icons movie clip actually contains all of the graphics that were previously used for our buttons (eyes, nose, and glasses). By the time we've finished scripting and playing this project, these four instances will appear as the buttons did in the previous exercises. The reason we've replaced the buttons is because in this exercise we'll be setting up the Icons movie clip and thus these four instances to inherit its functionality from a custom class we will create. As a result, the four instances will act like enhanced versions of the buttons we previously used. These four instances have been given instance names (from top to bottom) of mouth, nose, eyes, and glasses. Remember these instance names: They will play an important role later in this project. Most of the scripting we'll add in this exercise will be placed within the Icons movie clip's timeline. Before we do that, however, let's examine this clip in the library. -
Choose Window > Library to open the Library panel. Locate the movie clip named Icons. Right-click (or Control-click on a Mac) on the clip and choose Linkage from the menu that appears. This opens the Linkage Properties dialog box. Here you can see that we've given the Icons movie clip an Identifier name of "icons" (to identify it in the library). You'll also note that the option for "Export in first frame" has been selected: This will cause the clip (and in some cases a script it contains) to load before anything else in the movie, including the first frame functionality that will be important to remember later in the exercise.  NOTE For more information about linkage properties settings, see Lesson 14, Controlling Movie Clips Dynamically. -
Click Cancel to close the Linkage Properties dialog box. Close the Library panel. On the stage, double-click one of the instances of the Icons movie clip to edit it in place. This clip's timeline contains four layers, each of which stretches across 40 frames. There are four keyframes (on the Labels layer) labeled mouth, nose, eyes, and glasses. At each of these frame labels, the graphic on the stage (on the Graphics layer) changes to reflect the name of the label. The Hit State layer has a small transparent square that exists behind the graphic on the Graphics layer. This square serves a very useful purpose, which we will explain shortly. Frame 1 of the Actions layer will contain all of the script we will be adding in this exercise. -
With the Actions panel open, select Frame 1 and add the following script: _global.Custom1 = function(){ } Custom1.prototype = new MovieClip() The first two lines create a new class named Custom1 . As you can see, this class definition is very simple. The next line creates inheritance, where the Custom1 class inherits all of the functionality of the MovieClip class. Next, we'll defining new functionality specific to the Custom1 class. -
Add this script at the end of the current script: Custom1.prototype.scale = function(amount){ this._xscale = amount; this._yscale = amount; } This block of code defines a new method for the Custom1 class, called scale() , which is set to scale an instance by the value specified by amount when the method is invoked. You'll see it used in a moment. NOTE The use of this in the script (and the additions that follow) refer to any instance that inherits this class' functionality. Thus, if there is an instance named myClip that has the functionality of Custom1, myClip.scale(50); would scale that instance 50 percent. -
Add the following script to the end of the current script: Custom1.prototype.onLoad = function(){ this.gotoAndStop(this._name); } This part of the script uses an onLoad event handler method to set what instances of this class should do upon loading. A gotoAndStop() action will move each instance to a frame label based on its name. The four instances of the Icons movie clip will inherit this class' functionality. These instances mouth, nose, eyes, and glasses have the same names as the four labels on this movie's timeline. Thus, when an instance loads (onLoad ), it will look at its name (this.name ) and go to the frame label that matches its name. As a result, the four instances will appear as the buttons appeared in the previous exercises. 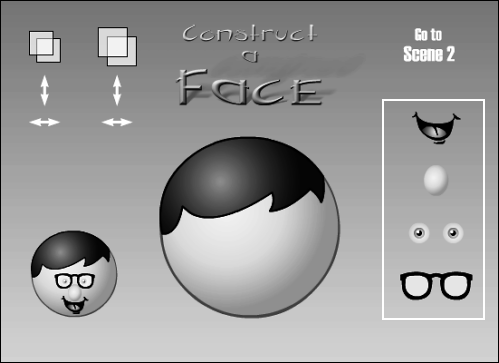 -
Add this script to the end of the current script: Custom1.prototype.onPress = function(){ thisX = this._x; thisY = this._y; startDrag(this, true); this.scale(70); } This part of the script uses an onPress event handler method to set what instances of this class should do when they are pressed. The first two lines capture the current x and y positions of the instance and store those values in variables named thisX and thisY . (We'll use these in a moment). The next action causes the instance to become draggable. The last action makes use of the scale() method we created for this class in Step 5, so that when the instance is pressed, it becomes 70 percent of its actual size. -
Add this script to the end of the current script: Custom1.prototype.onRelease = function(){ stopDrag(); if (this.hitTest("_root.bigHead")){ this._x = thisX; this._y = thisY; _root.bighead[this._name] = true; this.scale(100); this.enabled = false; }else{ this._x = thisX; this._y = thisY; this.scale(100); } } This part of the script uses an onRelease event handler method to set what instances of this class should do when they are pressed and released. The first thing that occurs when the instance is released is that it ceases to be draggable. Next, an if statement is used to take one of two sets of actions, depending on the location of the instance when it's released. The first part of the statement uses the hitTest() method to determine if the instance is hitting the bigHead instance on the main timeline at the time it's released. If it is, then five actions are executed. The first two will set the x and y position of the instance to the values of thisX and thisY , respectively, moving the instance back to its position when originally pressed. The next action uses the instance name to set a property value in the bigHead instance to true . Thus, if the just-released instance has an instance name of nose, this line of script would be evaluated to read as follows: _root.bigHead.nose = true; This changes the value of the nose property in the bigHead instance, which you'll remember is a watched property. This will cause the face to gain a nose as scripted in an earlier exercise. The following action scales the instance back to its original size. And the last action disables the instance so that the onPress event handler method (as it relates to this instance) can't be triggered again. If the else part of the statement executes, this means that the instance was not hitting the bigHead instance when it was released. In this case, only three actions execute. They simply snap the instance back to its original position and scale it back to its original size. When this occurs, the instance can be pressed and dragged again. When released, the aforementioned if statement will execute again and take the appropriate action. The functionality of the class is now complete. We simply need to associate the Icons movie clip with this class so that instances of that movie clip inherit this class' functionality. -
Place the following line of script at the end of the current script: Object.registerClass("icons", Custom1); This will register instances of the Icons movie clip (with a Linkage identifier name of "icons") to inherit the functionality of the Custom1 class we just set up. -
Choose Control > Test Movie to test the project to this point. As soon as it begins playing, you'll notice a problem with the way our project is functioning. The four instances of the Icons movie clip haven't seemed to inherit the functionality of Custom1, as we set up. If you press the Go to Scene 2 button, you'll notice that the four instances in that scene have inherited the functionality of the Custom1 class. If you press the Go to Scene 1 button, the instances that weren't functioning properly before are now. If you go back to Scene 2, then back to Scene 1, you'll see that all of the instances are still working. The registerClass() method is not taking effect in Scene 1 when the movie initially plays, but it does in all subsequent scene changes. Let's fix the problem and then discuss why it's occurring. -
Close the test movie to return to the authoring environment. You should return to the Icons movie clip timeline. With the Actions panel open, select Frame 1 and move all of the code you added in the previous steps below the #initclip action but before the #endinitclip action, as shown: #initclip //code added in previous steps #endinitclip These actions are used to enclose what is known as an initialization code block. Before we explain what this is, let's look at how the movie now functions.  -
Choose Control > Test Movie to test the project to this point. As soon as the project begins playing, you'll see that the four instances on the right are now functioning properly: You can press and drop them as scripted. They have all the functionality of the Custom1 class. If you navigate to Scene 2 you can see that the instances on that scene work properly as well. So what happened? In the first test of our movie, the effect of registering the Icons movie clip symbol with the Custom1 class obviously didn't happen with the four instances that were initially loaded when the movie first played. To understand why, you need to look at the flow of how things are occurring when the movie first plays. The following is a breakdown of that flow: Movie (SWF) loads and initializes. Frame 1 loads. Instances on Frame 1 are created (including four instances of Icons clip). Actions on Frame 1 of the main timeline execute. Frame 1 actions on instances execute. (This is where the actions that define Custom1 exist. This is also where the registerClass() method is invoked.) New instances of the Icons movie clip from this point forward have the functionality of the Custom1 class. By examining this flow, we can see that the initial four instances were not functioning properly because they were appearing on the stage (third step in the flow) prior to being registered to Custom1 (fifth step in flow). You'll remember that we mentioned earlier that the effect of registering and unregistering a movie clip with a custom class is not applied to existing instances of the specified movie clip, only new instances placed in your movie. Existing instances retain their current functionality. Because the initial four instances in our movie are created in the third step of the flow, they are considered existing instances by the time the registration process occurs in the fifth step of the flow and thus they didn't work as expected. But what about the instances in Scene 2 of our initial test? They worked as expected because navigating to that scene could be thought of as the seventh step in the flow. Registration had occurred, so the instances in that scene would be affected by it. Navigating back to Scene 1 as we did could be thought of as the eighth step in the flow. Even though we returned to the scene where the initial instances didn't work properly, at the point we returned to the scene, registration had occurred and thus the instances now functioned properly. This explains why our initial test worked the way it did. But how did the actions we added in the previous step solve the problem? In order for the initial four instances to inherit the functionality of Custom1, we needed a mechanism to execute the registration process prior to Frame 1 loading and the instances being created (second and third steps in flow). The #initclip and #endinitclip actions provide us with the means to do this. These are special movie clip-only actions (that is, they can only be used on Frame 1 of a movie clip) that allow you to control the way your movie initializes and thus the order in which actions are executed. Here's how they work. You'll remember that the Icons movie clip in the library was set to "Export in first frame" in the Linkage Properties dialog box (see Step 2 of the exercise). This setting means that the clip will load into memory even before Frame 1. By using #initclip and #endinitclip on Frame 1 of the Icons clip as we have, we're telling Flash to do something extra at that time. We're telling it to execute any script between these two actions. Thus, the script gets executed prior to Frame 1 of the main timeline loading. This changes the flow we discussed earlier to look like this: Movie loads and initializes. Actions between #initclip and #endinitclip are executed. (This is where the actions that define Custom1 exist. This is also where the registerClass() method is invoked, registering instances of the Icons clip to the Custom1 class.) New instances of the Icons movie clip from this point forward have the functionality of the Custom1 class. Frame 1 loads. Instances on frame 1 are created (including four instances of Icons clip) Actions on Frame 1 of the main timeline execute. Frame 1 actions on instances execute (any actions outside of the #initclip and #endinitclip actions). As a result, the registration process now occurs prior (second step in flow) to the instances on Frame 1 being created (fifth step in flow). The registration process is now successful on those initial four instances on Frame 1, as our tests indicated. You don't need to script the creation of a custom class and the registration of a movie clip to that class in the way that we've demonstrated in this exercise it's usually just the most efficient way of doing so. As long as you understand how the way your movie executes scripts affects the registration process, you're free to do as you wish. NOTE All of the components included with Flash use the initialization scheme demonstrated here (using #initclip and #endinitclip ) to achieve their functionality. You would do well to follow this scheme when creating custom components of your own. NOTE If you deselect the "Export in first frame" option on the Linkage Properties dialog box for a clip that contains actions between #initclip and #endinitclip , instead of being executed before Frame 1 of the movie, that code will instead be executed before the frame that contains the first instance of the clip. For example, if the first instance doesn't appear until Frame 47, the code is executed before Frame 47 loads. As a result, the instance(s) on Frame 47 will be properly registered (as just demonstrated). To help you understand how this all works, let's add a couple of final scripts to our project. -
Close the Test movie to return to the authoring environment. Navigate to Scene 1. Choose Window > Library to open the Library panel, and find the HeadClip movie clip symbol in the library. Right-click (or Control-click on a Mac) that symbol and choose Linkage from the menu that appears. When the Linkage Properties dialog box appears, check the Export for ActionScript option and give this clip an identifier name of headClip.  This clip is the clip of the head in the scene. We needed to give it an identifier name so that we could register instances of it to inherit functionality from another simple class we will define next. -
With the Actions panel open, select the Go to Scene 2 button and add the following script within the on(release) event handler just above where it says nextScene(); : _global.Custom2 = function(){ } Custom2.prototype = new MovieClip(); Custom2.prototype.onEnterFrame = function(){ this._rotation += 5; } Object.registerClass("Icons", Custom2); Object.registerClass("HeadClip", Custom2); The first six lines create a new class named Custom2 and set it up so that instances of it will spin 5 degrees with each enterFrame event that occurs. The last two lines register the Icons and HeadClip movie clips with the Custom2 class so that instances of those clips created after the button-press will inherit the functionality of the Custom2 class. Notice we've placed these actions before the nextScene() action: This is to register the clips before moving to the next scene, where instances of these clips (which exist in that scene) are created. If we placed the script after the nextScene() action, its flow would change so that the movie would move to the next scene first, the instances would be created, then the clips would get registered. This means that the instances in that scene would be created prior to registration and thus the registration would have no effect on them initially. By setting it up so that registration occurs before moving to the next scene, registration occurs before the instances in that scene are created and thus they're registered as intended. When the button is pressed and this script is executed, the registration of the Icons clip to the Custom2 class (as shown in Line 7 above) will wipe out its initial association with the Custom1 class (as set up and discussed in the previous exercises). Thus, instances on the Icons clip in Scene 1 will initially have the functionality of the Custom1 class, but once this button is pressed, subsequent instances will have the functionality of Custom2 (in addition to instances of the HeadClip movie clip). This script demonstrates how a custom class can be defined, and that registration can happen anywhere in your movie. As long as you're aware of the flow of how registration occurs, you're free to implement its use just about any way you choose. -
Choose Control > Test Move to test the project up to this point. When the movie plays, the instances to the right of bigHead have the functionality of the Custom1 class. Press the button to navigate to Scene 2, and those instances, as well as the instances of the HeadClip movie clip, now have the functionality of the Custom2 class. You can no longer drag and drop them; they simply spin around, as defined by the Custom2 class. 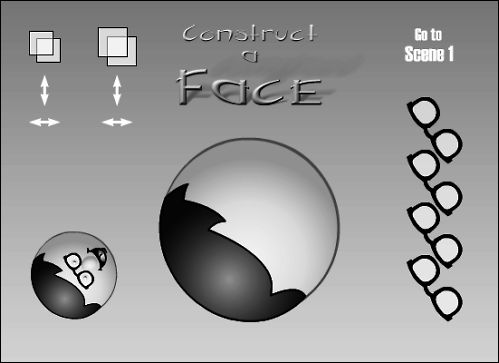 -
Close the test movie and save your work as registerClass2.fla. Believe it or not, this completes this lesson. It's been a long lesson, but you now have a very thorough knowledge of objects, inheritance, classes, subclasses, methods and more. You're well equipped to tackle the development of more complex projects. This understanding will also help you in the remaining lessons in this book. |