| The getTimer() function is used to return (in milliseconds) the length of time that's elapsed since the movie was first opened and played. Thus, if your movie has been open for six seconds, the following script: playBackTime = getTimer(); would assign playBackTime a value of 6000 (1000 for each second). This is an accurate and precise representation of time based on the user's system clock and is not dependent on the movie's frame rate, the user's processor speed, or whether or not the movie is playing. This is also a universal value, which means it represents the playback of the movie as a whole; you cannot track the length of time that individual timelines have been present. By setting a variable's value based on the value returned by the getTimer() function, then comparing that value to the value returned by the function at a later point in time, you can evaluate the amount of time (too much or too little) that's passed within the span and take appropriate action. To better understand this, take a look at the following example: // Place on button A on (release) { startTime = getTimer(); } // Place on button B on (release) { nowTime = getTimer() if (nowTime startTime < 1000) { message.text = "You press buttons pretty quickly"; } else { message.text = "You're pretty slow"; } } Here, the action on one button (button A) establishes a starting point by capturing the time when the button is pressed and released. When button B is pressed and released, the time is captured once again. A conditional statement is then used to determine whether the amount of time between these two button-presses was more or less than a second and then acts accordingly. Similarly, by placing the following script on a single button, you can facilitate double-clicking functionality for that button (that is, the script will only take action if separate clicks occur within a half-second of each other): on (release) { if(getTimer() lastClick < 500) { // Actions } lastClick = getTimer(); } By integrating the getTimer() function with the enterFrame event and some conditional statements, you can create a mechanism that triggers actions at specific times independently of the timeline and with much greater accuracy. Take a look at the following example: onClipEvent (enterFrame) { if (getTimer() > 5000) { // Actions } if (getTimer() > 10000) { // Actions } if (getTimer() > 150000) { // Actions } } This script will trigger actions every five seconds while the movie plays often the most accurate way of executing actions at specific points in time during your movie's playback. In the following exercise, we'll use the getTimer() function to create a timer/alarm. NOTE The getTimer() function can be found under Functions, of the Toolbox list window in the Actions panel.
 -
Open makeMyDay2.fla in the Lesson15/Assets folder. We will continue to build on the project from the last exercise. You'll remember that this file has two scenes, Alarm and Messages. As in the previous exercise, we'll be working solely in the Alarm scene this time focusing on the timer portion of the scene, which is on the right side of the stage. This section of the project contains three text fields at the top-right corner of the stage: minutesToAlarm, secondsToAlarm, and numberOfLoops (from top to bottom). These are input text fields used to set when the alarm should go off as well as how many times the alarm sound will play. Just below these text fields is a Start button, which will be used to start the timer/alarm. Below this button is a movie clip instance named clock, which includes several moving elements (just like a real timer); let's take a look at those. 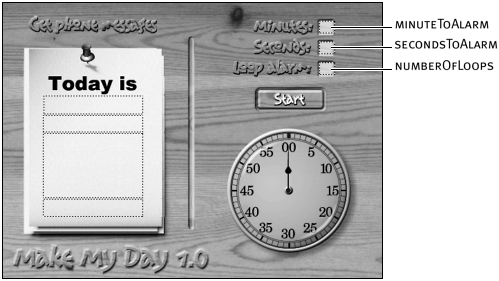 -
Double-click the clock movie clip instance to edit it in place. This timeline contains two layers: The Clock layer contains the main clock graphic, and the Hands layer contains three movie clip instances that represent various indicators on the clock face. One of these movie clip instances, secondHand, represents the clock's second hand, which will rotate, simulating a tick each second the timer is on. Just below this instance is a movie clip instance named minuteHand, which will rotate as well only at one-tenth the speed of the second hand (just as on a real clock). The third movie clip instance appears as a small, red tick mark at the top of the clock. Named alarmHand, this instance will rotate when the timer is started to indicate when the alarm is set to go off.  -
Return to the main timeline. With the Actions panel open, select the Start button and add the following script: on (release) { clock.alarmOn = true; clock.startingTime = getTimer(); } When this button is pressed and released, it will set the value of two variables in the clock movie clip instance. As you will see in a moment, the alarmOn variable being set to true will "turn on" a script attached to that instance. Using the getTimer() function, the startingTime variable's value is set to a numerical value representing the length of time (in milliseconds) that has elapsed since the movie was first opened and played. Capturing the exact time at which the timer was started is critical to making this part of the project work properly we'll explain why in a moment. -
With the Actions panel still open, select the clock movie clip instance and add this script: onClipEvent (enterFrame) { if (alarmOn) { } With the above script, a conditional statement is analyzed every time the enterFrame event occurs. This statement determines whether alarmOn has a value of true . (And you'll remember that in the last step we added an action to the Start button that will set it to true when that button is clicked.) Over the course of the next several steps, we'll add some actions to this statement that will only be executed when that value is true . These actions will move the hands on the timer as well as detect when the alarm should go off. So essentially, clicking the Start button will turn on the timer. -
Add the following line of script within the conditional statement: totalTimeToAlarm = (Number(_root.minutesToAlarm.text) * 60) + Number(_root.secondsToAlarm.text); 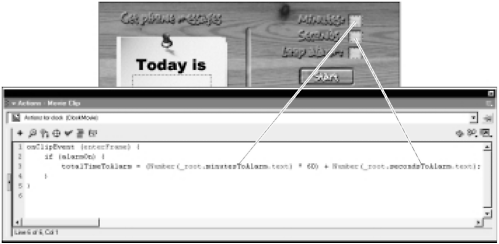 You'll remember that our scene contains one input text field for entering minutes and another for entering seconds: Used together, they determine how much time should elapse before the alarm goes off. The above line of script is used to convert the minutes entered to seconds and then add that figure to the seconds entered to come up with the total time (in seconds) that must elapse before the alarm sounds. Using parentheses in the expression, we've sectioned it off into two parts: (Number(_root.minutesToAlarm.text) * 60) gets added to Number(_root.secondsToAlarm.text) to determine the value of totalTimeToAlarm . We've used the Number function in both parts of the expression to ensure that the values of minutesToAlarm.text and secondsToAlarm.text are treated as numbers (not strings) before any mathematical processes occur. In a moment, you'll see why this is necessary. To understand how this expression works, let's look at an example. Assume the user has entered a value of 5 into the minutesToAlarm text field and 37 into the secondsToAlarm text field. Using these values, the expression would initially look like this: (Number("5") * 60) + Number("37") As you can see, these values are initially recognized as strings which would normally prevent this expression from evaluating properly. By using the Number function, however, the values are converted to numbers so that the expression ends up looking like this: (5 * 60) + 37 NOTE Values from the text property of a text field (as in minutesToAlarm.text ) are always considered string values unless you convert them to numbers as shown. Since there are 60 seconds in a minute, you can get the seconds equivalent of the minutes entered by multiplying the value entered for minutes by 60. In this case, that value comes out to be 300. This value is then added to the actual seconds entered to give a final total of 337 (seconds) which is assigned to totalTimeToAlarm . Eventually our script will compare the number of seconds that have passed since the timer was started with this value. Once the seconds that have passed exceed this value, the script will know it's time to sound the alarm more on this in a bit. TIP Although the timer would work just fine if the value of totalTimeToAlarm was set just once, by placing this line of script within the enterFrame event, we enable the variable's value to be updated 24 times a second (the frame rate of the movie) if necessary. This allows the user to reset the minute and second settings of the timer dynamically that is, while the timer is on and have the value of totalTimeToAlarm be automatically updated, affecting when the alarm will sound. -
Add the following line of script just below the one you added in the last step: secondsElapsed = Math.round((getTimer () - startingTime) / 1000); It's critical that our script track the amount of time that has elapsed since the user clicked the Start button and activated the timer. That's what the above line of script does. Understanding the precedence in this expression, we know that it's evaluated in the following manner: Using the getTimer() function, the current time (which is checked 24 times a second since this line of script is executed using an enterFrame event) is subtracted from the value of startingTime: getTimer() startingTime You'll remember that the value of startingTime is set to the current time at the point when the Start button is clicked. By constantly checking and subtracting the current time from that value, the script can determine how many milliseconds have elapsed between the current time and the time the Start button was pressed. As mentioned, this part of the expression will result in a millisecond value, such as 29349. If you were to divide this value by 1000, as the next part of the expression does: / 1000 you would get a result of 29.349 equal to 29.349 actual seconds. The last part of the expression is used to off round the value: Math.round() In the end, secondsElapsed will be assigned a value of 29. Remember, though, that this value continues to increment as long as the script executes (because the difference between the current time and the time the Start button was pressed continues to increase). Also, since the Math.round() method is used in the expression, its value will increment only in whole numbers (29, 30, 31, and so on). This will provide us with the amount of time that has elapsed accurate to 1/24th of a second, since that's how often the line of script is executed. At this point, we have two variable values that will facilitate the rest of the actions in this script. -
Add the following line of script just below the one you added in the last step: alarmHand._rotation = totalTimeToAlarm / 10; You'll remember that alarmHand is the instance name of the hands (red tick mark) inside the clock movie clip instance that indicate (on the clock's face) when the alarm is set to go off. This line of script is used to set the alarmHand's rotation so that it can perform this functionality. For example, if the alarm is set to go off in 20 minutes, the alarmHand instance needs to be rotated so that the red tick mark in the instance appears at the 20-minute mark on the clock's face. Let's look at how this expression accomplishes that. A full circular rotation is 360 degrees. By breaking this rotation into the 60 points on a clock's face that represent minutes, we can determine that each minute needs to represent a rotation of 6 degrees (6 x 60 = 360). Thus, to rotate the alarmHand movie clip instance to the 20-minute point, it needs to be rotated 120 degrees (6 degrees per minute x 20 minutes). Using the expression that sets the value of totalTimeToAlarm (as shown in Step 5), 20 minutes would be converted to 1200 seconds. Dividing this value by 10, as the expression in this line of script does, results in alarmHand being rotated 120 degrees right to where it needs to be to indicate that the alarm will go off in 20 minutes. 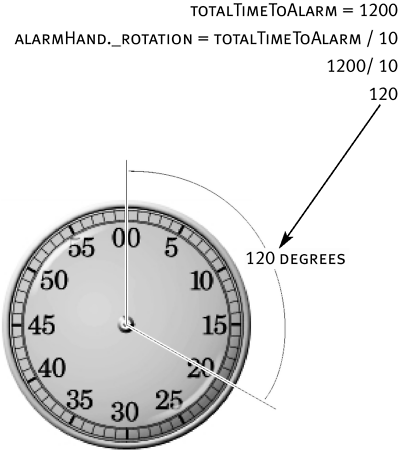 NOTE Since the minute and second values that the user sets can be changed while the timer is on, and this script uses that total time to rotate this instance, changing those values will change its rotation to reflect the updated values. -
Add the following lines of script just below the one you added in the last step: secondHand._rotation = secondsElapsed * 6; minuteHand._rotation = secondsElapsed / 10; These two lines are used to rotate the secondHand and minuteHand movie clip instances, based on the continually updated value of secondsElapsed . The logic that makes this occur is once again based on the fact that a full circular rotation is 360 degrees, and the clock face is split into 60 graduations (both minutes and seconds) of 6 degrees each. For each second that elapses, the second hand needs to move 6 degrees, representing one second. Knowing this, the first action above sets the rotation of the secondHand movie clip instance to the value of secondsElapsed multiplied by 6. Thus, at one second it will be rotated 6 degrees, at two seconds it will be rotated 12 degrees, and so on, making it appear to tick like a real clock. The minute hand functionality requires a slightly different approach. The minute hand on a clock usually rotates at 1/60th the pace of the second hand. For example, if 60 seconds have ticked away, the second hand has made a full rotation. At this point, the minute hand should have rotated just 6 degrees on the clock face, indicating that one minute has passed. Knowing this, the second action above sets the rotation of the minuteHand movie clip instance based on the value of secondsElapsed divided by 10. Thus, if 60 seconds pass, this expression will evaluate to a value of 6, which is the amount minuteHand is rotated. In the end, the secondHand movie clip instance is rotated six times the value of secondsElapsed, while the minuteHand instance is rotated one-tenth that same value. Thus, the minuteHand instance rotates 1/60th as much as the secondHand instance, just like on a real clock. Since the value of secondsElapsed is constantly being updated, both of these hands are in constant motion while the timer (the entire script we've been working on) is "on." -
Add the following conditional statement just below the actions added in the last step: if (secondsElapsed == totalTimeToAlarm) { activateAlarm(); } 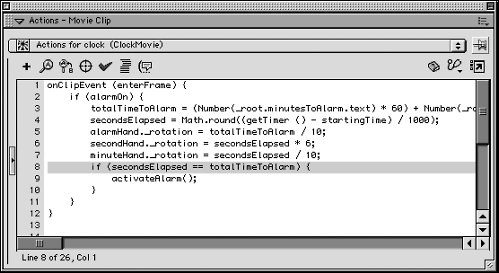 This conditional statement, which is executed 24 times a second like all the other actions in this script, compares the value of secondsElapsed to the value of totalTimeToAlarm . Once they both have the same value (indicating that it's time for the alarm to sound), this statement becomes true and the action within it is executed. The action within the statement calls the activateAlarm() function, causing the action of that function to be executed. This function will be defined next. -
Add the following script just below the current script: onClipEvent (load) { function activateAlarm () { alarmOn = false; secondHand._rotation = 0; minuteHand._rotation = 0; alarmHand._rotation = 0; alarmSound = new Sound(); alarmSound.attachSound("annoying"); alarmSound.start( 0, _root.numberOfLoops.text ); } } 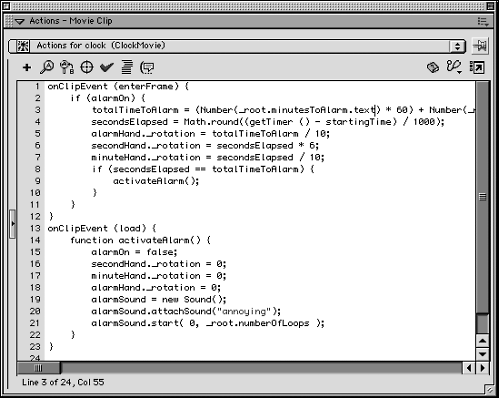 This script defines the activateAlarm() function when the clock movie clip instance (to which this script is attached) is first loaded. The first thing this function does is set the value of alarmOn to false . This will "turn off" the script being executed by the enterFrame event, causing the timer to stop functioning. The next three actions in the function reset the rotation of the various hands on the clock to their starting positions. After that, a Sound object is created and given a name of alarmSound . Obviously, this Sound object represents the alarm sound. The next action attaches the sound in the library named "annoying" to the newly created Sound object. The last action uses the start() method to play that sound. The first parameter determines how many seconds into the sound it should begin to play; the second parameter determines how many times the sound should loop. Because we want the sound to start playing at its beginning, we set the first parameter to 0. The value of the second parameter is set based on what the user inputs into the numberOfLoops text field on the main timeline. -
Choose Control > Test Movie to view the project to this point. When the movie appears, enter values into the appropriate input text fields for the timer, then press the Start button. The various hands on the clock should go into action. When the time the alarm is set to go off is reached, the timer will turn off, its hands will be reset, and the alarm will sound and continue to loop based on the value entered into the numberOfLoops text field. -
Close the test movie and save your project as makeMyDay3.fla. As you've seen in this lesson, the getTimer() function plays a vital role in interactivity that requires an accurate measurement of time in order to function properly. We will continue building on this exercise in the next lesson. |