Connecting to Frequently Accessed Servers and Shares
Although there may be times when connecting to a particular server is a one-time deal, there's a good chance that if you're accessing files from a remote computer, you'll be doing so more than once. In this section I'm going to show you how to take advantage of functionality discussed previously to make repeated connections more convenient.
Using Aliases (iDisk/AFP/SMB/NFS)
I talked about aliases in Chapter 5 as a way to quickly access files and folders, but they're also extremely useful as a way to quickly access iDisks as well as Personal File Sharing, Windows SMB, and Unix NFS shares. Once a share is mounted on your computer (under "Computer" in a Finder window, and on the Desktop if you've chosen to show mounted volumes on the Desktop via Finder preferences), make an alias of the share itself. You can store this alias anywhere on your hard drive, and the next time you want to connect to the share, simply open the alias. You'll be presented with the name/password dialog; enter the appropriate information and the share will be mounted, without having to use the Connect to Server dialog.
If you tend to access the same sub-folder on a remote share, you can actually make an alias to that folder or directory, rather than to the share itself. Double-clicking such an alias will mount the share in the same way, but the sub-folder will automatically be opened for you.
To make things even more convenient, for many servers, you can avoid having to enter your name and password by saving your login information in your Keychain (see Figure 11.5). When you first connect to the share, click the Options… in the name/password dialog and check the "Add Password to Keychain" or "Add to Keychain" box. Your login info will be saved and automatically entered the next time you double-click the alias to the share. (I'll talk more about the Keychain in Chapter 13.)
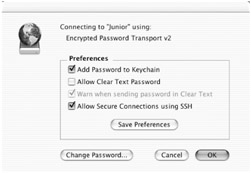
Figure 11.5: Adding your username and password for a remote server to the Keychain
| Tip | You can make aliases to all of your frequently accessed shares and servers and then take advantage of one of the methods for quick file access described in Chapters 5 and the Online Bonus Chapter. For example, put all of these aliases in a single folder, and then drag that folder to the Dock. You'll get instant access to any of your remote shares by control/right-clicking on the folder in the Dock. You can also drag shares (or subdirectories of shares) directly to Finder window toolbars; the new toolbar item will remain even after you unmount it. This saves you the trouble of creating an alias, and a quick click on the toolbar item will mount the share (and, in the case of a subdirectory, open that directory). |
Using Internet Location Files (i.e., Location Files, Part II)
I've mentioned Internet Location files in several places throughout the book. They're OS X's way of creating a "bookmark" for a particular URL. Double-clicking on an Internet Location file opens the enclosed URL appropriately; for example, HTTP Location files are opened in your default web browser. What you may not be aware of is that, like URLs themselves, Internet Location files support many different protocols: an AFP Location file will attempt to mount a File Sharing sharepoint, and an FTP Location file will attempt to connect to an FTP server. If you could create your own Internet Location files, you'd have a great tool for quickly accessing remote computers, right?
Fortunately, Internet Location files are extremely easy to create, but the way to do so isn't completely obvious.
-
Open a text editor such as TextEdit or BBEdit.
-
Type in the complete URL of the server/share you want to access; I've included examples of the most common types below.
-
Highlight the complete URL.
-
Drag the highlighted URL to the Finder (the Desktop or any other folder).
An Internet Location file will be created (Figure 11.6). You can double-click on the file to access the share or server just as if you had opened Connect to Server and typed the URL in manually. In fact, most URLs can also contain a username and password, saving you the trouble of having to enter them each time you connect. You can also rename Location files as you please; it won't affect their ability to connect.

Figure 11.6: Internet Location files for (left to right) an iDisk, an FTP server, and a local Mac running Personal File Sharing
The only downside to Internet Location files is that you can't edit them directly. If you need to change the address or any other information contained in an Internet Location file, you'll have to throw away the original and create a new one. Before you throw it away, drag it into an open text document (which will paste the URL into the document); edit the URL as needed, highlight it, and then drag it to the Finder to create a new Location file.
Location File Formats
Table 11.1 shows the formats for URLs supported by Internet Location files; Table 11.2 indicates how to include username and password info in the Location file. If you can put up with slightly less convenience (having to enter the password manually), for security reasons I generally recommend not including the password.
| Type of Connection | URLs Supported by Internet Location Files |
|---|---|
| iDisk | afp://idisk.mac.com/membername |
| iDisk Public Folder | http://idisk.mac.com/membername/Public |
| Personal File Sharing/AppleShare | afp://serveraddress/ |
| Specific Volumes or Sharepoints via Personal File Sharing | afp://serveraddress/volume or share name (Use %20 in place of spaces in volume or sharepoint names.) |
| Personal File Sharing via Rendezvous | afp://rendezvousname.local (Add /volume or share name to the end to connect to specific volumes or sharepoints.) |
| FTP | ftp://serveraddress |
| FTP (anonymous access) | <ftp://anonymous@serveraddress> |
| NFS exports | <nfs://serveraddress/exportpath> |
| Type of Connection | URLs Modified with Passwords |
|---|---|
| iDisk | <afp://membername:password@idisk.mac.com/membername> |
| iDisk Public Folder | <http://public:password@idisk.mac.com/membername/Public> |
| Personal File Sharing/AppleShare | <afp://username:password@serveraddress/> |
| Specific Volumes or Share Points via Personal File Sharing | <afp://username:password@serveraddress/volume.or.share.name> |
| Personal File Sharing via Rendezvous | <afp://username:password@rendezvousname.local> (Add /volume or share name to the end to connect to specific volumes or sharepoints.) |
| FTP | <ftp://username:password@serveraddress> |
| NFS exports | <nfs://username:password@serveraddress/exportpath> |
| Warning | If you include your username and password in Location files, be sure to store these files somewhere secure—inside the private areas of your user folder—so that other users don't have access to them! |
| Note | Note that in the case of FTP Location files, the default setting in OS X is to use the Finder to connect. If you'd rather use a dedicated FTP client, you'll need to edit the FTP Helper setting using the third-party utility More Internet, as described in Chapter 9. |
Unfortunately, at the time of this writing it's not possible to create an Internet Location file for SMB shares or SFTP connections. However, I suspect that Apple will soon fix this, given how convenient Internet Locations can be. Assuming this bug does get fixed, here are the formats for SMB and SFTP Locations. Note that because SFTP connections first establish a connection, and then send the password securely, you can't include the password in the URL:
smb://serveraddress/share smb://workgroup;username:password@serveraddress/share sftp://serveraddress sftp://username@serveraddress
Once you've created Internet Location files, you can put them in the Dock, in a folder in the Dock, in a menu, or any other place where you have quick access to them. Here are a couple ideas for how to take advantage of them.
Using Location Files with Dock and Custom Menus
In Chapters 5 and its Online Bonus Chapter, I talked about adding custom menus to OS X as a way of quickly accessing files and folders. If you have several remote servers or shares that you access frequently, Dock menus and custom menus can be extremely convenient. You can place all of your Internet Location files in a folder and drag that folder to the Dock, and you have an instant Dock menu that provides one-click access to any server (Figure 11.7). Likewise, if you use one of the many third-party menu utilities, you can add your Location files to their menus for quick access. I personally prefer the freeware iChoose (http://www.luckysoftware.dk/ichoose.php). You can drag Internet Location files into the iChoose preferences pane and they'll be added to your iChoose menu (Figure 11.7). In addition, iChoose lets you add URLs directly (in the formats listed above), without having to create Location files first.
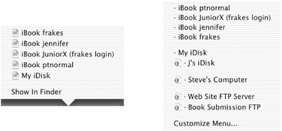
Figure 11.7: Accessing favorite servers via the Dock (left) and iChoose (right)
| Tip | You can also drag Location files to Finder toolbars to provide quick access. |
Using Location Files as Recent Servers and Favorites
If you don't want to clutter your Dock or use a third-party menu, you can use your Internet Location files with Mac OS X's built-in Favorites and Recent Servers features to gain quick access to remote shares.
I mentioned earlier in the chapter that when you access a server via Connect to Server, OS X creates a Location file in ~/Library/Recent Servers, and when you add a server as a Favorite, a Location file is created in ~/Library/Favorites. These files are simply standard Internet Location files. What this means is that by placing Internet Location files that you've created into one of those two directories, they'll show up in the At: pop-up menu in Connect to Server (under Recent Servers or Favorites, respectively). The Recent Servers list shows a maximum of five Locations/servers, but the Favorites listing shows as many servers as there are Location files in the Favorites folder.
| Warning | If you place an Internet Location file in ~/Library/Favorites or ~/Library/Recent Servers, it will show up in the At: menu in Connect to Server not by the name of the Location file, but by the URL contained in it—including any username and password. This isn't too bad when you're using Location files within your own account, but be aware that if someone else has access to your Location files, they could use this trick to view your name and password. |
Automatically Connect to Shares/Servers at Login
If you use a particular remote share or server on a regular basis, you may find yourself connecting to it each time you log in. Under Mac OS 9, when you connected to an AppleShare volume you could choose to have the volume mounted at startup automatically. Although this option is gone in Mac OS X, you can combine Internet Location files with OS X's Login Items to gain similar functionality. Simply drag the Internet Location file for the server or share to which you want to connect into the Login Items pane of System Preferences (preferably at the bottom of the list of login items, so that it's opened last), and the next time you log in the server or share will be mounted automatically.
| Tip | Mac OS X also has the ability to use "auto mount points," which are basically a way to automatically mount shares at startup—meaning that these shares will be available to everyone rather than just an individual user. Unfortunately, Apple hasn't provided an easy interface to create auto mount points. The author of SharePoints, which I've mentioned in several places in the book, has created a useful utility called SharePoints AutoMounter (http://www.hornware.com/sharepointsautomounter/) that lets you do this. If you need to automatically mount shares/servers at startup so that they're available to all users, you should give SharePoints AutoMounter a try. |
|
|