Better Browsing Basics
I've spent most of this chapter helping you get the most out of your network/Internet settings and connections. I'd like to spend the rest of it talking about web browsing, since it's probably the most popular use of the Internet (followed closely by e-mail), yet one of the areas where users generally work the same way they did when they first starting surfing. These tips are fairly general and should work with any web browser.
Surfing with ICeCoffEE
| User Level: | normal or admin |
| Affects: | individual user or computer |
| Terminal: | no |
You surely get a lot of your URLs right from web pages—you see a link and click on it. But how often do you find URLs in e-mail messages, text documents, application "About" boxes, or other sources besides web pages? Probably fairly often. If you're lucky, your e-mail client lets you click on a link to open it in your browser, but some don't. On top of that, what about all those URLs that are in text documents, dialog boxes, and the like?
Mac OS 9 and earlier had a clever third-party extension called ICeTEe that allowed you to command-click on a text URL to open it in your browser. Nicholas Riley has provided the same functionality in OS X via his freeware ICeCoffEE (http://web.sabi.net/nriley/software/). After installing ICeCoffEE and then logging out and back in, you'll be able to command-click on a URL in any Cocoa application to open it in your default web browser (the one selected in Internet preferences). I probably use this feature 20 to 30 times a day! The only drawback is that applications that haven't been updated to use OS X's text engine generally don't work with ICeCoffEE.
An added bonus of ICeCoffEE is that it adds a Services menu—that includes access to all Services, not just ICeCoffEE— to the text contextual menu (the one you get when you control/right-click on text in a Cocoa application). Although you could just as easily highlight some text and then go to the Services menu in the Apple Menu, having it in the contextual menu is a nice feature.
Simple (and Slick) Searching
One of the most frequent activities people do when surfing the Web is to search for things: information on Google, products on eBay, news, software updates… if it exists, someone's trying to find it. Yet the average search goes something like this: go to your web browser, type in the search engine URL (or, if you have the site bookmarked, select the bookmark), type in your search term(s), then wait for the results. It's not too big of a deal, but what if you could just press a key, type in a word or two, and everything else was automatic?
Just as it's true that if something exists, someone's trying to find it, it's also true that no matter how few steps it takes, someone wants fewer. The result is a plethora of "search assistance" utilities that make searching the Web easier. I used to think these utilities were, well, silly…until I found a couple that were both unobtrusive and powerful. These gems are the freeware utilities Searchling (http://web.ics.purdue.edu/~mthole/searchling/) and SearchBar (http://www.pommsoft.com/searchbar/). Both provide floating windows that allow you to search any of a number of search engines or websites. Both also provide a hotkey that automatically brings it to the front for quick searching. Although SearchBar's list of search engines and websites is much more extensive, and it provides quite a few more features than Searchling, I actually prefer Searchling because it's simple and elegant. Searchling exists only in the menu bar. You can either click on its icon, or press command+option+/, and a small text field drops down (Figure 9.5). You can choose the site to search from the pop-up menu to the left (many sites have options you can choose from the menu on the right), enter the text to be searched and hit return, and your web browser is opened to the results of the search.

Figure 9.5: Searchling lets you search many different sites and search engines quickly and easily.
Reading over what I just wrote, it may not seem like a lot of time or effort saved, but it really is. In writing this book I used Google several times each hour to find the URL for a piece of software. The procedure used by Searchling—command+option+/, type a few words, press return— is much faster than the typical search steps. Not to mention better on the hands and wrists.
| Tip | Speaking of search engines, a hidden gem is Google's Mac-specific search: http://www.google.com/mac. |
Browsing the Browsers
At the time of this writing, Mac OS X comes with Microsoft's Internet Explorer pre-installed and selected as the default Web browser. Although Internet Explorer is an excellent browser (and provides the best compatibility with Web sites designed for the Windows version of Internet Explorer), along with the growing popularity of Mac OS X has emerged a growing number of excellent alternatives, including Apple's own Safari. I would be remiss if, in the midst of all the ways I encourage you to get more out of your Mac, I didn't also encourage you to explore alternative Web browsers. There are currently at least seven viable alternatives to Internet Explorer—browsers that you could feasibly switch to for all your browsing. None of them offer the same feature set as Internet Explorer, but they compensate by offering additional features such as tabbed browsing, pop-up ad blocking, and content filtering, to name a few. These browsers are:
-
Camino (formerly Chimera Navigator): http://www.mozilla.org/projects/camino/, free.
-
iCab: http://www.icab.de/, shareware.
-
Mozilla: http://www.mozilla.org/releases/, free.
-
Netscape: http://channels.netscape.com/ns/browsers/, free.
-
OmniWeb: http://www.omnigroup.com/applications/omniweb/download/, commercial.
-
Opera: http://www.opera.com/products/desktop/, commercial.
-
Safari: http://www.apple.com/safari/, free.
My personal favorites are Camino and Safari. Camino is fast, looks great (it uses Mac OS X's Aqua interface and provides such Aqua features as customizable toolbars and transparency), and supports almost every website and plug-in I've come across. In addition, it has some really great features that I find it hard to do without after using them. The first is "tabbed" windows. I tend to open a lot of web pages at once. In Internet Explorer this means opening a lot of different windows; in Camino, each page opens within the same window. Each window gets its own "tab" at the top of the main browser window (Figure 9.6). I have my preferences set so that command-clicking on a link on a web page opens it in a new tab behind the tab I'm currently viewing. Another feature Camino provides is pop-up ad blocking. Since I started using Camino I haven't seen a single pop-up ad! Finally, Camino supports grouped bookmarks. Every morning I invariably visit the same six or seven websites for news and information. I've bookmarked these sites in a "group" bookmark; selecting this bookmark opens each page in its own tab, all at the same time.

Figure 9.6: Tabbed windows in Camino's toolbar
You can customize Camino using some great freeware utilities like SpeedChimera (http://homepage.mac.com/reedm/SpeedChimera.html) and ChimerIcon (http://homepage.mac.com/reinholdpenner) and automatically download and install the latest development version using the excellent CaminoKnight (from the same developer as ChimerIcon). In addition, you can edit the Camino preference files—using SpeedChimera or a text editor—to enable features and tricks such as those found at http://www.efritz.net/chimeratricks.html.
Apple's own Safari is also excellent, and appears to be taking the crown of "browser of choice" for many Mac users. It's fast, stable, has a great—and familiar, if you've used any of Apple's iApps—interface, and by the time you read this should be pre-installed on all new Macs. It also has a few unique features, such as a built-in Google search system, the best bookmarks system of any browser, and built-in Rendezvous support—local Macs with Personal Web Sharing enabled (see Chapter 10 for more info on Personal Web Sharing) will show up in Safari's Rendezvous list as Rendezvous bookmarks. In addition, Apple has worked hard at making Safari as compatible as Internet Explorer so that we Mac users don't have to feel like second-class citizens when trying to access online banking and other Windows-oriented web services.
Like Camino, Safari is also quite customizable, with over 50 utilities for Safari available at the time of this writing, and more being released each week. Browse over to http://www.versiontracker.com/macosx/ or http://www.macupdate.com/ and do a search for "safari" and you'll get more results than you know what to do with. In addition, Apple has provided a number of Safari-enhancing AppleScripts at http://www.apple.com/applescript/safari/.
| Tip | To see a list of Safari's keyboard shortcuts (there are lots of them), control/right-click on the Safari icon, and then select Show Package Contents from the resulting menu. Navigate to /Contents/Resources/English.lproj/Shortcuts.html. Drag this file onto the Safari icon in the Finder or the Dock to open it in Safari; to keep it handy, add it to your Safari bookmarks. (What you're actually doing is creating a link to one of the Safari Help files, but this bookmark is much faster than launching Help just to view keyboard shortcuts.) |
But don't take my word for it; download a few of these browsers and give them a try; they're each unique in their own way, and all of them give Internet Explorer a run for its money. Even better, whereas Internet Explorer is lucky to get an update every six months, most of these alternative browsers are updated quite regularly—some weekly or even nightly!
Location Files, Part I
If you've ever downloaded software (freeware, shareware, etc.), chances are you've seen a file that says "Visit the website!" or something like that. Double-clicking that file opens the company's website in your Web browser. This is a nice trick for the software developer, but these kinds of files, called Internet Location files, are easy to create and use yourself. (Although the names are similar, don't confuse location files with network Locations, discussed earlier in the chapter.)
You can create a Location file several ways. The first is to drag a link/URL from a page in your web browser to the Finder (the Desktop, a folder, etc.). A Location file will be created that, when opened, will point your browser to that URL. This is a simple way to create a Location file for a site you haven't yet visited. The second method is to select the URL of the current page in your browser's address bar, and then drag it to the Finder. This is the easiest way to create a Location file for a page you are currently viewing.
| Note | Unfortunately, when you drag a link from a web page in Microsoft's Internet Explorer, Explorer downloads the text of the link's web page, rather than creating a location file. To create a location file, you need to control/right-click on the link, select Copy Link to Clipboard, and paste the URL into an application like TextEdit; you can then drag the URL to the Finder to create a Location file, as described below. |
The third way is to highlight a URL in almost any text field—a text editor, an e-mail client, a word processor, a text field in a browser window—then drag that highlighted text to the Finder. OS X will automatically create a Location file for you. This is a great way to create a Location file when you find a URL in a ReadMe file or an e-mail message that you want to look at later. (Sadly, this won't work in Microsoft Word, since Word uses its own text engine that doesn't fully support OS X's drag-and-drop functionality.)
| Tip | If you frequently visit a website that requires a username and password to access—not sites that have "account logins" on the web page itself, but rather those that present a password dialog before you can even get to the website—you can actually include your username and password in a Location file. Open TextEdit and type the URL in the following format: http://username:password@domain, where username and password are the login name and password for the site, and domain is the URL you would normally use to access the site (minus the http://, which is already included). Highlight the entire URL and drag it to the Finder to create a new Location file that automatically provides your password information to the Web server. |
I use Location files all the time when I see a web site or page that I want to come back to later, but I don't want to add to my browser's "permanent" bookmarks (e.g., a news article, an interesting site), or when someone sends me a URL to check out. I simply create a Location file on the Desktop, and it serves as both a temporary bookmark and as a reminder to go back and look at the website. However, you can also use Location files as an alternative to your browser's bookmarks/favorites. I'll talk about why you might want to do that in the next section. In case you're wondering, Location Files, Part II is located in Chapter 11—you can quickly access file servers and remove volumes using them.
Better Bookmarks (a.k.a. Finer Favorites)
You probably use your web browser's bookmarks or favorites feature to bookmark sites that you visit often, or to keep track of sites that you want to come back to later. However, you may not know that there are other ways to manage URLs besides the functionality built into your web browser. Why wouldn't you want to use your browser's built-in abilities? One reason is that third-party bookmark utilities provide a lot more functionality. The other is that you may want to be able to access your bookmarks no matter what browser you use—if you can use your bookmarks from within any browser, you're no longer tied to using a single one for fear of "losing" all those sites you've collected over the years.
Favorites from the Finder (and Dock)
The simplest way to have a universal set of bookmarks is to use Internet Location files as described in the previous section. Create a folder in the Finder and call it Bookmarks or Favorites, and create and/or place Location files inside. If you drag this folder to the Dock, as I showed you in Chapter 5, you can quickly access its contents—in this case, bookmarks to your favorite websites—by control/right-clicking on the folder in the Dock (Figure 9.7), and then selecting a Location file. You can even arrange your Location files into subfolders. (You can choose which browser will open Web Location files using the web tab of Internet preferences; in addition, most browsers also let you open Web Location files by dragging the files onto their icon in the Dock or into any open browser window.)

Figure 9.7: A homemade menu of bookmarks/favorites in the Dock
Managing Bookmarks Using URL Manager Pro
Although using location files in the Dock is quick and convenient, it doesn't offer a lot of functionality. If you're a heavy user of bookmarks/favorites, and especially if you tend to use several different browsers, your new best (browsing) friend is going to be URL Manager Pro (http://www.url-manager.com/)—UMP for short. UMP lets you use any number of bookmark files, and lets you access those bookmarks from within any application using its Dock menu (Figure 9.8). Selecting a URL from a bookmark file opens it in the web browser you've selected in Internet preferences. (If you have multiple bookmark files, you can also open them from the Cabinet submenu.) Even better, you can add a bookmark from within any browser via the Dock menu; you can even add a note to the bookmark when you save it—I use this on URLs that aren't very descriptive to help me remember what the site is. (A nice touch is that you can place the bookmark directly into a sub-folder of your bookmarks file by selecting the Add Bookmark item inside the sub-folder—a feature not available in most browsers.) You can even keep e-mail addresses in your UMP bookmark file; selecting an e-mail bookmark opens a new outgoing e-mail message, addressed to the chosen e-mail address, in your e-mail client.
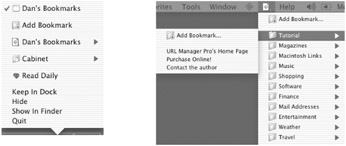
Figure 9.8: URL Manager Pro's Dock (left) and menu bar (right) menus
In addition to its Dock menu, UMP supports what it calls shared menus in Internet Explorer, Netscape, Camino, OmniWeb, Opera, and iCab, as well as in most e-mail clients. These shared menus appear in the menu bar when a browser is active (or when any Internet-related application is active, if you prefer), and provide quick access to UMP's features, as well as to any of your UMP bookmark files (Figure 9.8). The great thing about these shared menus is that selecting a Web bookmark from within a browser using UMP's shared menus will open that Web page in the current browser, regardless of which browser is your preferred selection in Internet preferences.
If being able to use the same bookmarks in all your browsers isn't enough, UMP also offers some great bookmark management tools. You can import bookmarks from your existing browser's bookmarks/favorites, and you can export your UMP bookmarks to text, HTML, or location files. You can upload your bookmarks file(s) to an FTP site so that you can access it from multiple computers. You can sort bookmarks in a number of different ways, eliminate duplicate bookmarks, search bookmark URLs, titles, and notes…the list goes on and on. If you're a web addict, URL Manager Pro is one of the most useful utilities you can find.
Synchronizing (Bookmarks) Succinctly
So what if you're not as bonkers for bookmarks as I am, and you don't need something like URL Manager Pro? What if you just wish you could consolidate or synchronize your bookmarks/favorites between browsers? The shareware Bookit (http://www.everydaysoftware.net/bookit/) is the answer for you. When you run Bookit, it asks you which browsers' bookmarks you want to synchronize (it supports Camino/Chimera, iCab, Internet Explorer, Mozilla, Netscape, OmniWeb, Opera, and Safari), and which is your default/preferred browser. It then opens a window with your default browser's bookmarks in the main window—this will become your "universal" bookmarks file—and a list to the right of any bookmarks found in your other browsers that don't exist in your default browser's bookmarks (Figure 9.9). Clicking on a bookmark on the right shows you the full URL, as well as which bookmarks/favorites file it comes from; drag it to the main window to add it to your main bookmarks file. (You can also create new folders, rearrange bookmarks and folders, and perform other organizational tasks on your main bookmarks file.)
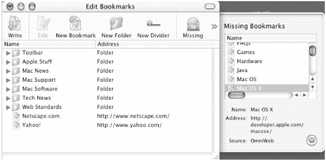
Figure 9.9: Bookit lets you synchronize the bookmarks of all your browsers.
Once you're done consolidating and organizing all your browsers' bookmarks, click the Write… button; you'll be asked which browser(s) you want to use this new master bookmarks file. Bookit will then create a new, updated bookmarks/favorites file for each of the browsers you select. You can also choose to write a Bookit file to be used by the Bookit Dockling or menu; the Dockling and menu let you access your master bookmarks file at any time from the Dock or the menu bar, respectively.
The only downside to Bookit is that it doesn't automatically consolidate all your bookmarks/favorites; you have to run it periodically and repeat the process described above. However, it allows you to use your browsers' bookmarks/favorites, instead of a third-party bookmark utility, which some users find more convenient. If you don't care about the extra features of something like URL Manager Pro, Bookit may serve your needs just fine.
Preventing Pop-Ups (Pop-Up Ads, That Is)
| User Level: | any |
| Affects: | individual user |
| Terminal: | no |
I mentioned earlier that many of the web browsers available for Mac OS X have pop-up advertisement blocking built in. However, the browser used by more Mac users than any other (at least at the time of this writing), Internet Explorer, does not. When using Internet Explorer, you're at the mercy of web advertising. To make matters worse, both advertisers and legitimate website content take advantage of pop-up windows, so the solution isn't as simple as being able to "turn off" pop-ups.
Fortunately, there are a couple of good utilities on the market designed specifically for blocking pop-up ads in Internet Explorer. Unpopular (http://www.rampellsoft.com/) and Pop-Up Zapper (http://www.batista.org/) both prevent pop-up ads from, well, popping up. In addition, they both offer varying levels of anti-pop-up protection, since some sites may use pop-up windows that you want to see. You can also customize both by choosing particular sites to block or allow pop-up windows. Finally, both utilities allow you to turn them off temporarily in case you want to allow all pop-ups.
The main difference between the two utilities is in how they decide what not to block. Pop-Up Zapper tries to block every pop-up window unless you specifically tell it to allow them from certain domains or sites. Unpopular, on the other hand, uses a database of known sites, updated regularly by the developers, to decide what to allow and prevent. Using feedback from users, the developers have created a list of "desired" pop-up sites (such as polls on the CNN website) and "undesired" sites, and Unpopular periodically updates its preferences by accessing this database. As a user, you can contribute to the database yourself using Unpopular's reporting feature.
Getting Your Internet Explorer Windows Back to Size
| User Level: | any |
| Affects: | individual user |
| Terminal: | no |
In addition to the annoyance of pop-up ads themselves, another problem with ads (and even some legitimate sites) is that they resize your browser windows, and, at least in the case of Internet Explorer, the new (undesired) window size sticks. You end up having to manually resize your browser back to your preferred size. (The reason I single out Internet Explorer here is that many other web browsers remember your preferred window size when a website or pop-up ad resizes the browser window.)
If you find this as annoying as I do, here's a trick that will save you some mousing about. In Explorer, choose Favorites ➣ Organize Favorites ➣ New Favorite. Name it something like Restore Window Size, and in the Address field, type javascript:window.resizeTo(880,600). (The first number is the width of your preferred window size in pixels; the second is the height. Adjust the numbers to your preference.) Click OK and the new Favorite is created. Whenever your Explorer window gets resized, select this new Favorite from Explorer's Favorites menu, and the window will be restored to your preferred size.
Setting Up Servers
| User Level: | admin |
| Affects: | computer |
| Terminal: | possibly |
Before we move on, I want to squeeze in a few quick notes about setting up more advanced Internet services on your Mac. In the next chapter I'll talk about setting up web and file servers; however, you should be aware that in addition to being a great desktop operating system, Mac OS X is also an industrial-strength server platform. It comes with built-in web, mail, FTP, file, Telnet, SSH, and print servers. By activating these, or installing alternatives, you can turn your Mac into a real Internet powerhouse. Here are just a few articles and web resources that can get you started:
-
Email Servers and Mac OS X (http://www.stepwise.com/Articles/Workbench/eart.index.html): an excellent site with information on replacing OS X's built-in sendmail server with the more secure—and generally more well-respected—postfix mail server.
-
Homemade Dot-Mac with OS X (http://www.macdevcenter.com/pub/a/mac/2002/08/09/homemade_dotmac.html): a tutorial for setting your Mac up to provide many of the same services available through Apple's .Mac service.
-
Serving iCal Calendars Using WebDAV (http://www.macdevcenter.com/pub/a/mac/2002/09/20/ical_webdav.html): a tutorial on how to set up a WebDAV server using OS X's built-in Apache web server. You can find out more about WebDAV from http://www.webdav.org/, but the quick "Why would I want it?" explanation is that with WebDAV enabled on your Mac, you can host your own iCal calendar without having to sign up for Apple's .Mac service.
|
|
- Chapter VI Web Site Quality and Usability in E-Commerce
- Chapter VIII Personalization Systems and Their Deployment as Web Site Interface Design Decisions
- Chapter X Converting Browsers to Buyers: Key Considerations in Designing Business-to-Consumer Web Sites
- Chapter XII Web Design and E-Commerce
- Chapter XVII Internet Markets and E-Loyalty