Customizing the Boot Panel
The boot panel is the white and gray striped box with the blue Apple logo that appears at startup; you see it in between the initial grey Apple screen and the login screen. As it is displayed, you also see text that indicates the various system services that are being loaded. This is all well and good, but many users really don't care; they'd rather have a screen that illustrates their individuality (these are the same people that changed their startup screen under OS 9). It turns out that you can change both the image used for the boot panel, and the text displayed during boot (called the boot strings).
Changing the Boot Panel Image
There are two ways to change the boot panel image. You can either change it manually, or you can use one of several third-party utilities. But first you need to find or make a boot panel image. If you're the creative type, you can make your own in any photo or graphics application. The size of the image should be approximately 350 pixels wide by 265 pixels high (and you should make sure that you leave room in the bottom half of your image for the progress bar and boot strings). Your new image should be in PDF format (if your graphics application cannot save as a PDF file, you can use OS X's Preview application to convert your image to PDF). Or, if you want to take advantage of one of the many replacement boot panels already out there, check out http://www.resexcellence.com/user_X_boot.shtml. Once you've got your new boot panel image, you can choose how to install it.
| Note | Changing the boot panel only changes it for the specific Mac OS X volume on which you make the change. If you have multiple Mac OS X volumes and want a custom boot panel on each of them, you'll need to follow the procedures below for each volume. |
Changing the Boot Panel Image Manually
| User level: | admin/root |
| Affects: | all users |
| Terminal: | optional |
The default boot panel image is located in /System/Library/CoreServices/SystemStarter/ QuartzDisplay.bundle/Resources/BootPanel.pdf. In order to replace it with your new boot panel image, you'll need to use sudo in Terminal or launch a utility like File Buddy as root (as discussed in Chapter 1). I'm going to use Terminal below, but you can use File Buddy to copy and move files as we did in Chapter 2.
-
Rename your new boot panel image BootPanel.pdf .
-
Launch Terminal and back up the default boot panel image to your Desktop:
cp /System/Library/CoreServices/SystemStarter/QuartzDisplay.bundle /Resources/BootPanel.pdf ~/Desktop/BootPanelBackup.pdf <RETURN>
 (There are two spaces in that line: one after the cp command, and one between the first .pdf and ~.)
-
Using the path to your new boot panel image, copy it to the location of the original image; since the location to which you're copying it is located in /System, you need to use the sudo command:
sudo cp NewImagePath /System/Library/CoreServices/SystemStarter /QuartzDisplay.bundle/Resources/BootPanel.pdf
 (There are three spaces in that line: after sudo, after cp, and after NewImagePath.)
You will be asked for your account password for the copy to proceed. It will automatically replace the original (which is why we made a backup in Step 1).
-
Restart your Mac to see the new boot panel image (see the example in Figure 3.3).
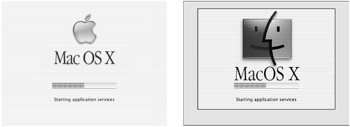
Figure 3.3: The default (left) boot panel image, and a custom image (right)
Changing the Boot Panel Using Visage
| User level: | admin |
| Affects: | all users |
| Terminal: | no |
Although the previous procedure is fairly simply, an even easier way to change your boot panel image is using Sanity Software's shareware Visage (http://www.stanford.edu/~keaka/). As a preference pane, you need to copy Visage to the appropriate /Library/PreferencePanes folder as discussed in the previous chapter. Once installed, Visage provides a graphical interface to changing the boot panel image, as well as changing many other boot and login characteristics. I'll discuss this excellent utility more in the next section when I talk about changing the boot strings, and later in the chapter when I talk about customizing the login process.
| Warning | In addition to modifying the boot panel, it is possible to customize the boot image, the grey Apple logo on a grey background that you see immediately after pressing the power button (before you see the boot panel). However, to do this you must actually modify the BootX utility described at the beginning of this chapter. I do not recommend doing this, as any mistake or file corruption could render your Mac dead in the water, necessitating a full reinstall of Mac OS X. However, if you're feeling brave and want to try this on your own, you can check out (http://www.ryandesign.com/jagboot/) for a detailed tutorial on how to modify the boot image. The website also provides a utility, StartupSyringe, that will automate the process for you, and another similar utility, MacBoot, is available from http://ittpoi.com/cci.html. Hello Jaguar (http://www.fishbacksw.com/), does the same thing except that it replaces the gray Apple logo with the old Happy Mac image from earlier versions of the Mac OS. |
Customizing the Boot Strings
| User level: | admin |
| Affects: | all users |
| Terminal: | no |
In addition to changing the boot panel image, you can also modify the boot strings, which are the bits of text that appear in the boot panel as services are started (e.g., "Starting Apache web server," "Starting Core Services," and "Starting NetInfo"). Why would you want to change these strings? I can think of two reasons: first, because it can be fun to have your own little snippets of text appear; second, because you can use this functionality to identify your computer should it ever be stolen or lost. I'm going to use the latter as the basis for the following tutorial.
If you have a PowerBook or iBook, you've probably been concerned at some point about it getting stolen or lost—I know I have. When I was running Mac OS 9, I would create a custom startup screen that contained my name, phone number, and e-mail address so that anyone starting up my laptop would immediately see who owned it. Under OS X, I can use the boot strings to accomplish the same thing. I simply change the boot strings from their default state to the text strings that I want to appear at startup. I use Visage, discussed in the previous section.
-
Launch System Preferences and select the Visage pane.
-
Click on the Boot Strings tab.
-
Click the padlock button at the bottom of the window to authenticate using your admin username and password.
-
In the boot strings window, double-click on a boot string to edit it; when you're finished, hit return, or press the tab key to move to the next string.
-
Restart to view your new and improved boot strings!
| Tip | Since the boot strings go by incredibly fast during the boot process, you'll want to use multiple boot strings for each line of info you want to be readable at startup. I chose to show just two bits of info—my name and my e-mail address—so I put my name in half of the boot strings, and my e-mail address in the other half (Figure 3.4). |
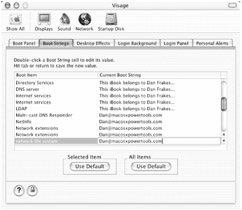
You could even use a picture of yourself (using the previous tip on replacing the boot panel image) to have a completely customized boot panel that identifies you and tells anyone using your laptop how to contact you. If you ever change your mind and want to go back to the default boot strings, simply click the Use Default buttons: the Selected Item button returns the current boot string to its default value and the All Items button returns all boot strings to their default values.
|
|