Disk Drive Diligence
Today's hard drives are marvels of technology. They store upwards of billions of bits of data on tiny magnetic sectors, and spin as much as 24 hours a day, and yet the vast majority of time they work problem-free and last for years. Unfortunately, things can and do go wrong, but even then there are things you can do to keep your drives running well, and to fix them when they don't.
| Note | There are a number of third-party hard drive repair and maintenance utilities available for OS X; the truth is that it can get pretty confusing which ones do what. In the discussion that follows, you'll get a good idea of the features and abilities of each. I don't have the space to give you a how-to or walk-through of each, but by giving you a taste of which utilities to consider for particular uses, you'll be better able to decide which you might want to purchase for yourself. Note that almost all disk utilities currently available for OS X are incompatible with the UFS volume format. (HFS Plus is the default for Macs, but UFS is an option if you manually reformat a volume.) |
| Warning | Before you perform any sort of repair or maintenance on your hard drive(s), you should make sure you've backed up any important data. It's rare that a repair will actually cause you to lose data, but it's possible. I hope you back up regularly and this isn't an issue…you do back up regularly, right? (This is just the first of many nagging lectures about backing up your important data that I'll be giving you in this chapter.) |
Doctoring Disk Directories
When you stop to think about it, your hard drive is a pretty amazing thing; you have hundreds of thousands of files stored on it, yet you can access any of them at a moment's notice. This ability to store and access files quickly is provided by your drive's directory. The directory is like a card catalog or computer database at the library—the books are spread all over the building, but the catalog/database exists in a central location and lets you quickly figure out where each book is actually located. Your disk directory works similarly: it keeps track of where every file is located on your hard drive (specifically, the exact blocks—tiny storage spaces on the drive's magnetic platters—where all of the file's data are stored), so that your hard drive's read/write heads can access them on command. (I hope I didn't date myself too much by using the term "card catalog" there.)
Although the disk directory generally works well, it isn't foolproof. Just like the old card catalogs could sometimes fall victim to lost cards, or books wouldn't actually be where the catalog said they'd be, disk directories can develop errors and corruption so that files (or parts of files) aren't where the directory says they should be. (Or, even worse, files are listed in the directory that no longer exist, and vice versa.) The worst cases of directory problems can result in lost data or even a computer that refuses to boot. Lesser instances can manifest themselves in sluggish system performance or problems opening applications or documents.
If you're experiencing problems with your computer that can't be traced to a bad preference file or that affects all users, your first step should be to verify and/or repair your drive directory. However, minor directory corruption (which can eventually lead to bigger problems) often exhibits no symptoms at all, so you may never know you have it until you have it bad. So even if you aren't experiencing problems, I recommend periodically running the same procedures as routine maintenance—this will often catch minor problems before they can affect anything seriously. You can verify and repair your existing directory using tools provided with OS X, or you can rebuild your directory from scratch using third-party software.
| Note | Each hard drive, drive partition, or other volume has its own directory. If you have multiple volumes, you'll have to check and/or repair the directory on each separately. |
Note that if you're experiencing problems due to corrupt files or applications, rebuilding the disk directory won't do you any good. The only solution is to reinstall the application, or restore the file from a backup. (You do have a backup, don't you?)
Apple's Disk Utility
| User Level: | admin or any (see note below) |
| Affects: | computer |
| Terminal: | no |
Apple's officially supported method for verifying and repairing disk directories is to use Disk Utility's Verify Disk and Repair Disk functions. I talked about Disk Utility in Chapter 7, but as a refresher, launch Disk Utility, select the First Aid tab, select the desired volume on the left, and then click Verify Disk (to check the directory) or Repair Disk (to repair the directory). I generally just use the Repair Disk button, since it takes about the same amount of time as Verify, and if something's wrong I want it fixed. What the Verify/Repair function of Disk Utility does is examine your hard drive to see whether or not what's on the drive matches what the directory actually says is on the drive. If there are any discrepancies, it edits the directory accordingly.
The main drawback to using Disk Utility is that you can't use it to verify or repair the directory of the volume from which OS X is booted. (This is actually true of most disk repair utilities.) In other words, to repair the startup drive, you either need to boot from another OS X volume and then run Disk Utility, or you need to use the OS X Installer CD or DVD. To use the Installer CD or DVD, place the disc in your optical drive, restart your Mac, and hold the C key down as your computer reboots. You'll eventually see the OS X Installer screen. Select Disk Utility from the Installer menu, and then choose your normal startup volume to repair it.
| Note | You need admin access to use Disk Utility when booted into OS X. However, any user who can reboot your Mac can use Disk Utility from the OS X Installer CD/DVD. |
It's possible to run the same diagnostic and repair routines used by Disk Utility using single-user mode and fsck at startup; I'll show you how next.
Disk Utility at Startup: fsck
| User Level: | any user who can restart |
| Affects: | computer |
| Terminal: | yes |
If you don't have your OS X Install disc handy and need to verify or repair your boot volume (for routine maintenance or because you're having problems that actually prevent you from booting into OS X at all), you can boot into single-user mode and run OS X's fsck (file system consistency check) utility from the command line.
| Note | The fsck utility is automatically run after a system crash under OS X 10.2 and later (which is why there is a long delay after a system crash before you see the familiar boot panel). |
As I discussed in Chapter 3, if you hold down command+S as your Mac boots, you'll eventually see a command-line interface; this is called single-user mode. If you then type /sbin/fsck -y <RETURN>, you'll invoke the fsck utility, which, according to Apple, runs the exact same diagnosis and repair routines Disk Utility uses. (The -y option tells fsck to automatically answer "yes" to any suggested repairs; you should always include this option.) You'll see some lines of text as the utility checks various aspects of your drive's directory.
When fsck is finished, you'll see one of two messages. If you're told that your volume "appears to be OK," your drive is in good shape. However, if you see the message "FILE SYSTEM WAS MODIFIED," that means that fsck found problems and attempted to repair them. In this case, you actually need to run fsck again, using the same command as above. The reason is that larger problems can sometimes conceal smaller problems, and vice versa. Once a problem is fixed, you want to check the disk again to make sure there aren't any other lingering issues. Repeat the procedure until you get the message that everything is OK. When you're done, type exit <RETURN> and your Mac will continue booting normally.
| Note | By default, fsck verifies and repairs only the boot volume (the one chosen in the Startup Disk preferences pane prior to the last restart or shutdown). This is by design, since you can easily verify and repair non-boot volumes using Disk Utility when booted into OS X. |
| Tip | Because I keep my Mac running all the time (I put it to sleep when I'm not using it, instead of shutting it down—Apple's recommended approach), I rarely restart. When I do restart, I almost always run fsck at startup as routine maintenance. It only takes an extra minute or two, and it helps keep the directory on my boot volume healthy. |
| Warning | If after several runs, fsck reports the same exact error each time, the problem may be too severe for fsck to fix. You may need to use a third-party disk utility, such as one of those discussed in the next section, to repair or rebuild your directory. |
Third-Party Directory Repair/Rebuilding
| User Level: | depends on the utility |
| Affects: | computer |
| Terminal: | no |
Disk Utility and its command-line counterpart fsck are powerful utilities, and many users may never have a need for anything else; however, there are limits to what they can do. For example, there are times when a disk's directory is so badly damaged that it can no longer be repaired. (This is generally what happens when Disk Utility tells you it cannot repair a problem, or when fsck repeats the same error over and over.) In these situations, what you really need to do is discard your existing directory and build a new one from scratch. Although Apple's built-in tools can't do this, several commercial third-party utilities can.
Alsoft's DiskWarrior (http://www.alsoft.com/DiskWarrior/index.html), Micromat's Drive 10 and TechTool Pro 4 (http://www.micromat.com/), and Symantec's Norton Utilities (http://www.symantec.com/nu/nu_mac/index.html) all provide some way of replacing your existing (and assumed to be problematic) directory with a new one. Norton Utilities will rebuild parts of the directory, which is better than trying to repair it if there are significant problems, but Drive 10, TechTool Pro 4, and DiskWarrior will completely rebuild the directory from the ground up (or from the disk up, so to speak). (In practice, Drive 10 and TechTool Pro 4 will only create a completely new directory if absolutely necessary; otherwise they will repair or rebuild just those parts of the directory that need it. DiskWarrior, on the other hand, always builds a new directory—that's its forte.)
Which should you use? In this particular situation, I'm a big fan of DiskWarrior, mainly because it appears to do the most complete and comprehensive job at rebuilding disk directories—it even lets you compare the contents of the original directory with the new directory, including any file differences, before replacing the original directory. Alsoft also claims that DiskWarrior optimizes the directory so that it is more efficient than the directories repaired or created by other utilities. In my own experience, I've seen DiskWarrior save data on a drive that was given up for dead—it was able to recreate a usable directory where no other utility could. If there's a criticism of DiskWarrior, it's that it only rebuilds disk directories, whereas the other utilities mentioned in this section also have substantial additional functionality (which I'll talk about later in the chapter); however, DiskWarrior is so good at what it does that it's worth buying DiskWarrior and something else if you want those other features.
| Tip | Just to be on the safe side, I boot from the DiskWarrior CD (or from another bootable volume) about once a month and rebuild the directories on all of my mounted volumes, but especially my regular boot volume. |
Recovering Files
| User Level: | depends on the utility |
| Affects: | computer |
| Terminal: | no |
Repairing your disk directories is all fine and dandy, but what if you've actually lost data? For those situations you need a utility that can access your drive's data directly and recover files. If your hard drive ever develops problems serious enough to cause you to lose files and data, you're probably going to want to get them back, and it's best to have the tools you'll need for such a recovery beforehand. (Although, of course, a good backup strategy will help you avoid such situations entirely.)
The first thing to note is that unless your hard drive actually fails (breaks), data is rarely actually lost. It's often right there on your hard drive, but either your directory is damaged, or the file(s) have been deleted from the directory but not overwritten/erased (as explained in Chapter 13 when I discussed secure deletion of files). In the first case, fixing the directory as explained above may "find" the data, or you may need a utility that actually scours your drive to recover lost files. In the second case, a utility that recovers deleted files may be able to help; I discuss a few of those utilities in the next section.
Data Rescue X from Prosoft (http://www.prosoftengineering.com/products/data_rescue.php), TechTool Pro 4, and Norton Utilities all provide file recovery functionality. TechTool Pro and Norton Utilities use a method whereby they back up your disk directories at user-specified intervals. If you lose a file due to drive or directory problems, they can reference one of these past directories; if a file has not been overwritten, they can rescue the file for you. (This is similar to OS X's journaling feature; see the sidebar "Journaling: Your Drive's Personal Diary" for details.)
Beginning with OS X 10.2.2, Apple included support in OS X for a new hard drive filesystem feature called journaling. The purpose of journaling, to paraphrase Apple, is to protect the integrity of your disk's filesystem; it helps prevent your disk from getting into an inconsistent state, and expedites disk repairs if your system fails.
When journaling is enabled, any change made to your hard drive (a file saved, a file deleted, a file moved, etc.) is recorded in a…well, a journal. The information in this journal includes the time of each change and the actual changes made. (The journal doesn't keep track of each change forever. Once the journal reaches an upper size limit, new change records bump the oldest records out.)
The benefit of journaling is realized when your Mac crashes or, for whatever reason, you need to force a reboot. Normally, when your Mac shuts down, it cleans up after itself, including writing any cached data to disk and verifying disk directories. A crash or forced reboot often doesn't allow these cleanup tasks to occur, so OS X tediously checks your boot drive—the entire thing—at the next startup for file and directory inconsistencies and other problems. With journaling enabled, your Mac can use the journal to restore the drive to a state that was known to be healthy. In addition, because your computer uses the journal to see which particular parts of the hard drive were most vulnerable to problems (those most recently accessed), it can concentrate on those at startup, instead of wasting time on sectors that haven't been accessed in months; the obvious additional benefit is much faster reboot times. (You can read more about journaling at http://docs.info.apple.com/article.html?artnum=107249.)
If the benefits of journaling don't seem to be very enticing to you, keep in mind that journaling was developed mainly for servers—computers with very large hard drives where data integrity is paramount and which can't afford to be offline for long periods of time. In fact, at the time of this writing, journaling was only officially supported on Mac OS X Server, not the client version of OS X (the version that ships with most Macs). If you open Disk Utility on Mac OS X Server, there is a simple option to turn journaling on and off; this option doesn't appear when you launch Disk Utility on a non-Server version of OS X.
That being said, remember when I told you earlier in the book that OS X and OS X Server are basically identical under the hood? That holds true here, as well, and journaling is also part of the standard version of OS X. It's just that Apple hasn't given you an easy way to enable it. Yet. (I expect that by the time you read this, or shortly after, journaling will be a standard option available from Disk Utility.) If you're interested in enabling journaling on your non-Server version of OS X, I'm going to show you how. But first I'm going to try to warn you off.
Journaling Caveats
Despite its obvious benefits, there are a few caveats with journaling. First, and most importantly from a data standpoint, with journaling enabled you shouldn't use fsck to repair your hard drive at startup; be sure to read the following Apple Knowledge Base article about disk repairs with journaling enabled: http://docs.info.apple.com/article.html?art-num=107250. Similarly, many disk utilities—at the time of this writing—haven't been updated to work with journaling. For example, running DiskWarrior on a journaled volume will disable journaling; you'll have to re-enable it afterwards. Second, OS X will set aside a chunk of hard drive space for journaling data; the bigger your hard drive, the bigger the chunk of space. This means that the amount of space you have available for other files will be reduced. (However, in all fairness, this should only be an issue if your hard drive is almost full.) The third thing to consider is that the space set aside for journaling must be contiguous; it can't be split up all over the drive. If your drive is highly fragmented, I suggest you defragment it first before enabling journaling. (I discuss defragmentation and optimization later in this chapter.) Fourth, recording every single change made to your hard drive doesn't happen in a vacuum; it will affect your system's performance. According to Apple, OS X Server includes some tweaks that reduce the degree to which journaling slows down the system, but (again, at the time of this writing) the standard version of OS X doesn't have these tweaks. My guess, however, is that when journaling is made available in the standard version of OS X, these optimizations will come with it. Fifth, journaling is only compatible with HFS Plus; if your drive is formatted as UFS, you can't enable journaling. Finally, since journaling isn't yet officially supported on the standard version of OS X, don't expect Apple's Tech Support to help you with it.
Enabling Journaling
Whew! Those caveats out of the way, if you're still interested in enabling journaling, there are two ways to do it: using Terminal or via a third-party utility. (Assuming, of course, that Apple hasn't yet made journaling available via Disk Utility by the time you read this.)
-
Enabling and Disabling Journaling via Terminal To enable journaling using Terminal, type sudo diskutil enableJournal 'mountpoint' <RETURN>, where mountpoint is the path to the drive for which you want journaling enabled; provide your admin password when prompted. (For the boot volume, the mountpoint is /; for other volumes, use /Volumes/volumename.) It's that simple. To disable journaling, type sudo diskutil disableJournal 'mountpoint' <RETURN>.
-
Enabling and Disabling Journaling via Third-Party Utilities Even easier than using Terminal is using a third-party utility like Xupport (http://www.computer-support.ch/Xupport/). Launch Xupport, and click the System… button. In the System panel, find the Journaling section. From the pop-up menu, choose the mounted volume for which you want to enable journaling, and then click the "on" button (you'll be asked for your password). To check the status of journaling on any volume, select the volume from the pop-up menu and then click the "check" button. To disable journaling for a volume, select the volume and then click the "off" button.
Data Rescue probably has the best reputation for rescuing files based on the OS 9 version of the utility, and all accounts seem to confirm that the OS X version is just as effective. Like DiskWarrior, Data Rescue does one thing, but does it well. Instead of relying on saved directories, it analyzes every single block of your drive and recreates both directory and file information. I've been lucky enough never to have needed such a powerful tool (knock on wood), but I've heard from a number of people that Data Rescue has been able to recover files when all other utilities have failed.
Undeleting Deleted Data
| User Level: | depends on the utility |
| Affects: | computer |
| Terminal: | no |
Being meticulous about keeping your drives and files healthy helps prevent data loss due to drive problems, but it can't save you from yourself. If you've ever thrown away a file that you later realized you needed, only to find that you'd already emptied the Trash, you know exactly what I'm talking about. If you're a frequent "accidental deleter," there are a few utilities available that could save your bacon. Norton Utilities, Tech Tool Pro 4, and Prosoft's Data Recycler (http://www.prosoftengineering.com/products/data_recycler.php) all offer some degree of protection against accidental (or even purposeful) deletion. However, they take different approaches.
Norton Utilities' UnErase function relies on the fact that data isn't really erased when you empty the Trash, but is in fact still there, intact, until another file is written to the same space on your drive. It scours your drive for data, and if it finds the file(s) you want to undelete, it recovers them. The downside to UnErase is that although it works great if you realize you need to retrieve a file immediately after deleting it, its ability to recover data is reduced dramatically the more time that elapses. This is because the more time that goes by, the more files are written to your hard drive, and thus the greater the chance that data will be written to the same parts of the hard drive on which your deleted file(s) reside.
| Note | When you "undelete" data, you should always restore it to a drive other that the one from which you're recovering it. If you try to restore it to the same drive, the newly restored file could accidentally overwrite some of the file data you're trying to recover. Luckily, UnErase requires you to save the recovered file(s) to a different volume. |
Data Recycler (and reportedly TechTool Pro 4, although it hasn't officially been released at the time of this writing, so I can't confirm) take a different approach than Norton Utilities. Rather than counting on data to still be on the drive, it creates a cache of deleted files. This cache resides in its own hard drive space, and keeps a copy of any files you've deleted. Files remain in the cache until enough new files are deleted (which adds them to the cache) to move older files out, causing them to be deleted permanently. (You can choose how big you want the cache of deleted files to be; how big of a cache you choose, combined with the size and number of files you delete, determine how much protection you have.) If you want to recover a deleted file, you simply open Data Recycler, select the file from the list of "deleted" files, and then tell Data Recycler to restore it.
| Tip | In addition to files that you've thrown away yourself, Data Recycler can also restore files deleted by the OS (e.g., temporary files deleted after a system procedure is completed), files deleted from within applications such as iPhoto, and even files deleted from within Terminal using the rm command!. |
Keep in mind that the flip side of "Trash cache" utilities is that if you want to make sure a file is permanently deleted you'll need to manually tell the utility not to protect that file; TechTool Pro 4 and Data Recycler each do this a bit differently, but they both have the capacity. Or you can use one of the "secure deletion" utilities I mentioned in Chapter 13.
| Warning | If you use a "secure delete" utility to delete files permanently, as described in Chapter 13, no utility will be able to recover these files. After all, that's why you used the utility in the first place, right? |
Defragmenting Drives
| User Level: | depends on the utility |
| Affects: | computer |
| Terminal: | no |
Even though you may keep your drives and directories error-free, that doesn't necessarily mean they're in tip-top shape. Fragmentation is a common issue that develops over time and can't be fixed by rebuilding directories or examining hardware.
In you're not familiar with the term "fragmentation," it simply means that files are stored in fragments about your hard drive, rather than in contiguous segments. Fragmentation actually isn't a problem for new (or newly formatted) drives, since most of the files on the drive—the operating system and stock files and applications—are generally concentrated in one part of the drive and the rest of the drive is free. New files can thus be written in contiguous chunks where the free space starts. However, as you delete files from your disk, small blocks of free space appear here and there. When you save a new file, or when a new file is created by the OS, instead of placing it in contiguous empty space away from existing files, in the interest of efficiency the OS tends to try to find space for it among existing files. If a block of contiguous free space isn't available, the file will be split up into smaller segments, each of which is saved to smaller free spaces across the drive.
Over time, as you save, copy, and delete files to and from your disk, files become increasingly fragmented (Figure 14.1). This has several consequences. First, since files are broken up into many pieces, it takes more time and more disk action to access them than if they were in contiguous blocks. Second, because the disk directory for a highly fragmented volume is much more complex than one for a volume with low levels of fragmentation, the chances of directory problems are higher. Finally, because virtual memory swap files are, at the most basic level, simply files on your hard drive, severe fragmentation causes swap files to be spread out across your drive, which can slow down system performance, and, conversely, swap files themselves can exacerbate fragmentation. (This final issue is one of the arguments for moving your virtual memory swap files to an alternate drive; I discuss that topic in Appendix B.)
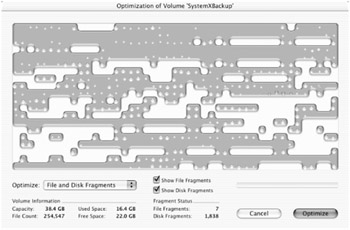
Figure 14.1: A graphical representation of disk fragmentation (courtesy of Drive 10)
Under Mac OS 9, fragmentation was a major issue that could severely impact your computer's performance. OS X deals with disk fragmentation much better, but fragmentation can still affect system performance and can contribute to directory corruption (although the topic is subject to some debate). Fortunately, many of the tools already discussed here can be used to defragment your drive(s). Drive 10, TechTool Pro 4, and Norton Utilities (via its Speed Disk feature) all have the ability to defragment drives, and all work fairly similarly. (DiskWarrior 2, for OS 9, comes with a utility called Plus Optimizer that will defragment OS X disks. Unfortunately, you can only use it on a Mac that will boot into OS 9. At the time of this writing, an OS X version of Plus Optimizer is not available, but is in the works.)
| Warning | Before you use any utility to defragment a volume, be sure to verify and, if necessary, repair any problems on the volume first. Defragmenting a damaged volume can result in data loss. This is also another good argument for backing up—if the defragmentation procedure is interrupted for any reason, it's possible to lose data or, in extreme cases, the entire volume. |
For example, in Drive 10 you choose Services ➣ Optimize Volume… and a window pops up with a list of volumes. Choose the volume to be optimized, and click Analyze. (As with all optimization utilities, the volume to be optimized can't be the boot volume, nor can it be the volume on which the utility is located—this is why most come with bootable CDs.) Drive 10 then presents a graphical representation of the volume's contents (this is what I showed you in Figure 14.1). You can choose to optimize the volume based on File Fragments (which reunites each file's pieces into a single contiguous block), or based on File and Disk Fragments (which additionally groups all files onto contiguous drive space, leaving as much contiguous free space as possible). The graph will actually be updated in real time as the drive is defragmented—a process which can take anywhere from 20 minutes to a few hours, depending on the size of the drive and the degree of fragmentation. When it's done, the graph will look like Figure 14.2—fragment-free.
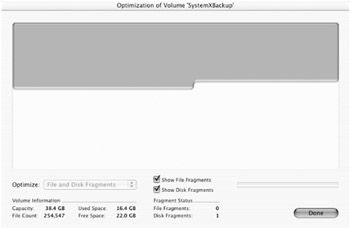
Figure 14.2: The volume from Figure 14.1 after being defragmented
| Note | Some users avoid defragmenting utilities, and instead back up their entire volume, erase it, and then restore it from the backup, assuming this method will give them a drive that is no longer fragmented. However, this is only the case if the utility you use for backups copies files contiguously; many instead copy the drive back bit-for-bit. This procedure is safer from a data standpoint, but it means that your restored drive will be just as fragmented as it was before. |
Organized Defragmenting: Optimizing
In addition to defragmenting your drive—making sure that each file resides on a contiguous section of the hard drive—several utilities allow you to optimize it. Optimization can take two forms. TechTool Pro, Drive 10 (via the File and Disk Fragments option), and DiskWarrior 2's Plus Optimizer take the basic approach of simply relocating all files in one large contiguous block, leaving as much contiguous free space as possible.
Norton Utilities' Speed Disk component, on the other hand, bases its defragmentation routines on profiles. You select the profile that most closely resembles what the chosen volume will be used for (some examples are General Use, CD-ROM Mastering, and Recently Used Files), and Speed Disk will defragment the volume, but will also move certain files to certain locations based on their use and type. For example, the Recently Used Files profile places those files that were most recently modified closest to free space, on the assumption that you (or the OS) are more likely to modify those files again—thus helping to slow future fragmentation. Most profiles also place system files in close proximity to each other, predicting that they're more likely to be accessed closely in time.
| Tip | Because of their slower speeds, CDs actually benefit from optimization much more than hard drives; Speed Disk's CD-ROM Mastering profile is useful for optimizing CD images before burning. |
I mentioned earlier that the value of defragmenting is often debated; the idea of optimization is even more of a hot topic. However, some people swear by it—I've even seen custom Speed Disk profiles, designed specifically to optimize OS X boot volumes, floating around the Internet. I've defragmented my boot volume, and definitely noticed an increase in system performance. However, I haven't (yet) "optimized" it, so I can't tell you how much it helps as compared to defragmentation.
| Note | If you're curious about Apple's stance on defragmenting, you can read the following Knowledge Base article: http://docs.info.apple.com/article.html?artnum=17933. |
Earlier in the chapter I mentioned that most disk utilities that modify the startup disk—to repair it, defragment it, or optimize it—require you to boot from another volume or from a special CD. Most of these utilities in fact come with their own bootable CD. Unfortunately, there are two problems with these CDs. The first is that as new Mac models are released, these "bootable" CDs are often outdated and no longer boot the newest hardware. The second is that each of these CDs generally includes only a single utility.
The solution to both problems is to create your own bootable OS X utility CD. In Chapter 7 I recommended the application BootCD (http://www.charlessoft.com/) as a way to do this. The steps to making such a CD are lengthy, so I can't include them here, but the BootCD documentation is excellent and easy to follow. You can include all of your favorite disk utilities on your custom CD, and they'll all be available to you at once when you boot from that CD.
Disk Drive Diagnosis
| User Level: | depends on the utility |
| Affects: | computer |
| Terminal: | no |
Although it's certainly true that today's hard drives are more reliable than ever before, that doesn't mean they're foolproof. Hard drives are susceptible to both environmental factors and, occasionally, manufacturing defects. So, ideally, in addition to periodically checking your disk directories, you'll want to make sure your hard drive itself is working right.
There are three approaches to hard drive testing. The first, used by Norton Utilities' Disk Doctor, TechTool Pro 4, and Drive 10, is to scan every single block on your drive to make sure each is working properly. If the utility finds a bad block or sector, it disables that particular bit of the hard drive so that it will never again be used for storing data. This is actually a fairly common problem, but once a bad block or sector is deactivated, your drive should operate perfectly.
The second method, used by TechTool Pro 4 and Drive 10, is to perform a battery of hardware tests on the drive that checks everything from the correct power supply voltage to the ability of the drive to read and write to both the drive's disk platters and its RAM buffer. If a problem is found, you're notified of what that problem is and what can be done about it.
Finally, many recent EIDE hard drives—which includes all those used in today's Macs— include a system called Self-Monitoring Analysis & Reporting Technology (SMART). SMART is a system through which the hard drive communicates with the host computer and provides information about the operating state of the drive. The SMART system monitors several aspects of the drive's performance and compares them with expected values for that particular drive model to determine if the drive is operating as it should. If a problem or anomaly is detected, the SMART system can produce an alert. Since most hard drive problems develop gradually rather than suddenly, such an alert can give you advanced warning and a chance to save important data (and then have the drive repaired or replaced).
Unfortunately, the SMART system can't notify you of errors on its own; it requires software that communicates with the drive and reports any warnings to the user. Currently, only DiskWarrior, Drive 10, and TechTool Pro 4 support SMART. If you're using one of these utilities, you can check your manual for information on how a SMART warning would be reported to you.
In reality, hard drive failures are rare; however, when they happen, the aftermath can be fairly disastrous (in terms of data loss). Good backups are your best protection, but you can take advantage of tools like those discussed here to at least get some advance notice of an impending failure.
Data Despair?
I've talked about all the ways in which you can keep your disk directories, files, and drives healthy, but what about worst-case scenarios? What if you drop your PowerBook onto concrete and the hard drive no longer responds? What if your G4 tower is caught in an office fire (or drowned by the fire hoses trying to put out the fire)? What if a lightning storm fries your computer and your hard drive(s) with it? What if the hard drive just goes kaput on its own? These are pretty horrible things to think about, but the truth is that they can and do happen. If you find yourself in a situation where an important hard drive doesn't respond to the utilities mentioned here, and you don't have a proper backup, it's time to get out your checkbook—your only choice may be to spend some dough and have your data recovered professionally. I've never had to do this, but the most reputable name in the business is DriveSavers (http://drivesavers.com/). They actually take your drive apart and examine the data in a sterile lab, platter by platter. They're not cheap, but if you're using their services, your data must be worth something.
| Note | If you need to recover data after a disaster (manmade or otherwise), I'm going to assume that you have a proper backup, but that by some horrible twist of fate your backup was damaged or lost or stolen or that there's some other explanation as to why you don't have a good backup. If you don't have a recent backup, you must read the part of this chapter dedicated to the topic. |
|
|