Building Enhanced Lists Using the List View
| The List View control is a lot like a list box on steroidswithout all the aggression. The List View can be used to create simple lists, multicolumn grids, and icon trays. The right pane in Windows Explorer is a List View. The primary display options available for Explorer's List View are Large Icon, List, Details, Small Icon, and Tiles (though Explorer refers to them by slightly different names). These correspond to the display options available for a List View by way of its View property. (You might not know it, but you can change the appearance of the List View in Explorer by right-clicking it and using the View submenu of the shortcut menu that appears.) You're now going to create a List View with a few items on it and experiment with the different viewsincluding showing a picture for the items. Did you Know? I can only scratch the surface of this great control here. After you've learned the basics in this hour, I highly recommend that you spend some time with the List View control, the help text, and whatever additional material you can find. I use the List View all the time, and it's a powerful tool to have in your arsenaldisplaying lists is very common. Add a List View control to your form now by double-clicking the ListView item in the toolbox. Set the properties of the List View as follows:
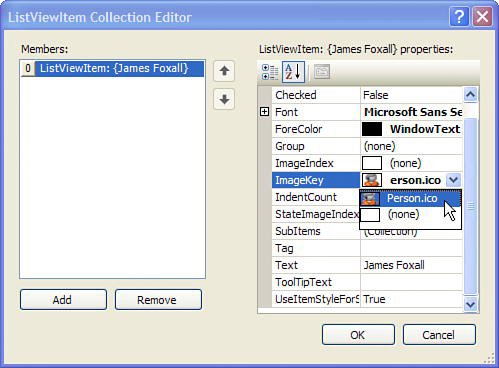
As you can see, you can attach an Image List to a control via the Properties window (and with code as well, of course). Not all controls support the Image List, but those that do make it as simple as setting a property to link to an Image List control. The List View actually allows linking to two Image Lists: one for large images (32x32 pixels) and one for small images (16x16 pixels). In this example, you're going to use only small pictures. If you wanted to use the large format, you could hook up a second Image List containing larger images to the List View control's LargeImageList property. Creating ColumnsWhen you changed the View property to Details, an empty header was placed at the top of the control. The contents of this header are determined by the columns defined in the Columns collection. Follow these steps to create columns in your List View:
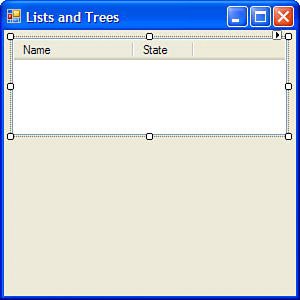
Your List View should now have two named columns (see Figure 8.6). Figure 8.6. Use List Views to present multi-column lists. Adding List ItemsComplete the following steps to add two items to the List View:
Manipulating a List View Using CodeYou've just learned the basics of working with a List View control. Even though you performed all the steps in Design view for this example, you'll probably manipulate your list items using code because you won't necessarily know ahead of time what to display in the list. Next, I'll show you how to work with the List View in code. Adding List Items Using CodeAdding an item using Visual C# code is simpleif the item you're adding is simple. To add an item to your List View, you use the Add() method of the Items collection, like this: lvwMyListView.Items.Add("Monty Sothmann");If the item is to have a picture, you can specify the index of the picture as a second parameter, like this: lvwMyListView.Items.Add("Jason Goss",0);If the item has subitems, things get more complicated. The Add() method enables you to specify only the text and image index. To access the additional properties of a list item, you need to get a reference to the item in code. Remember that new items have only one subitem by default; you have to create additional items. The Add() method of the Items collection returns a reference to the newly added item. Knowing this, you can create a new variable to hold a reference to the item, create the item, and manipulate anything you choose to about the item using the variable (see Hour 11, "Using Constants, Data Types, Variables, and Arrays," for information about using variables). The following code creates a new item and appends a subitem to its SubItems collection: ListViewItem objListItem; objListItem = lvwMyListView.Items.Add("Mike Saklar", 0); objListItem.SubItems.Add("Nebraska");Determining the Selected Item in CodeThe List View control has a collection that contains a reference to each selected item in the control: the SelectedItems collection. If the MultiSelect property of the List View is set to True (as it is by default), the user can select multiple items by holding down the Ctrl or Shift key when clicking items. This is why the List View supports a SelectedItems collection rather than a SelectedItem property. To gather information about a selected item, you refer to it by its index. For example, to display the text of the first selected item (or the only selected item if just one is selected) you could use code like this: if (lvwMyListView.SelectedItems.Count > 0) MessageBox.Show(lvwMyListView.SelectedItems[0].Text); The reason you check the Count property of the SelectedItems collection is that if no items are selected, a runtime error would occur if you attempt to reference element 0 in the SelectedItems collection. Removing List Items Using CodeTo remove a list item, use the Remove() method of the Items collection. The Remove() method accepts and expects a reference to a list item. To remove the currently selected item, for example, you could use a statement such as lvwMyListView.Items.Remove(lvwMyListView.SelectedItems[0]); Again, you'd want to make sure that an item is actually selected before using this statement. Removing All List ItemsIf you're filling a List View using code, you'll probably want to clear the contents of the List View first. That way, if the code to fill the List View is called a second time, you won't end up with duplicate entries. To clear the contents of a List View, use the Clear() method of the Items collection, like this: lvwMyListView.Items.Clear(); The List View control is an amazingly versatile tool. As a matter of fact, I rarely use the standard List Box control; I prefer to use the List View because of its added functionality, such as displaying an image for an item. I've barely scratched the surface here, but you now know enough to begin using this powerful tool in your own development. |

EAN: 2147483647
Pages: 248