Adding a Control by Drawing It
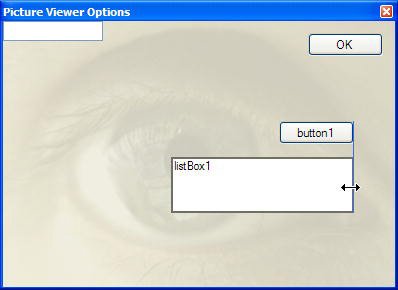
| The last and most precise method of placing a control on a form is to draw the control on a form. Follow these steps:
The list box is created with its dimensions set to the rectangle you drew on the form. This is by far the most precise method of adding controls to a form. Did you Know? If you prefer to draw controls on your forms by clicking and dragging, I strongly suggest that you float the toolbox or dock it to the right or bottom edge of the design environment. The toolbox interferes with drawing controls when it's docked to the left edge and set to Auto Hide because it obscures a good bit of the underlying form. It's important to note that the first item in each tool category is titled Pointer. Pointer isn't actually a control. When the pointer item is selected, the design environment is placed in Select mode rather than in a mode to create a new control. With the pointer chosen, you can select a control and view its properties simply by clicking it in the designer. This is the default behavior of the development environment. Manipulating ControlsGetting controls on a form is the easy part. Arranging them so that they create an intuitive and attractive interface is the challenge. Interface possibilities are nearly endless, so I can't tell you how to design any given interface here (though I strongly suggest you create forms that closely match the appearance and behavior of similar commercial applications). I can, however, show you the techniques to move, size, and arrange controls so that they appear the way you want them to. By mastering these techniques, you'll be much more efficient at building interfaces, freeing your time for writing the code that makes things happen. Using the Grid (Size and Snap)You may have noticed as you worked with controls so far in this book that controls seem to "snap" to an invisible grid. You're not crazythey actually do. When you draw or move a control on a form in a project with grids enabled (which they are by default in Visual C# 2005), the coordinates of the control automatically snap to the nearest grid coordinate. This offers some precision when adjusting the size and location of controls. In practical use, I often find the grid to be only slightly helpful because the size or location I want often doesn't fit neatly with the grid locations. You can, however, control the granularity and even the visibility of the grid, and I suggest you do both. Grid settings are global to Visual C# 2005you don't set them for each individual project or form. To display the grid settings on your computer, choose Tools, Options from the menu to display the Options form. Next, select the checkbox named Show all settings, and then click Windows Form Designer in the tree on the left to view the designer settings (see Figure 6.1). Figure 6.1. Grid settings are global to Visual C# 2005.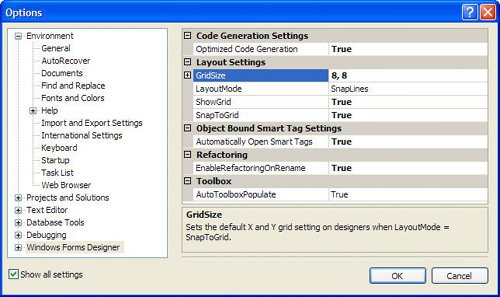 The settings we're interested in here are
Right now, you're not using the grid for drawing controls, but you are using snap lines when moving controls because your LayoutMode is set to SnapLines. I'll talk about this in more detail later in this section. Right now, I want to show you how grids work, so change your LayoutMode setting to SnapToGrid. You're now going to assign a higher level of granularity to the grid (the space between the grid points will be smaller). I find that this helps with design because edges aren't so easily snapped to unwanted places. To adjust the granularity of the grid, you change the GridSize setting. Setting the Width or Height of the grid to a smaller number creates a more precise grid, which allows for finer control over sizing and placement, whereas using larger values creates a much coarser grid and offers less control. With a larger grid, you'll find that edges snap to grid points much easier and at larger increments, making it impossible to fine-tune the size or position of a control. Follow these steps:
Try dragging the controls on your form or dragging their edges to size them (leave the OK button alone). Notice that you have more control over the placement with the finer grid. Try changing the GridSize to a set of higher numbers, such as 25,25 and see what happens. When you're finished experimenting, change the GridSize values back to 4,4. If you have a list box on your form, you might notice that the list box won't resize perfectly to match the grid. This is because the list box always retains a height that allows full rows of data to be displayed. It will go close the grid, but might not align perfectly with it. An unfortunate side effect of a smaller grid is that the grid can become distracting. Again, you'll decide what you like best, but I generally turn the grids off on my forms. In fact, I prefer the new Snap to Lines feature discussed next. By the Way The ShowGrid property determines only whether the grid is drawn, not whether it's active; whether a grid is active is determined by the form's SnapToGrid property. Using Snap LinesA new and useful feature is the Snap to Lines layout feature. Tell Visual C# to use Snap to Lines now by following these steps:
Snap lines is a feature designed to help you create better interfaces faster by "snapping" control edges to imaginary lines along the edges of other controls. The easiest way to understand this is to try it. Follow these steps:
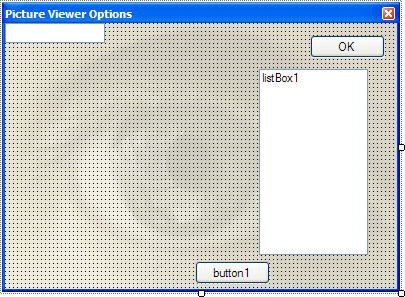
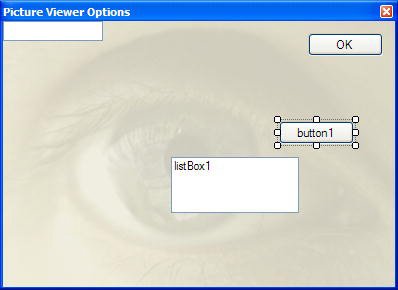
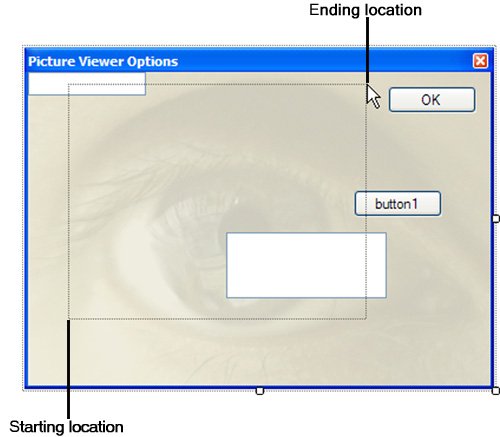
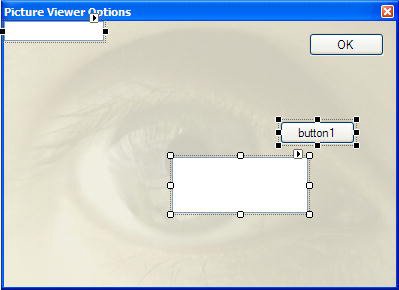
You're free to continue dragging the edge, and as you do so Visual C# creates more snap lines as you near vertical alignment with other controls. Controls also support horizontal snap lines, and all snap lines work when dragging a control as well. This may seem like a small feature to you now, but trust me when I say this is a great addition to Visual C# and will save you many tedious hours over time. Selecting a Group of ControlsAs your skills increase, you'll find your forms becoming increasingly complex. Some forms might contain dozens, or even hundreds, of controls. Visual C# has a set of features that make it easy to align groups of controls. By default, clicking a control on a form selects it while simultaneously deselecting any controls that were previously selected. To perform actions on more than one control, you need to select a group of controls. You can do this in one of two ways, the first of which is to lasso the controls. To lasso a group of controls, you first click and drag the mouse pointer anywhere on the form. As you drag the mouse, a rectangle is drawn on the form. When you release the mouse button, all controls intersected by the rectangle become selected. Note that you don't have to completely surround a control with the lasso (also called a marquee), you only have to intersect part of the control to select it. Try this now: Click somewhere in the lower-left corner of the form and drag the pointer toward the upper-right of the form without releasing the button. Intersect or surround all controls except the OK button (see Figure 6.5). When the rectangle has surrounded or intersected all the controls, release the button, and the controls will be selected (see Figure 6.6). Figure 6.5. Click and drag to create a selection rectangle. Figure 6.6. All selected controls appear with a dotted border and sizing handles (rectangles). When a control is selected, it has a dotted border and a number of sizing handles (squares located in the dotted border at the corners and midpoints of the control). Pay careful attention to the sizing handles. The control with the white sizing handles is the active control in the selected group. When you use Visual C#'s tools to work on a group of selected controls (such as the alignment and formatting tools), the values of the active control are used. For example, if you were to align the left side of the selected controls shown in Figure 6.6, each of the controls would have its Left property value set to that of the active control (the control with the white handles). When you use the lasso technique to select a group of controls, you really don't have much influence over which control Visual C# makes the active control. Deselect all the controls now by clicking anywhere on the form (don't click on a control. By the Way Not all sizing handles are movable at all times. For example, Visual C# won't allow you to change the height of the text box until you set the Multiline property of a text box to True, so only the sizing handles at the left and right edges are the only ones available when the control is selected. The second technique for selecting multiple controls is to use the Shift or Ctrl key while clicking controls (either can be used to the same effect). This method is much like selecting multiple files in Explorer. Follow these steps:
By the Way Clicking a selected control while holding down the Shift key deselects the control. You can combine the two selection techniques when needed. For instance, you could first lasso all controls to select them. If you happened to select a control that you don't want in the group, simply hold down the Shift key and click that control to deselect it. Did you Know? If you must click the same control twice, such as to deselect and then reselect it, do so s-l-o-w-l-y. If you click too fast, Visual C# interprets your actions as a double-click and creates a new event handler for the control. Aligning ControlsVisual C# includes a number of formatting tools you can use to design attractive interfaces. Most of these are accessed using the Layout toolbar. Display the Layout toolbar now by right-clicking a toolbar at the top of Visual C# and choose Layout from the shortcut menu that appears (if it appears checked, then it is already visible). The Layout toolbar includes options for aligning controls horizontally and vertically to the controls' edges or centers (see Figure 6.7). Figure 6.7. The Layout tool-bar makes it quick and easy to align controls.Slowly move your pointer over the buttons on this toolbar to read their Tooltipsmove from left to right. Notice that with this toolbar you can
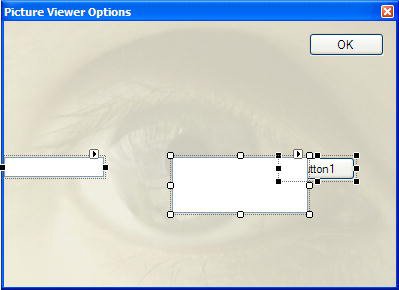
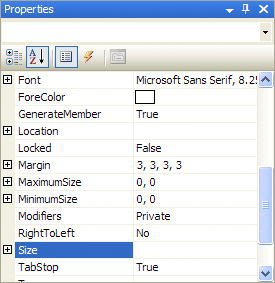
The first item simply aligns the selected controls to the gridnot much fun there. However, the remainder of the buttons are very useful. Remember that Visual C# uses the active control as its baseline when performing alignment. This is important. Click the Align Tops button now and notice that the selected controls are now aligned with the active control (see Figure 6.8). Figure 6.8. The selected control is used as the baseline when aligning groups of selected controls. Making Controls the Same SizeIn addition to aligning controls, you can also make all selected controls the same sizeheight, width, or both. To do this, use the Make Same Size button on the tool-bar. Make all your controls the same size now by clicking the Make the Same Size button. This makes the selected controls the same size as the list box (rather large). Now try this: In the Properties window, enter 75,25 in the Size property and press Tab to commit the entry. Notice that your change affects all the selected controls. Having the Properties window affect all selected controls like this makes it easy to quickly modify a number of controls that need to share property values, and I talk about this in a little more detail shortly. Evenly Spacing a Group of ControlsAs many a salesman has said, "...and that's not all!" You can also make the spacing between controls uniform using the Layout toolbar. Try this now: Click the Make Horizontal Spacing Equal button on the toolbar. All the controls are now evenly spaced. Next, click the Decrease Horizontal Spacing button on the toolbar a few times and notice how the spacing between the controls decreases slightly with each click. You can also increase the horizontal or vertical spacing or completely remove spacing from between controls using buttons on the Layout toolbar. Save your project now by clicking the Save All button on the toolbar. Setting Property Values for a Group of ControlsThe following is a technique that many experienced Visual C# developers seem to overlook: You can change a property value in the Properties window when multiple controls are selected. This causes the corresponding property to change for all selected controls. Make sure that all three controls are still selected and then display the Properties window (if it's not already displayed). When a group of controls is selected, the Properties window appears with some modifications (see Figure 6.9):
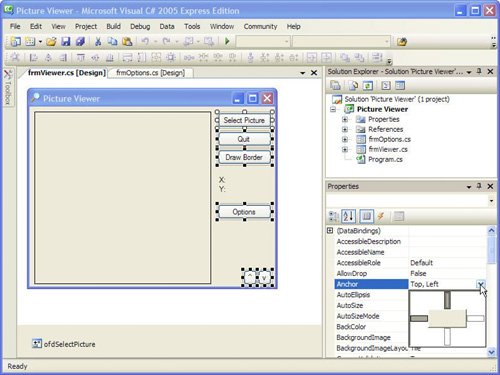
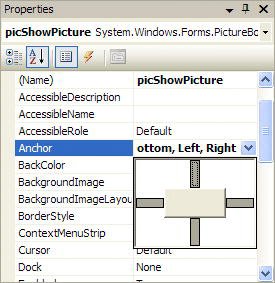
Entering a value in a property changes the corresponding property for all selected controls. To see how this works, change the BackColor property to a shade of yellow, and you'll see that all controls have their BackColor set to yellow. You're not going to actually use the three controls you've been experimenting with so far in this chapter, so press the Delete key on your keyboard now to delete all the selected controls. Anchoring and Autosizing ControlsSome of my favorite additions to the new forms engine in Visual C# 2005 are the capability to anchor controls to one or more edges of a form and the capability for controls to size themselves appropriately when the user sizes a form. In the past, you had to use a (usually cumbersome) third-party component or resort to writing code in the form Resize event to get this behavior, but it's an intrinsic capability of Visual C# 2005's form engine. The default behavior of all new controls is that controls are docked to the top and left edges of their containers. What if you want a control to always appear in the upper-right corner or lower-left corner of a form? You're now going to learn how to anchor controls so that they adapt accordingly when the form is resized. Follow theses steps:
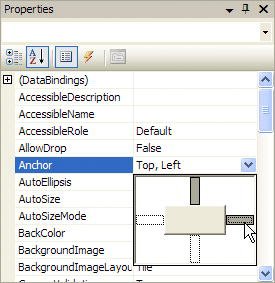
The gray square in the center of the the drop-down box represents the control whose property you're setting. The thin rectangles on the top, bottom, left, and right represent the possible edges to which you can dock the control; if a rectangle is filled in, the edge of the control facing that rectangle is docked to that edge of the form. Follow these steps to see how the Anchor property works:
Pretty interesting, huh? What Visual C# has done is anchored the right edge of the buttons to the right edge of the form (see Figure 6.13). Really, anchoring means keeping an edge of the control a constant, relative distance from an edge of the form, and it's an unbelievably powerful tool for building interfaces. Figure 6.13. Anchoring is a powerful feature for creating adaptable forms.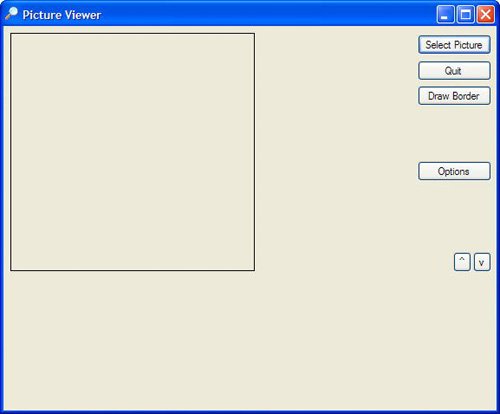 Notice that the picture box and the coordinate labels still retain their original locations when the form is resized. No problemyou can address that with the Anchor property as well. Start by changing the anchoring of the X and Y labels by following these steps:
Now the picture box is a bit a different thebeast from the other controls in that you want the top and left anchored the way they are now, but you want the right and bottom edge to grow and shrink with the form. This is actually easy to accomplish. Follow these steps:
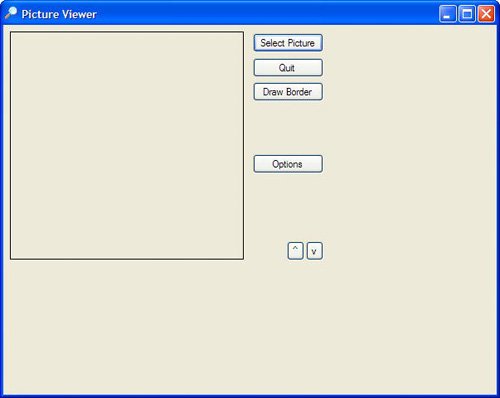
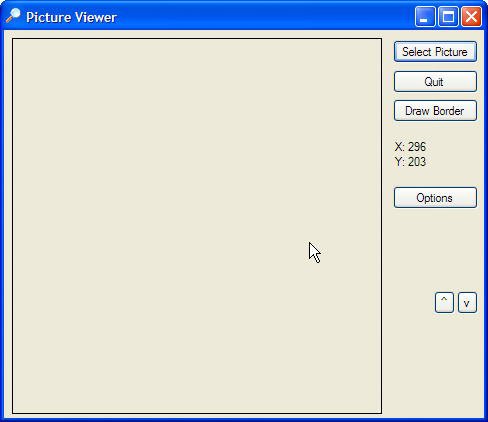
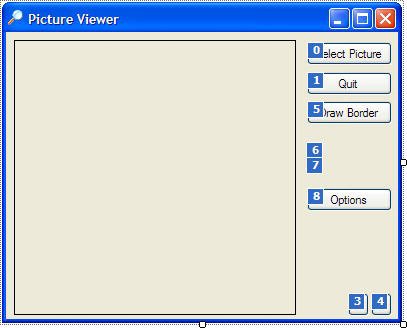
Now press F5 to run the project and drag the lower-right of the form to make it bigger. Notice that now the picture box sizes itself to match the form size (see Figure 6.15). You'll find this is useful when viewing larger images. Figure 6.15. Proper use of the Anchor property allows you to build flexible forms. Now that you know how to use the Anchor property, you can make forms that users can resize with no code. One caveat: Depending on its Anchor setting, a control might disappear if the form is shrunk quite small. Creating a Tab OrderTab order is something often (emphasis on often) overlooked by even seasoned Visual C# programmers. You're probably familiar with tab order as a user, although you might not realize it. When you press Tab while on a form, the focus moves from the current control to the next control in the tab order. This enables easy keyboard navigation on forms. The tab order for controls on a form is determined by the TabIndex properties of the controls. The control with the TabIndex value of 0 is the first control that receives the focus when the form first displays. When you press Tab, the control with the TabIndex of 1 receives the focus, and so on. When you add a control to a form, Visual C# assigns the next available TabIndex value to the new control (it will be last in the tab order). Each control has a unique TabIndex value, and TabIndex values are always used in ascending order. If the tab order isn't set correctly for a form, pressing Tab causes the focus to jump from control to control in no apparent order. This is a great way to frustrate a user. In the past, the only way to change the tab order for controls on a form was to manually change the TabIndex values using the Properties window. For instance, to make a control the first control in the tab order, you would change its TabIndex property to 0; Visual C# would then bump the values of all other controls accordingly. This was often a painful processbelieve me. Although it can be handy to set a TabIndex property manually, such as when you want to insert a control into an existing tab sequence, there is a much better way to set the tab order of forms. Press F5 to run the project now (if its not already running) and notice that the Select Picture button has the focus (it's highlighted by a blue rectangle). If you press Enter now, the button would be "clicked" because it has the focus. Now, press Tab, and the Quit button has the focus. This is because you added the Quit button to the form right after you added the Select picture button. Press Tab once more. Did you expect the Draw Border button to get the focus? So would a user. Instead, the ^ button receives the focus because it was the next control you added to the form. You're about to fix that, so stop the project now by closing the form. You're now going to set the tab order of the form via the visual method of .NET:
Did you Know? You can programmatically move the focus via the tab order by calling the SelectNextControl() method of a control or a form. To remove a control from the tab sequence, set its TabStop property to False. When a control's TabStop property is set to False, users can still select the control with the mouse, but they can't enter the control using the Tab key. You should still set the TabIndex property to a logical value so that if the control receives the focus (such as by being clicked), pressing Tab moves the focus to the next logical control. Layering Controls (Z-Order)Tab order and visual alignment are key elements for effectively placing controls on forms. However, these two elements address control placement in only two dimensionsthe x,y axis. Although it's rare that you'll need to do so, at times, you might need to have controls overlap. Whenever two controls overlap, whichever control is added to the form most recently appears on top of the other. You can control the ordering of controls using the Bring to Front or Send to Back buttons found on the right side of the Layout toolbar. Did you Know? You can move a control forward or backward using code by invoking the BringToFront or SendToBack() methods of the control. |
EAN: 2147483647
Pages: 248